5 Ways to Fix UEFI Firmware Settings Not In Windows 10 – If you go into BIOS and find UEFI Firmware Settings missing or missing, here’s how to get them back.

How to Fix UEFI Firmware Settings Not In Windows 10
UEFI BIOS is a special software program that connects your computer’s firmware to its operating system (OS). This is the first program that runs when you turn on your PC. It checks to see what hardware components your PC has, turns the components on, and hands them over to the OS.
Read more:
- 3 Ways to Check MBR or GPT Partition Type in Windows 10
- What Is A Bootloader And How Does It Work? Complete Guide
- 6 Ways to Fix Operating Systems Not Found In Windows 10 PC
- What Is Silex Malware And How Does It Work
When opening the UEFI BIOS menu, you may find that you cannot access the UEFI Firmware Settings. This may prevent you from fixing some system problems. If these settings are missing from your PC, we will show you how you can restore them.
Why are UEFI Firmware Settings Missing?
Depending on your PC manufacturer, you can access the UEFI BIOS settings in various ways. If you can’t find UEFI Firmware Settings in the BIOS menu, here are some common reasons for this problem:
- Your PC motherboard does not support UEFI.
- The Fast Startup function disables access to the UEFI Firmware Settings menu.
- Windows 10 is installed in Legacy Mode.
How to Fix Missing UEFI Firmware Settings
#1. Make sure your PC is equipped with UEFI
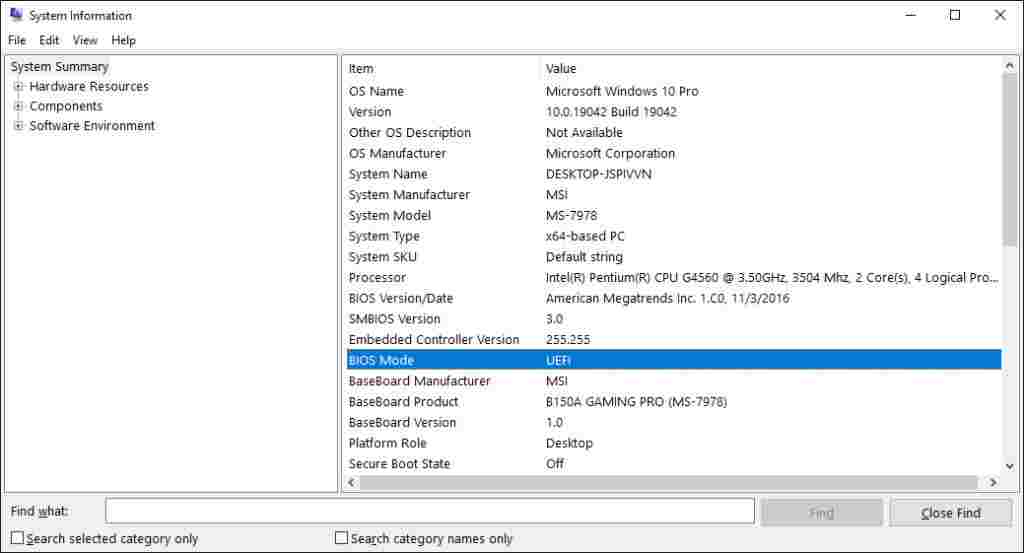
Before trying other potential fixes, you need to verify that your PC’s motherboard does support UEFI. If your PC is an older model, most likely UEFI Firmware Settings are not available. Here’s how you can check your PC’s BIOS Mode:
- Press Windows key + R to open the Run command dialog box.
- Type msinfo32 and press Enter to open the System Information screen.
- Select System Summary in the left side pane.
- Scroll down on the right-side panel and look for the BIOS Mode option.
In the Value section, it must be UEFI or Legacy. If it’s Legacy, then your PC can’t access UEFI Firmware Settings.
#2. Bypass Fast Startup Function
The Fast Startup function allows you to boot your PC quickly. When enabled, the feature can stop delays in loading some UEFI BIOS menu options. For this reason, it can prevent you from accessing UEFI Firmware Settings. Bypassing this function can help solve your problem. To do this, follow these steps:
- Open the Windows Start Menu and select the Power icon.
- Hold down the Shift key then select Shut down from the power options. This will bypass Windows 10 fast startup and shut down your PC completely.
- Restart your computer and enter the BIOS setup by pressing some special keys.
If this solves the problem, you can disable the Fast Startup feature so that the UEFI Firmware Settings can be accessed at any time. However, keep in mind that this will make your boot-up time a little longer. To permanently disable fast startup, you can follow these steps:
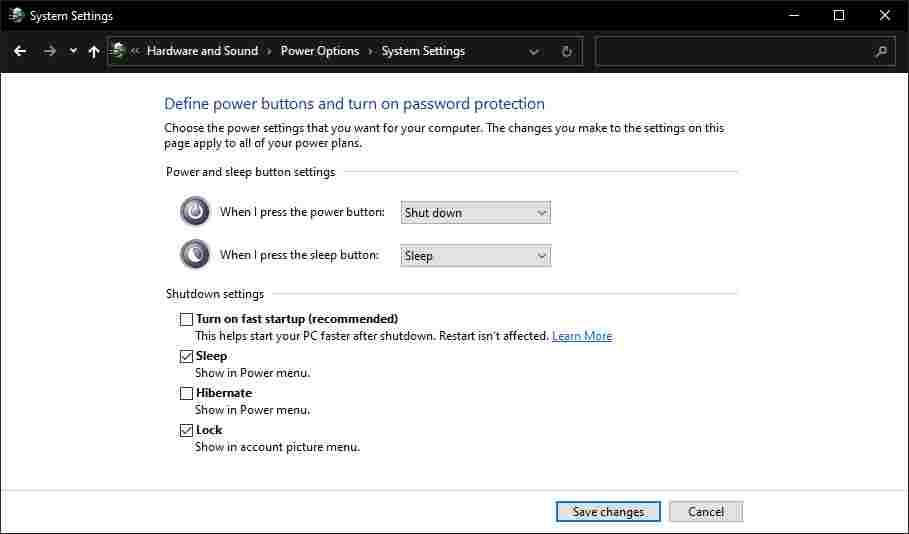
- Press the Windows key + R to open the Run command dialog box. Type powercfg.cpl and press Enter to open the Power Options menu.
- In the Power Options window, click Choose what the power buttons do.
- On the System Settings menu, click Change settings that are currently unavailable.
- Then under Shutdown settings, uncheck the box next to the Turn on fast startup (recommended) option.
#3. Create Desktop Boot Shortcut To UEFI Firmware Settings
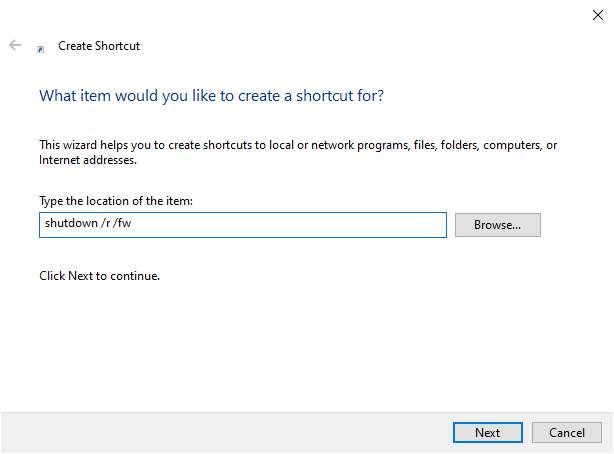
Another way to solve this problem is to create a desktop shortcut that forces your PC to boot directly into the UEFI Firmware Settings menu. Here’s how you do it:
- Right-click on a space on your Desktop, select New, then select Shortcut.
- On the next screen, type shutdown /r /fw and click the Next button.
- Choose a suitable name for the shortcut then click Finish.
- Right-click the shortcut, select the Properties option, then select the Advanced button.
- On the next screen, check the Run as administrator box and hit OK.
- Select Apply > OK to apply these changes.
- To use the shortcut, double-click on it. Your PC must restart directly into the UEFI Firmware Settings menu.
#4. Change BIOS From Legacy To UEFI By Converting MBR Disk To GPT
Depending on the age and specifications of your PC, it will use a Master Boot Record (MBR) or GUID Partition Table (GPT) disk. Even if your motherboard is equipped with UEFI capabilities, the UEFI Firmware Settings will not be accessible if your drive is equipped with an MBR disk. In this case, you have to switch BIOS from Legacy to UEFI by converting MBR disk to the GPT disk.
Given that you are converting a system disk, it is best to create a system image to back up your system. So it is highly recommended to take a system backup as there is potential for data loss during this process.
If you already know that your partition is MBR type and your system is capable of booting from UEFI. You can proceed with converting your drive to GPT format. If not, here’s how to check if your PC is equipped with an MBR or GPT disk.
- Press the Windows key + R to open the Run command dialog box.
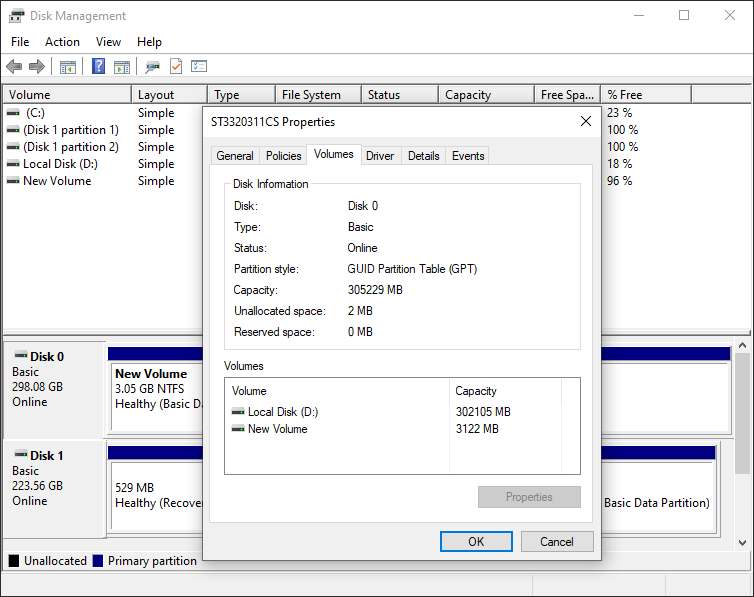
- Type diskmgmt.msc and click Enter to open the Disk Management window.
- Right-click on Disk 0 (or the disk containing the Windows installation) and select Properties.
- In the Properties screen, click the Volume tab. Look for the Partition style option under Disk Information.
If the partition style is GUID Partition Table (GPT), then there is no need to continue with the conversion.
#5. Clear CMOS Settings To Restore Default BIOS Settings
As a last resort, you can reset the CMOS settings of your PC’s motherboard. This will help restore your computer to the default BIOS settings. This is how you do it.
- Turn off your computer and unplug it from the power source.
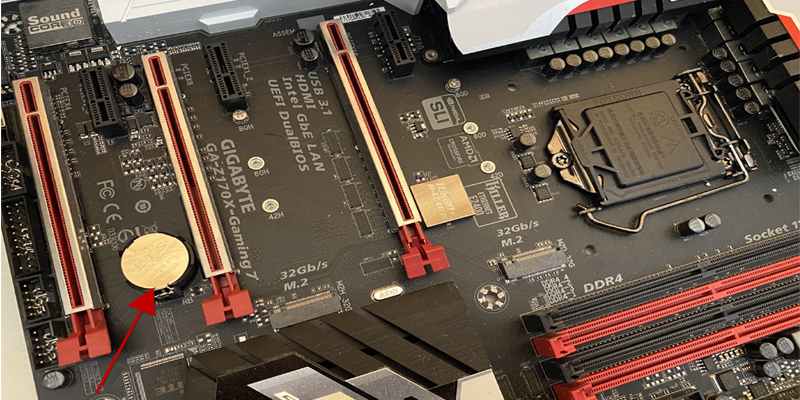
- Remove the bottom cover of your PC. From here, look for the CMOS battery and jumpers on the motherboard.
- To easily find the CMOS jumper, look for “ CLR CMOS ” on the motherboard.
- Usually, you will find three pins where the CMOS jumper is. Jumpers will only be placed on two of those pins. If they are on the first and second pins, move them to the second and third pins. If your motherboard only has two pins, the jumper will most likely be attached to one pin. In this case, plugin both pins.
- Next, remove the CMOS battery from its slot. Wait about 15 seconds, then plug it back in.
- Move the CMOS jumper back to its original pin.
- Put the cover back on the computer, plug in your computer, and turn it on.
On the advanced motherboard, you will find a special button to reset the CMOS settings. It will be labeled “ CMOS “, “ CMOS_SW “, or something similar. You can reset the CMOS settings by pressing this button and holding it for a few seconds. If you’re having trouble finding any hardware components on your PC, check your motherboard manual for help. Alternatively, you can check your motherboard type and find out more online.
Read more:
- 9 Common Reasons Cause Windows Crash Full Explain
- 9 Basic Computer Components And How To Upgrade It
- 12 Reasons Why WiFi Is Slow And How To Fix It
Conclusion:
Now you know how to fix missing or missing UEFI Firmware Settings in Windows 10. You will find these settings useful when troubleshooting various Windows 10 system problems. If your motherboard does not support these settings, then it is time to consider upgrading the motherboard.
![8 Ways to Fix The Hosted Network Couldn’t Be Started in Windows 10 [2026] 8 Ways to Fix The Hosted Network Couldn't Be Started in Windows 10](https://technowizah.com/wp-content/uploads/2021/07/8-Ways-to-Fix-The-Hosted-Network-Couldnt-Be-Started-in-Windows-10.jpg)


