How to Enable or Disable Caps Lock key in Windows 10 PC – Almost all of us have accidentally turned Caps Lock on while writing a Word article or submitting some work to the web and this gets annoying as we have to rewrite the entire article.

How To Enable or Disable Caps Lock key in Windows 10 Laptop PC
Anyway, this tutorial describes a simple way to disable Caps Lock until you enable it again and with this method, the physical key on the keyboard will not work.
Read more:
- How to Use Administrative Tools in Windows 10
- How to Uninstall Avast to Clean the Roots in Windows 10
- How to Install and Activate SPSS 24 on Windows
- How To Ping Google To Check Internet Connectivity
Don’t worry, you can still hold down the Shift key and press a letter to type in uppercase if Caps Lock is off. So without wasting any time, let’s see how to enable or disable the Caps Lock key in Windows 10 with the help of the guide below.
Make sure to create a restore point in case something goes wrong.
#1: Enable or disable the Caps Lock key in Registry Editor
1. Press the Windows key + R, then type Regedit and press Enter.
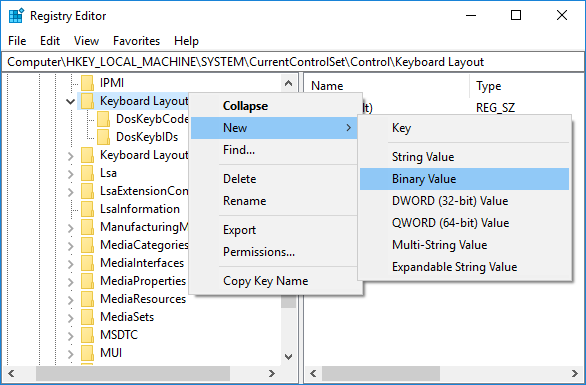
2. Navigate to the following registry key:
HKEY_LOCAL_MACHINEN-SYSTEM-Keyboard Layout Current Control

4. Name this newly created key Scancode Map.
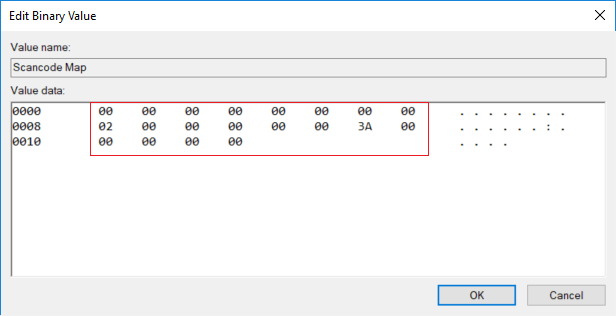
5. Double click Scancode Map and to disable Caps Lock change its value to:
00.00.00.00.00.00.00.00.00.02.00.00.00.00.00.3a, 00.00.00.00.00.00.00
Note: If you find it very difficult to follow, just open the file from Notepad and copy and paste the text below:
Windows Registry Editor Version 5.00 [HKEY_LOCAL_MACHINENSYSTEMN-Current Control of Keyboard Layout] «Scancode Map» = hex: 00,00,00,00,00,00,00,00,00,00.00, 00.00.3a, 00.00.00.00.00.00.00.00.00
Press Ctrl + S to open the Save As dialog box, then under the name type disable_caps.reg (the .reg extension is very important), and then in the Save As drop-down select “All Files” and click Save. Now right-click on the file you just created and select Merge.
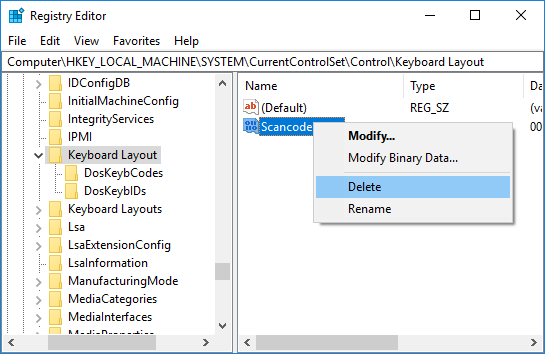
6. If you want to turn Caps Lock back on, right-click the Scancode Map key and select Delete.
7. Close the Registry Editor and restart your PC to save the changes.
#2: Enable or disable the Caps Lock key using KeyTweak
Download and install the KeyTweak program which is a free utility that allows you to disable Caps Lock on your keyboard and re-enable it. This program is not limited to the Caps Lock function, as any key on your keyboard can be disabled, enabled, or reset according to your preferences.
Note: Make sure to skip any adware installation during installation.
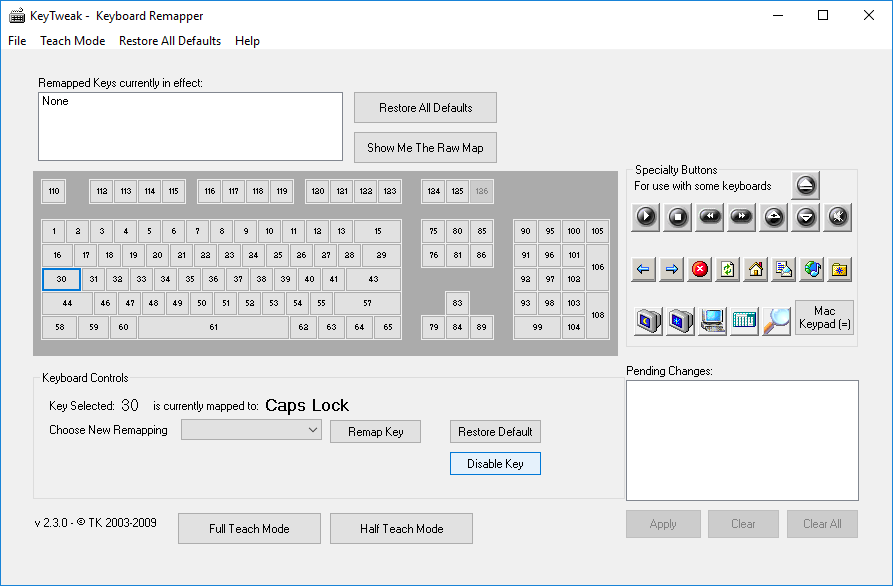
1. Run the program after installing it.
2. Select the Caps Lock key on the keyboard diagram. To make sure you’ve selected the correct key, look at which key it is currently assigned to and it should say, Caps Lock.
3. Next to it, there will be a button that says “Disable Key.” You just have to click on it to deactivate the caps lock.
4. Restart your PC to save the changes.
5. To enable Caps Lock again, select the key and click the “Enable Key” button.
Read more:
- How to Settings Windows 10 Start Menu
- How To Enter Safe Mode In Windows 10/8/7
- How to Take Screenshots on Windows 10 Laptop PCs
Conclusion:
This is the article on how to enable or disable the Caps Lock key on a Windows 10 PC. I hope this article will be helpful to you. if you have any queries about this, activate or deactivate the Caps Lock key in Windows 10, do not hesitate to check it in the comments section.


![8 Ways to Fix The Hosted Network Couldn’t Be Started in Windows 10 [2026] 8 Ways to Fix The Hosted Network Couldn't Be Started in Windows 10](https://technowizah.com/wp-content/uploads/2021/07/8-Ways-to-Fix-The-Hosted-Network-Couldnt-Be-Started-in-Windows-10.jpg)


