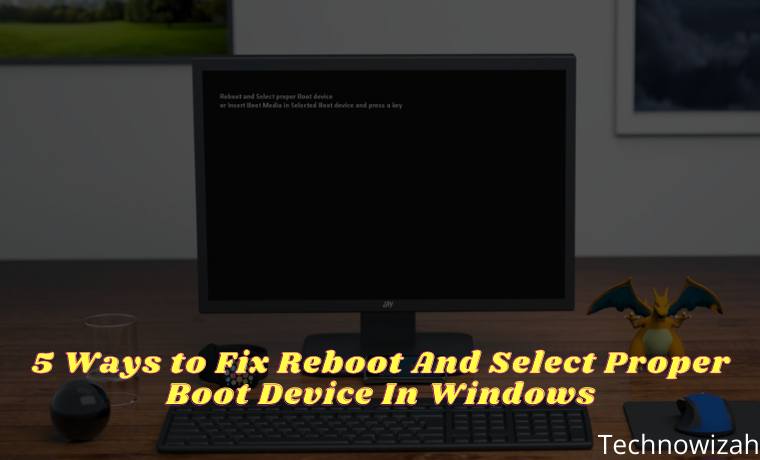
5 Ways to Fix Reboot And Select Proper Boot Device – When you turn on your computer, an error message appears: Reboot And Select Proper Boot Device. What does it mean? The computer was working fine when you shut it down, and now it’s not working at all. If your system reboots and has this error message, see the fix below.
What is Reboot And Select Proper Boot Device Error?
The “Reboot And Select Proper Boot” error message is your computer’s way of telling you that it can’t find the operating system.
Read more:
- 20 Best Windows 10 Themes Cool And Free Desktop
- 5 Ways to Fix You Need Permission To Perform This Action
- 7 Ways to Fix Error Code 0x80070005 In Windows PC
- 15 Ways to Improve Low-Resolution Video Quality
During the boot process, your system’s BIOS/UEFI knows the hard drive where your operating system is located. Then boot the operating system, and you arrive at the Windows 10 login screen. It’s a very simplified version, but you get the gist of it.
If the BIOS fails to recognize where the operating system is, it will not load. reboot and select proper device error has several possible causes:
- Broken BIOS/UEFI installation Instalasi
- Hard drive damaged
- Bootloader is broken
- Broken hardware
This is not the only cause, but the root of the reboot and select proper device error is usually related to one of these areas.
So, how to fix the reboot and select the proper device error?
How to Fix Reboot And Select Proper Boot Device in Windows
#1. Check the Connection
The first thing to check is the connection between your hard drive (or SSD) and your motherboard inside the computer. If your hard drive is not communicating with the motherboard properly or has been disconnected altogether, your operating system will not load.
Checking the inside of your computer case may seem a little confusing. You have to open the cover, and then check the disconnected cable.
When you open the side of the computer, you should also take advantage of this opportunity to clean the computer. Cleaning your computer may not resolve the reboot and select proper boot device error, but it can help protect against overheating and the problems that stem from it.
#2. the Wrong Drive was Selected In BIOS/UEFI
If your hard drive is properly connected to the motherboard, you should try another fix. The next step is to check if your BIOS/UEFI recognizes your hard drive and system boot order. From here, you can understand if the hard drive is the first thing your computer looks for when it tries to load the operating system, or if something has replaced it.
To check it, you have to enter the BIOS.
- During the boot process, you have to press the BIOS/UEFI access key. Specific keys differ between computers, but commonly used keys include F2, F10, DEL, and ESC.
- Once the BIOS is loaded, look for a menu or tab named Boot or similar. Check for a menu named Boot Device Priority, Boot Option Order, or similar. The name varies between different motherboard manufacturers and the BIOS used, but the menu content is the same.
- In the device priority menu, you need to check two things. First, check your hard drive is on the list. If there is, that’s a good sign. The second thing to check is the boot position. The hard drive containing the operating system should be the first thing to load, and therefore make sure it is placed in Boot Option 1 or BIOS equivalent. That will put your operating system hard drive in the first boot position.
- Now, save your BIOS settings, then restart your system.
#3. Use Windows Startup Repair
If you fix the problem with the BIOS, or there is no problem with the BIOS and the boot order to start with, you can try two more solutions.
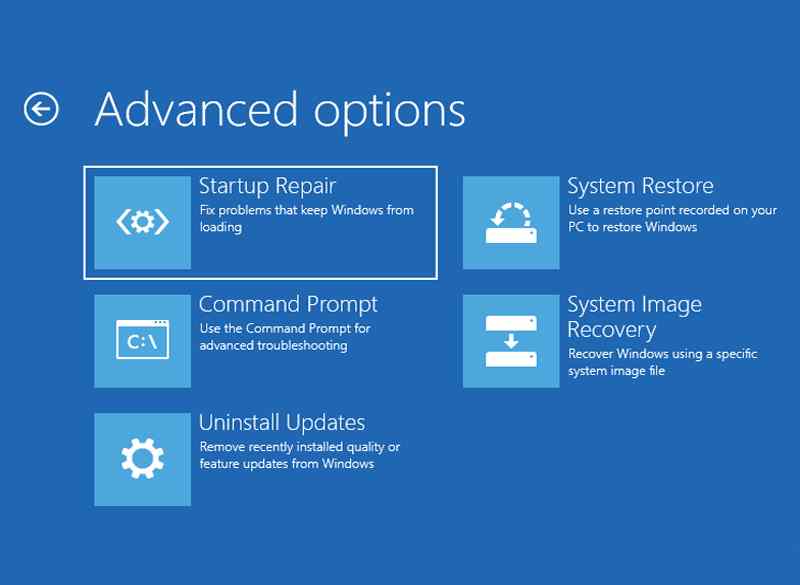
Windows Startup Repair From Advanced Options
Use the Windows Startup Repair feature. This will fix your boot problems automatically, but only if it runs.
When Windows has boot problems, it should launch Startup Repair automatically. If this happens:
- The Advanced boot options menu will open.
- Go to Troubleshoot > Advanced Options > Startup Repair.
- You will then have to enter your password, after which the startup repair process will begin.
The Startup Repair process may take a while to complete, but it will fix your boot device error.
Startup Repair Using Command Prompt And Windows Installation Media
If the advanced boot options don’t open automatically, you can still access them using your Windows 10 installation media. It’s a USB drive or disk with Windows 10 on it. So make sure you have a bootable USB according to the operating system used on your computer.
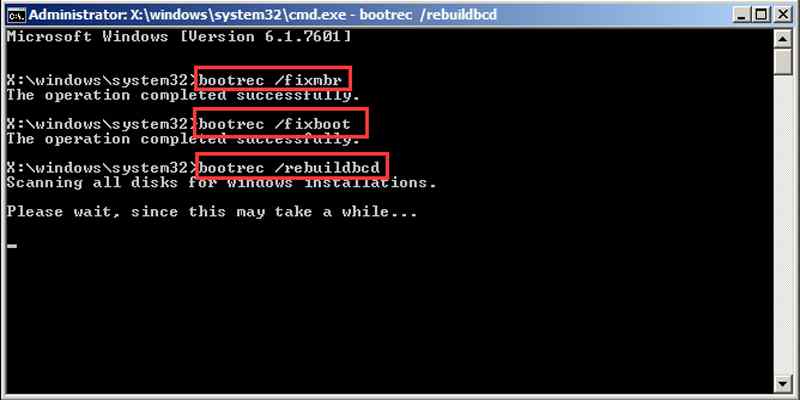
Once you have your Windows 10 installation media ready, you can force the system to load the installation process. From there, you can repair the boot process manually, using the bootrec.exe tool.
-
- Insert the Windows 10 installation media, then turn on your computer.
- Press the F2, F10, F12, or ESC keys to enter the system boot menu. These are some of the buttons that are common but differ between systems.
- The Install Now button will appear. At this point, press Shift + F10 to open the Command Prompt.
- Now, you have to enter the following commands in order, pressing Enter each time:
bootrec.exe /fixmbr

bootrec.exe /fixboot

bootrec.exe /rebuildbcd
- Once the process is complete, you can restart your computer, remove the Windows 10 installation media, and boot as usual.
Exporting And Rebuilding Master Boot Record
If neither of these fixes works, there’s a third fix you can try. Microsoft recommends exporting and rebuilding the BCD storage (where your boot data is stored). You have to enter Command Prompt using your Windows 10 installation media, according to the steps in the previous section.
When you arrive at the Command Prompt, you will have to enter the following commands in order:
bcdedit /export c:\bcdbackup
c:
cd boot
attrib bcd -s -h -r
ren c:\boot\bcd bcd.old
bootrec.exe /rebuildbcd
The export and rebuild process should fix your reboot and select boot device error.
#4. Set Active Partition
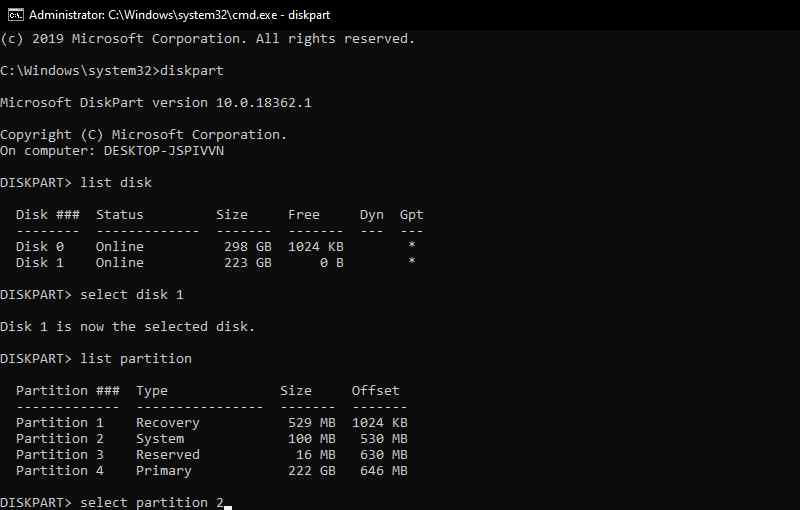
When you use Command Prompt via Windows 10 installation media, there are other fixes you can try. Windows DiskPart is an integrated system tool that you can use to manage your hard drives and disk partitions. In this case, you can make sure your operating system hard drive is active.
Again, enter Command Prompt using your Windows 10 installation media, according to the steps in the previous section. When the Command Prompt opens, complete the following process:
- Enter diskpart to enter the diskpart tool.
- Now, enter the list of disks to see the list of disks on the machine. You need to find out which drive contains your operating system. The drive letter for your operating system is usually C.
- Once you find the correct disk, enter select disk X (X is the appropriate disk number).
- Enter list partition to list the partitions on the disk. You need to select the system partition, which contains the bootloader (the bit of code that launches the operating system). In this case, the admin will select partition 2 by using the command select partition 2.
- Now, enter active to mark the system partition as active.
Reboot your system, and you should no longer have the boot device error.
#5. Reinstall Windows
If you have done all of the methods above and none of them have succeeded in overcoming the reboot and selecting the proper boot device error, then another way you can do this is to reinstall Windows. If you have trouble doing this, you can take your laptop or PC to a computer technician so that everything can be handled completely.
Read more:
- 8 Ways to Fix Stop Code Memory Management in Windows 10 PC
- 7 Ways to fix Unspecified Error 0x80004005 In Windows 10
- 6 Ways to Fix PAGE_FAULT_IN_NONPAGED_AREA in Windows 10
Conclusion:
So those were some ways to fix reboot and select the proper boot device error. This error is indeed frustrating. It appears without warning and can cripple your computer, leaving you locked out of your important files. But you can use any of the above fixes to restore your boot device to the correct order and regain access to your computer.
![8 Ways to Fix The Hosted Network Couldn’t Be Started in Windows 10 [2026] 8 Ways to Fix The Hosted Network Couldn't Be Started in Windows 10](https://technowizah.com/wp-content/uploads/2021/07/8-Ways-to-Fix-The-Hosted-Network-Couldnt-Be-Started-in-Windows-10.jpg)
