6 Ways to Fix Windows Can’t Communicate With The Device Or Resource – If you get the “Windows can’t communicate with the device or resource” error. This is not a common thing. Let’s see the steps to fix it.
How to Fix Windows Can’t Communicate With The Device Or Resource 2024
There’s nothing worse than receiving a Windows error preventing you from accessing the internet. See an error message that reads, “Windows can’t communicate with the device or resource”. This can get you into trouble.
Read more:
- 7 Ways to Fix Error Code 0x80070005 In Windows PC
- 7 Ways to fix Unspecified Error 0x80004005 In Windows 10
- 6 Ways to Fix Error Code 0xc0000e in Windows 10 PC
- 6 Ways to Fix Windows Boot Manager Error 0xc00000e9 PC
If you receive this message, there is no need to panic. Karen admin will explain exactly what this error means, and how you can solve it.
What Is Windows Can’t Communicate With The Device Or Resource?
Usually, you will see a “Windows can’t communicate with the device or resource” error when you can’t connect to the internet, and run Network Diagnostics.
When you encounter this error, it means that your computer cannot connect to the internet phone book, aka Domain Name System (DNS). This system automatically translates website names into IP addresses, allowing you to browse the web easily.
Your computer’s primary DNS server is usually provided by your internet service provider. Secondary DNS servers are also set up in case the primary server goes down. However, your computer settings can sometimes get corrupted, causing you to experience problems connecting to the internet.
If you can’t get rid of “windows can’t communicate with the device or resource (primary DNS server)”, here are some fixes that might help.
#1. Make sure the DNS and DHCP client is running
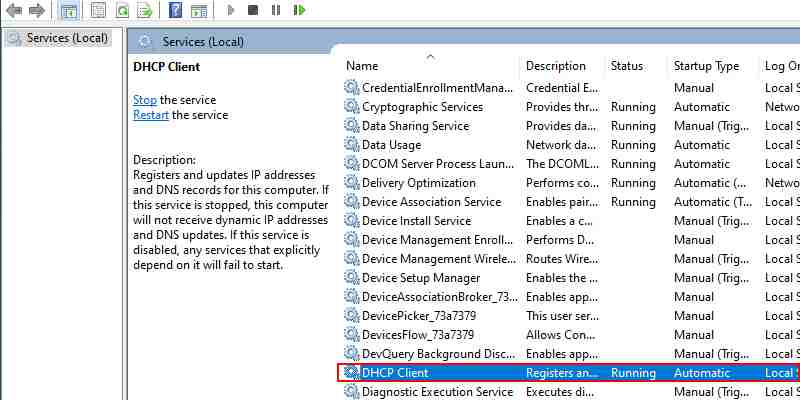
Before you try any of these fixes, you’ll want to make sure that your DNS and DHCP clients are running. To do this, open the Start menu search bar, and type “Services.”
Select the Services app , and you will see a list of all the services running on your device. Check the services labeled DNS and DHCP. If “Running” is not listed under the “Status” column for any of the services, then you need to fix it.
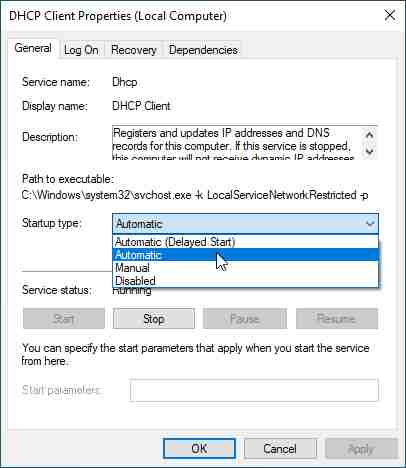
Enable DNS and DHCP by double-clicking on each service. If the service has been stopped, just select Start. You should also make sure that you select Automatic from the “Startup type” dropdown menu. Once done, click Apply > OK.
#2. Uninstall And Reinstall the Network Device
Outdated or faulty drivers can sometimes cause “Windows can’t communicate with the device or resource”. In this case, it is best to remove the slate and uninstall your network device.
To access your network device, press Windows + X to open the Quick Link menu. Select Device Manager from the list, and click Network adapters.
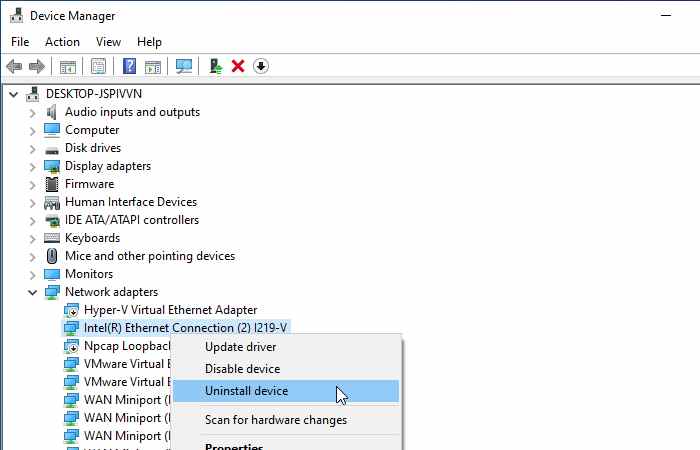
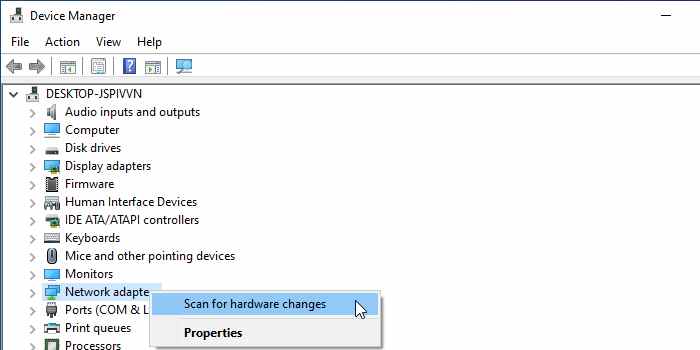
Select your network device, and click Uninstall device. Once done, right-click Network adapters and then hit Scan for hardware changes.
Windows will automatically detect the “new” network device. It will then proceed to install the default drivers that came with the device. Now you can reboot your computer and check your connection.
#3. Update Network Drivers Manual
Although network drivers are usually updated automatically on Windows 10, it never hurts to try updating your network drivers manually. To do this, press Windows + X > Device Manager > Network adapters.
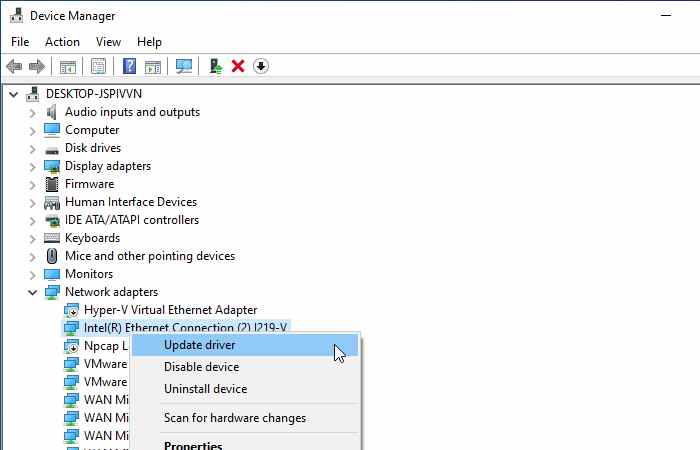
Find your network device in the dropdown menu, right-click it, and hit Update driver.
Windows will now give you two ways to find new drivers. Select the option that says Search automatically for updated driver software.
From here, Windows will look for any updates on your computer and the internet. If there is a new driver, make sure to install it.
#4. Clear DNS Cache
A corrupted DNS cache can also cause error messages. To fix this, you have to clear your DNS cache.
To get started, type “Command Prompt” into your Windows 10 search bar. Right-click Command Prompt from the search results, then select Run as administrator.
Once the program appears, type the following lines of code, one at a time:
ipconfig /flushdns
ipconfig /registerdns
ipconfig /release
ipconfig /renew
This not only clears your DNS cache but also makes your computer reset a corrupted configuration that can cause error messages. After that, press Enter, and you can close the Command Prompt.
#5. Configure Adapter Settings
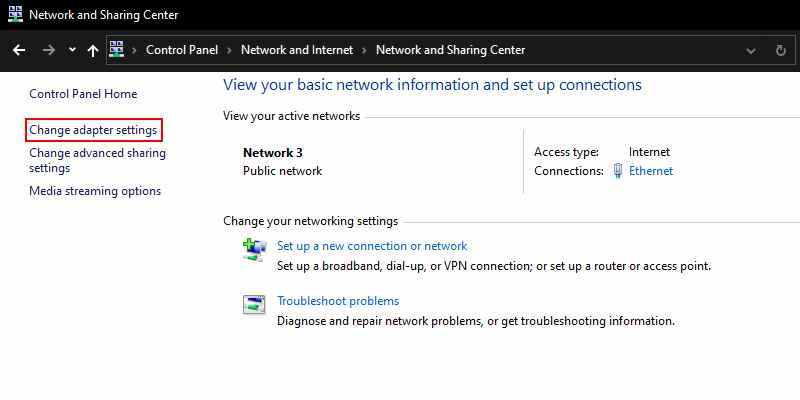
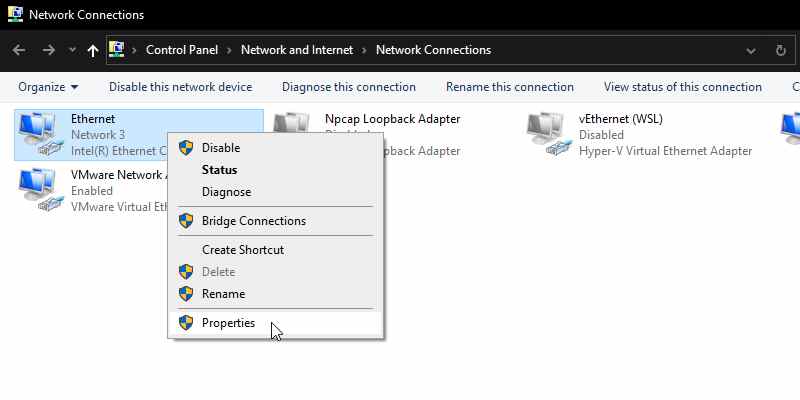
If the fix above still doesn’t work, your network adapter settings might be interfering with your connection. To start configuring your settings, open the Control Panel, and select View network status and tasks under the Network and Internet heading.
After that, select Change adapter settings from the menu on the left side of the screen.
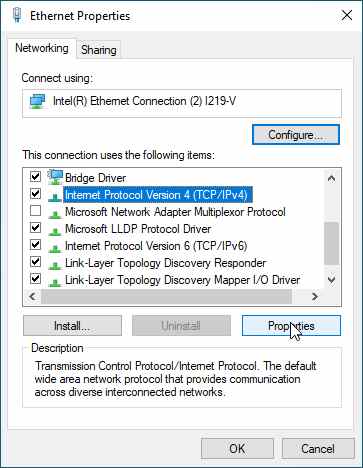
Right-click on your connection, and select Properties.
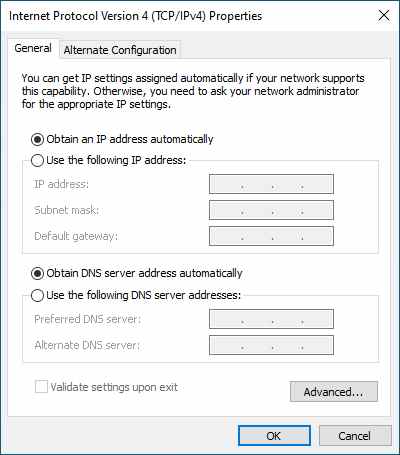
Make sure that the box next to Internet Protocol Version 4 (TCP/IPv4) is checked. From here, double-click on the IPv4 option.
Make sure you use Obtain an IP address automatically and Obtain DNS Server address automatically. Once done, press OK.
#6. Switch to Public DNS
If you are still unable to connect to the internet, you may be having problems with your DNS. Switching to a public DNS, such as Google’s DNS, can help resolve this issue. You may even find that switching to a different DNS can help you improve your internet speed.
To get started, you will need to access your network settings using the same method outlined in the previous step. Just open Control Panel, navigate to View networks status and tasks > Change adapter settings. Right-click on your connection, and select Properties.
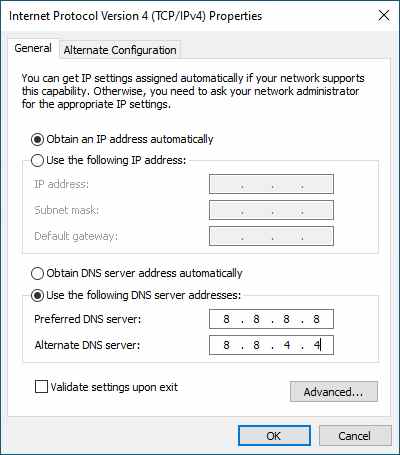
Double-click on Internet Protocol Version 4 (TCP/IPv4) again. This time, make sure you fill in using the following DNS server addresses.
Now, type in the address for Google DNS. In the field below, type these numbers:
- Preferred DNS server: 8.8.8.8
- Alternative DNS server: 8.8.4.4
After pressing OK, restart your computer to see if your internet connection is back.
Read more:
- 6 Ways to Fix Download Failed Network Error in Chrome
- 7 Ways to Fix Dxgkrnl Video Fatal Error on Windows 10 PC
- 6 Ways to Fix Error 0x80070091 in Windows 10 Laptop PC
Conclusion:
Fixing Windows 10 errors is not always the most pleasant task. This is especially annoying when you really need to use the internet, and your computer suddenly starts to malfunction. Nonetheless, this workaround should make the troubleshooting process a lot easier.
Having communication issues between your PC and your main DNS server is not a very difficult fix. Once you’ve finally resolved this issue, it’s important to be prepared for more troublesome issues in the future, like the infamous Windows blue screen error.
Don’t forget to bookmark and always visit every day Technowizah.com because you can find here the latest Tech Computer Android games How-to Guide Tips&Tricks Software Review etc, Which we update every day.

![8 Ways to Fix The Hosted Network Couldn’t Be Started in Windows 10 [2026] 8 Ways to Fix The Hosted Network Couldn't Be Started in Windows 10](https://technowizah.com/wp-content/uploads/2021/07/8-Ways-to-Fix-The-Hosted-Network-Couldnt-Be-Started-in-Windows-10.jpg)
