9 Ways to Fix Critical Process Died in Windows 10 PC – We all know that blue screens, also known as BSODs, can ruin your day. There are more than 500 BSOD error codes, but the Critical Process Died Stop Code gets a lot of attention. In most cases, BSODs occur less frequently in Windows 10 than in previous OS versions, but when they do occur, they are annoying nonetheless.

- 1 What does Critical Process die? How to Fix Critical Process Died in Windows 10 [2024]
- 2 How to Fix Critical Process Died in Windows 10 PC
- 2.1 #1. Run Hardware And Device Troubleshooting Tool
- 2.2 #2. Run System File Checker
- 2.3 #3. Run Antivirus Scan
- 2.4 #4. Run the Deployment Imaging Servicing And Management Tool
- 2.5 #5. Update Drivers
- 2.6 #6. Uninstall the Latest Windows Updates
- 2.7 #7. Do a Clean Boot
- 2.8 #8. Restore the System
- 2.9 #9. Update BIOS
- 3 Conclusion:
What does Critical Process die? How to Fix Critical Process Died in Windows 10 [2024]
Critical processes that stop unexpectedly are responsible for most BSODs. You will know if you have experienced it because you will see the error code 0x000000EF on the blue screen.
Read more:
- 15 Ways to Fix Steam Disk Write Error Quick and Easy Guide
- 7 Ways to Fix Error 0x80070422 in Windows 10 PC
- Fix Nvidia Geforce Experience Error 0x0003 on Windows 10 PC
- Best Ways to Fix Error 0x800F081F in Windows 10 PC
At the most basic level, the cause is simple, a background process that Windows relies on has been corrupted. It could have stopped completely, or the data had been modified incorrectly.
Digging deeper, it becomes more difficult to pinpoint the exact problem. Everything from driver issues to memory errors can be to blame. Worse, where the BSOD could appear. Maybe it only happens when you play games when log into your operating system, when you open certain apps, or when you start your operating system from sleep mode.
How to Fix Critical Process Died in Windows 10 PC
There are many reasons why critical process kills occur. Let’s take a closer look at how you can fix the Critical Process Died stop code in Windows 10.
#1. Run Hardware And Device Troubleshooting Tool
Before we move on to more complicated solutions, let’s start with the easiest. Windows now offer a variety of specialized troubleshooting tools. One of them is specifically designed for hardware and device problems.
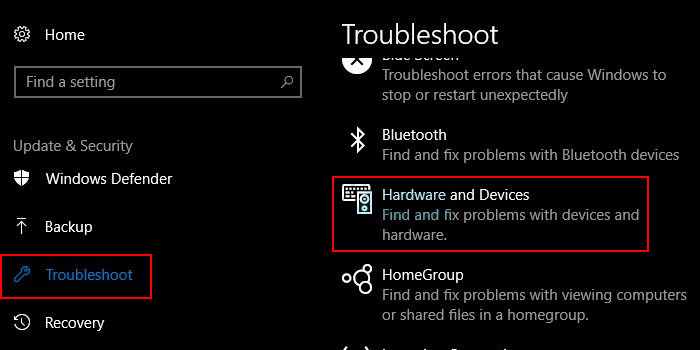
To run the tool, go to Settings and go to Update and Security > Troubleshoot. Scroll down and select Hardware and Devices, then click Run the troubleshooter. Your system will spend a few minutes scanning for problems and reporting back with its findings.
If you don’t find Hardware and Devices in the Troubleshoot tool, you can open Command Prompt in admin privileges then type the command msdt.exe -id DeviceDiagnostic and follow the instructions.
#2. Run System File Checker
The next step is to run the System File Checker tool. This is a well-known utility that can repair a wide variety of Windows-based ailments by repairing corrupted or incorrectly modified system files.
Actually, it’s not always useful, people do it out of habit, not out of necessity. However, in the case of the error code 0x000000EF, this is a critical troubleshooting step.
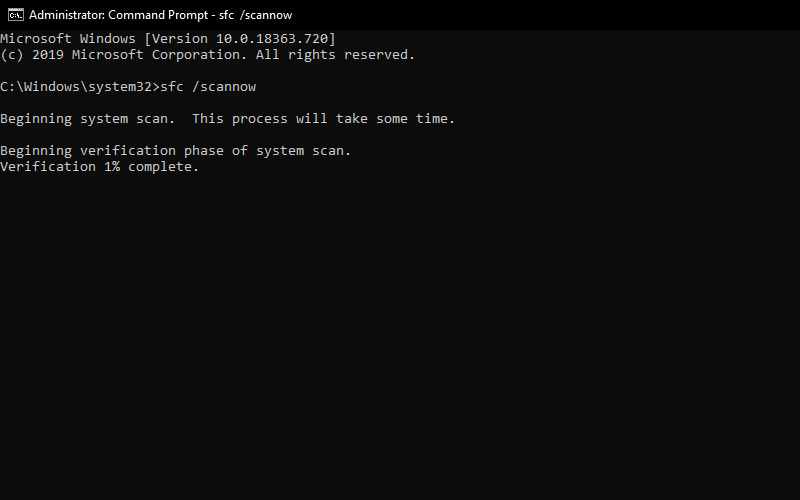
To run the checker, you need to run Command Prompt as admin. The easiest way is to run a cmd search in Windows Search, right-click on the result, and select Run as administrator.
Once Command Prompt opens, type sfc /scannow, and press Enter. The process may take a while to complete.
Once done, you will see a list of problems that appear on the screen and the steps the scan took to resolve them. Make sure you restart your computer before continuing to work.
#3. Run Antivirus Scan
The stop code could be caused by malware on your system. Malware can alter system files and processes and render them unusable. You can use a Windows Defender application or a third-party antivirus like Malwarebytes. Make sure you run an in-depth full-system scan.
#4. Run the Deployment Imaging Servicing And Management Tool
If you’re still experiencing errors, it’s time to switch to the Deployment Imaging Servicing and Management (DISM) tool. This tool will repair a broken system.
To use DISM, open Command Prompt as an administrator using the steps described earlier. When the app opens, type DISM /Online /Cleanup-Image /restore health and press Enter.
The process usually takes between 10 minutes to half an hour. Don’t worry if progress stops at 20 percent for a few minutes, that’s normal. After the scan is complete, restart your operating system.
#5. Update Drivers
Bad drivers are one of the most common causes of stop codes. Therefore, make sure that your drivers are always updated.
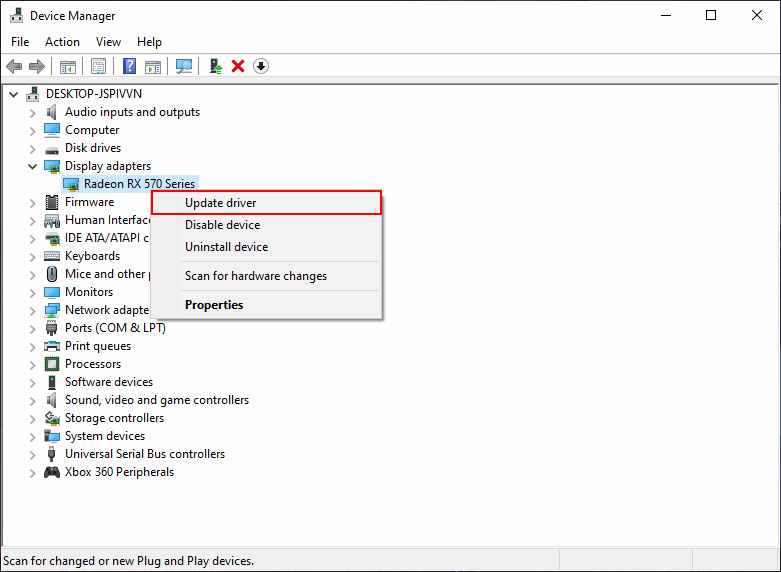
To check the status of your drivers, simultaneously click the Windows key + X, select Device Manager, then look for any devices that have a yellow exclamation mark next to them.
If you find an exclamation mark, right-click on the device in question and select Update Driver Software from the context menu.
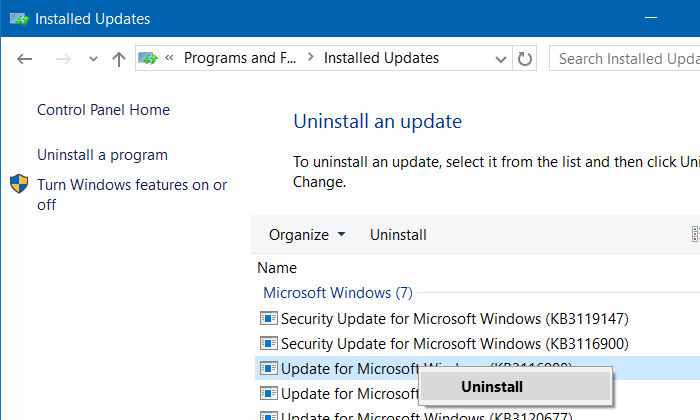
#6. Uninstall the Latest Windows Updates
If your problem has just started, the latest Windows Update could be the cause. Luckily, it’s easy to uninstall the latest update so you can see if your problem goes away.
To uninstall updates, open the Settings app and go to Update and Security > Windows Update > Update History > Uninstall Updates. Highlight the update you want to remove from your system, then hit the Uninstall button at the top of the window.
#7. Do a Clean Boot
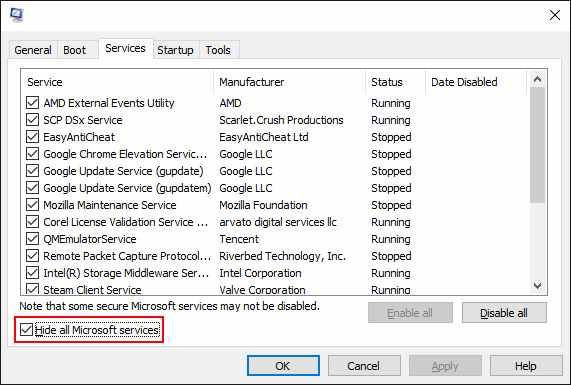
Clean Boot is a start-up mode that uses a minimum number of drivers, processes, and programs. Once your computer is running, you can start loading the missing processes in an attempt to isolate the problem.
To perform a clean boot on your computer, follow the step-by-step instructions below:
- Open the Windows search bar
- Type System Configuration and press Enter
- Click on the Services tab
- Uncheck the box next to Hide all Microsoft Services
- Click the Disable All button
- Select the Startup tab
- Click on Open Task Manager
- In the new window, click on the Startup tab again
- Deactivate all items in the list
- Restart your computer
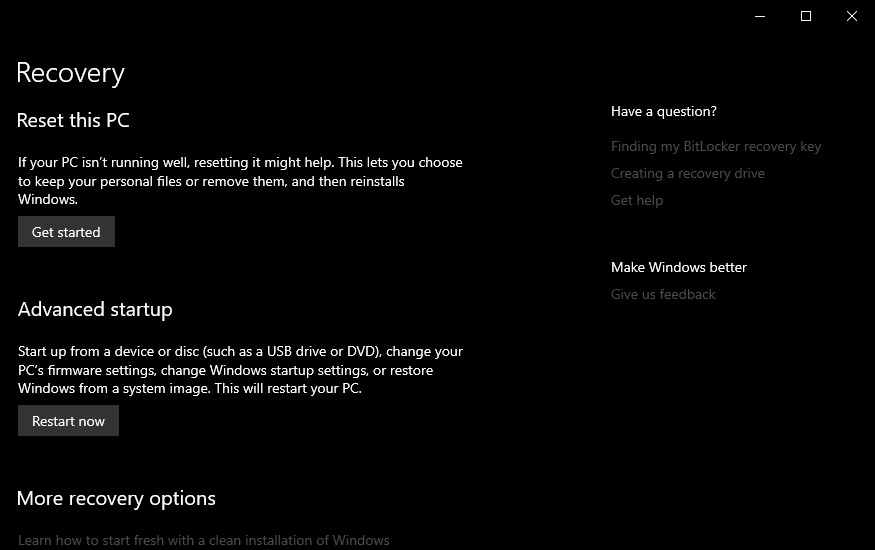
#8. Restore the System
You can try to restore your computer to a previous state using the System Restore tool. This option can only be used if you have enabled the restore point created before the stop code problem occurred.
To use the System Restore tool, go to Settings > Update & Security > Recovery > Reset this PC > Get Started > Keep Files and follow the on-screen instructions.
#9. Update BIOS
This is the last resort to fix critical process died stop code. You can try updating your computer’s BIOS. Unfortunately, there is no standard method to do it, it depends on your computer manufacturer. See your device’s documentation for instructions.
Read more:
- 7 Ways To Fix Error Code 0xC0000225 In Windows 10 PC
- 8 Ways To Fix Error Code 0x8000FFFF in Windows 10 PC
- 8 Ways to Fix WHEA Uncorrectable Error Windows 10 PC
Conclusion:
So those are some ways to overcome critical processes died to stop code. If none of the steps above fix your problem, it’s time for you to go to the nearest store to buy a new computer.


![8 Ways to Fix The Hosted Network Couldn’t Be Started in Windows 10 [2026] 8 Ways to Fix The Hosted Network Couldn't Be Started in Windows 10](https://technowizah.com/wp-content/uploads/2021/07/8-Ways-to-Fix-The-Hosted-Network-Couldnt-Be-Started-in-Windows-10.jpg)
