9 Ways To Fix Windows 10 Can’t Connect To WiFi Network – The most common problems experienced by Windows 10 users are WiFi that can’t connect with the error message ” Can’t connect to this network “, the network is not detected, or even WiFi can’t be turned on at all. Without knowing what caused it, dealing with this would be quite troublesome.
- 1 How To Fix Windows 10 Can’t Connect To WiFi Network 2024
- 2 How to Solve Windows 10 can’t connect to WiFi
- 2.1 #1. Turn on airplane mode then turn it off
- 2.2 #2. Use automatic IP and DNS
- 2.3 #3. Forget the network then reconnect
- 2.4 #4. Reset network settings
- 2.5 #5. Disable IPv6
- 2.6 #6. Fix WiFi can’t connect with CMD
- 2.7 #7. Restart the modem and router
- 2.8 #8. Use an external wireless adapter
- 2.9 #9. Reset PC (without reinstalling)
- 3 Conclusion:
How To Fix Windows 10 Can’t Connect To WiFi Network 2024
On this occasion, we will try to provide several solutions that you can try to fix your PC and laptop that cannot connect to WiFi.
Read more:
- 8 Ways To View WiFi Password on Windows PC
- 3 Easy Ways To Find Wifi Passwords on Laptop
- 9 Ways to Fix No WiFi Networks Found Windows 10 PC
- 3 Ways To Know Wifi Password In Windows 10 PC
WiFi is a wireless network protocol that we can use to connect to the internet. Thanks to current technological advances, getting WiFi access is not a luxury anymore, we can use a smartphone or modem to create our own WiFi network at home.
In addition to accessing the internet, WiFi networks can also be used for file sharing between devices and printer sharing. This way the work will be faster and the place where we work will be neater because there is no need for many cables to connect these devices.
How to Solve Windows 10 can’t connect to WiFi
1. Open Device Manager
Connection problems on WiFi are often related to drivers, therefore the first thing we need to try is to make sure the WiFi drivers on the laptop are working properly.
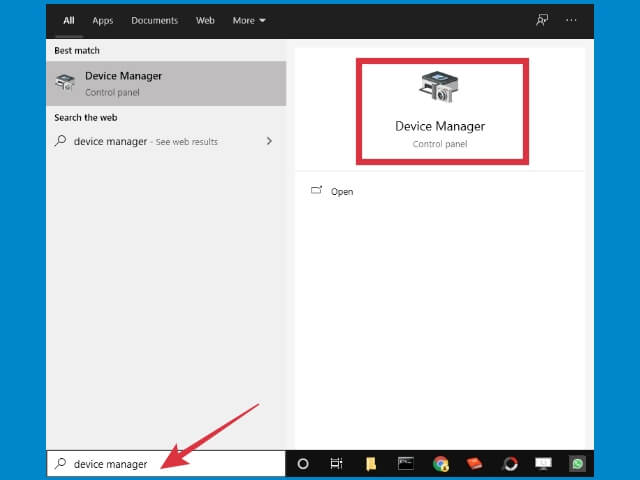
Open Device Manager by clicking on the Start button > typing Device Manager in the search field > clicking on the Device Manager program that appears on the Start menu.
2. Find the laptop WiFi driver in Device Manager
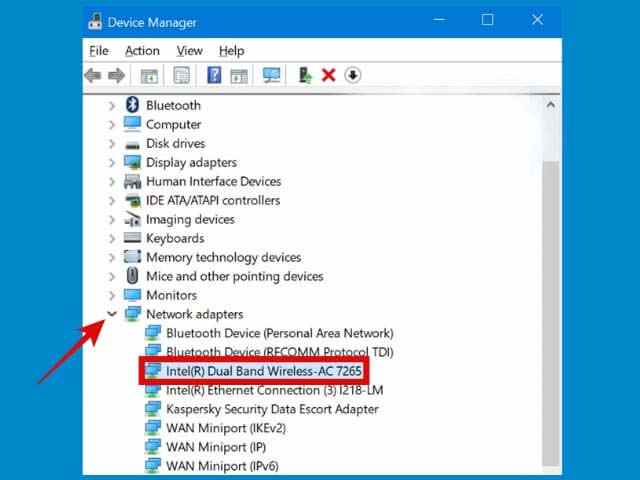
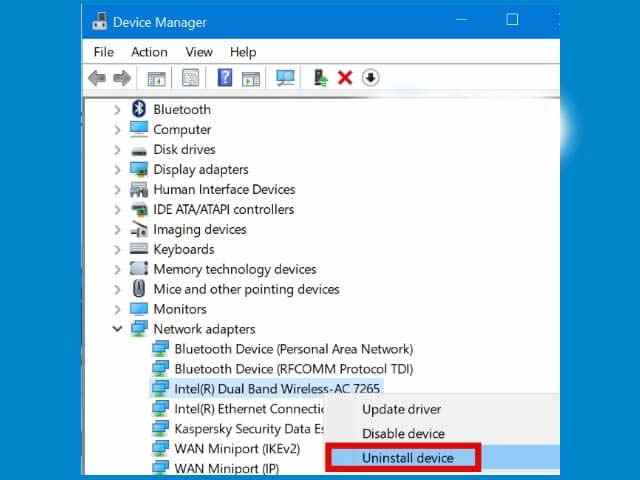
After entering the Device Manager, you will see all the devices and their drivers on your computer. Click the arrow on Network adapters then find your WiFi driver.
3. Check if there is an error in the driver
A corrupt or deleted driver can cause WiFi to be lost on the laptop, in the Device Manager, the problematic driver will see a yellow exclamation mark icon. This means that the driver cannot run properly, causing the device it is driving to stop working.
See if the WiFi driver on your laptop has a yellow icon. If there is, it can be ascertained that the driver is experiencing a problem.
4. Uninstall WiFi drivers
Fixing the WiFi driver can be done by uninstalling and then reinstalling the driver. In this way, we will get a clean version of the driver to remove corrupted files.
Right-click on the WiFi driver > then select Uninstall device
5. Restart the computer
After the driver is uninstalled, the last step you need to do is restart the computer. After the computer restarts, the WiFi driver will be automatically reinstalled by Windows.
What if the above method still doesn’t work?
WiFi that can’t connect on Windows 10 can have various causes, so the solution to fix it will also vary, depending on the source of the problem.
To be able to fix it yourself to succeed it takes patience and thoroughness.
If you have tried the first method but it didn’t work, you can try some of the solutions below.
#1. Turn on airplane mode then turn it off
Before trying anything else, try to do this simple thing first. Turn on airplane mode on your laptop to turn off all available signals disable airplane mode, then reconnect with the hotspot network.
How to do it is very easy, first, click the notification button in the right corner of the taskbar.
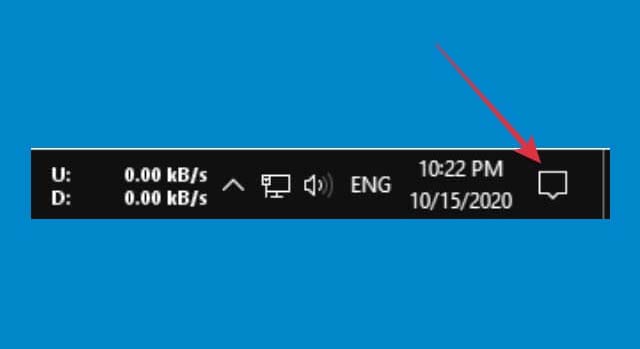
Then click on the Airplane mode button.
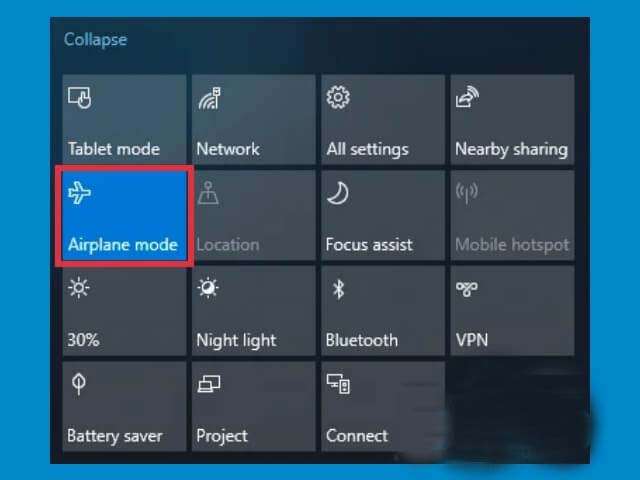
The Airplane mode button will change color to blue, this is a sign that it is active.
Leave it for about a minute, then press the button again to turn it off.
After that try to connect the laptop again to the WiFi network.
#2. Use automatic IP and DNS
The solution to dealing with problematic WiFi connections on Windows 10 is to set IP and DNS to automatic. This is usually powerful enough to fix WiFi that is already connected but the internet doesn’t work, especially on laptops that are often connected to different hotspot networks.
Follow these steps:
First, open the Control Panel then select the Network and Sharing Center menu.
In the Access type section, click on your WiFi network.
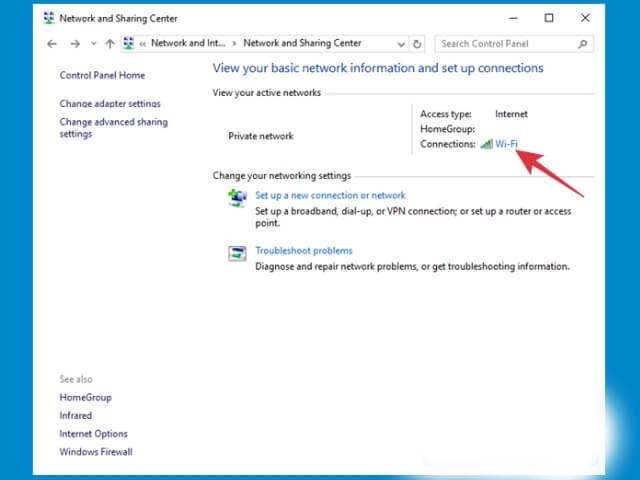
Then click the Properties button > select Internet Protocol Version 4 (TCP/IPv4) > then click the Properties button again.
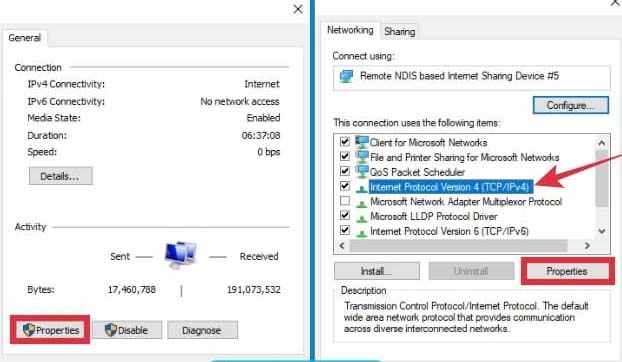
Check the following options,
Obtain an IP address automatically
Obtain DNS server address automatically
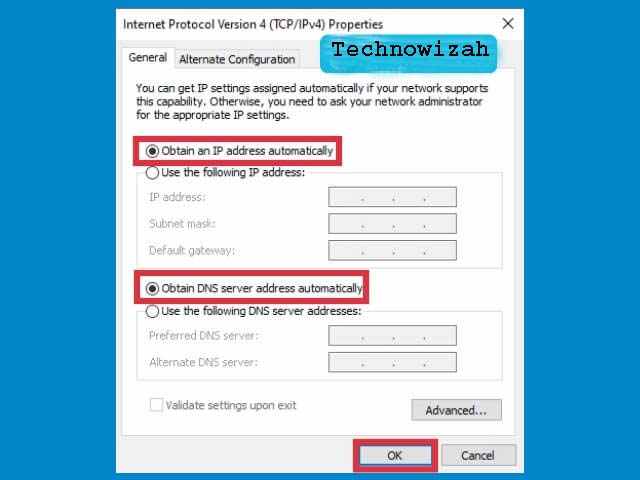
Click OK.
#3. Forget the network then reconnect
When there is a problem with the WiFi network, forgetting the network and then connecting it again is a pretty powerful solution. This is the same as restarting the computer.
If the WiFi on your laptop can’t connect, try the following steps.
Right-click on the WiFi icon on the taskbar > select Open Network & Internet settings.
Click on the Wi-Fi menu > select the Manage Known Networks menu.
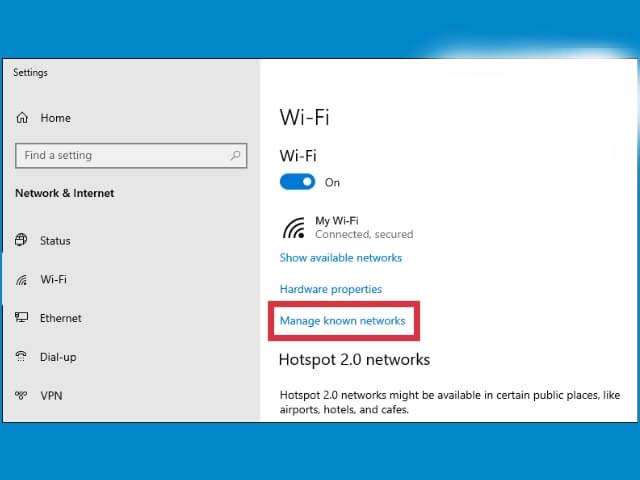
You will see a list of WiFi networks that have been used there, click on the problematic WiFi then click the Forget button.
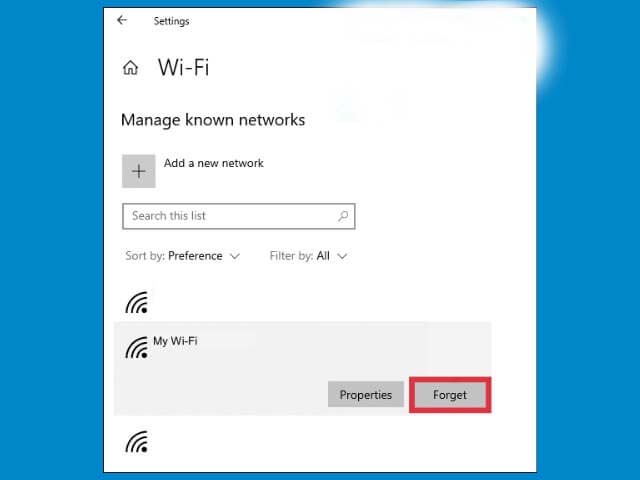
Close the settings window, wait a moment, and then try again to connect to the WiFi network that was unable to connect.
Most likely this method will work, but if not, do the next steps below.
#4. Reset network settings
WiFi connection can also be problematic due to incorrect network configuration on your Windows. The best way to fix this is to do a network reset, this way the settings will be returned to default, and you can adjust the settings again as needed.
First, click on the Start button > click the Settings button (gear icon). You can also press the Windows key + I on your keyboard.
After entering the Settings page > select the Network & Internet menu.
Click on the Status tab > on the right pane find the Network reset menu > click once > click on the Reset now button.
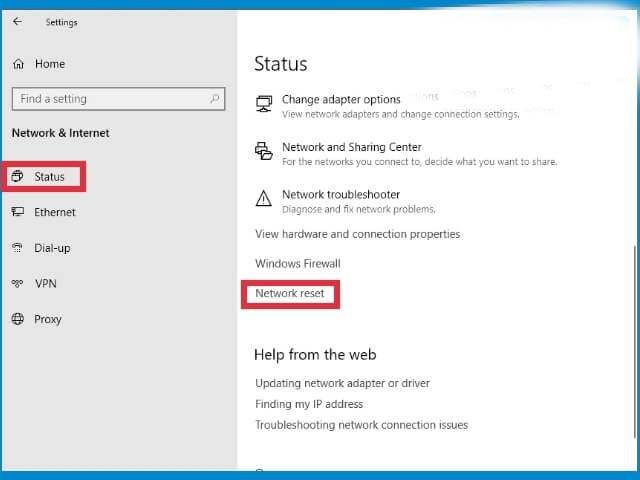
Wait a moment until the process is complete. After that, the network settings on your laptop will return to the initial settings. Try connecting to the WiFi network that was problematic earlier and see if it works.
#5. Disable IPv6
You can also try turning off the IPv6 version to resolve this issue. Most PCs and laptops can connect to the internet via IPv4, so actually, IPv6 is not needed.
How to right-click on the WiFi icon on the taskbar > select Open Network & Internet settings.
Click on the Change adapter options menu > find the WiFi network you want to repair > right-click > select Properties.
Uncheck the Internet Protocol Version 6 (TCP/IPv6) option > then click the OK button.
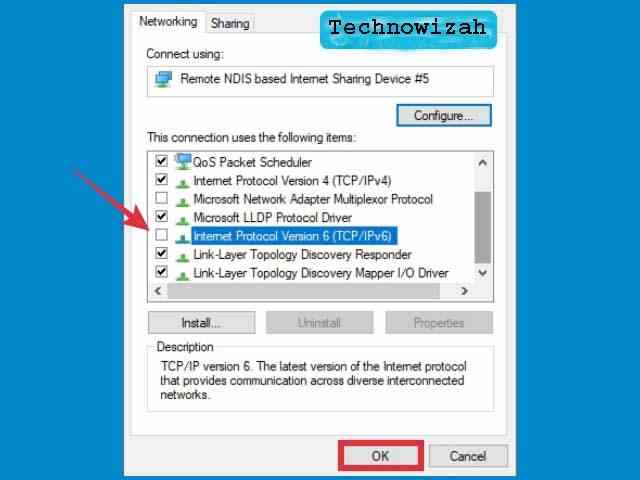
Close all settings windows and try again to connect to the WiFi network on your laptop.
#6. Fix WiFi can’t connect with CMD
We can also use the Command Prompt to solve the internet network on a problematic laptop, and this is a pretty powerful way.
First, open the CMD program with administrator access on your Windows, how to click on the Start button > in the search field type cmd > the Command Prompt menu will appear > in the right pane click on Run as administrator.
After that type the following command, followed by pressing the ENTER key after each finish typing each line:
netsh winsock reset
netsh int ip reset
ipconfig /release
ipconfig /renew
ipconfig /flushdns
When finished close the cmd program, then restart your laptop. After turning it back on, try again to connect to the WiFi network that was problematic, it should now work.
#7. Restart the modem and router
Based on reports from many users, restarting the modem and router that is used sometimes manages to solve the problem of WiFi not being able to connect to the laptop.
If you’ve tried all of the steps above but haven’t been successful, then the problem could be with your modem and router, and restarting is the simplest way to fix the problem.
The easiest way to restart is to turn off the device, let it sit for a while, then turn it back on. If you are using hotspot tethering from the cellphone then restart the cellphone.
After that try again to connect the network to your laptop and see if the problem is resolved.
#8. Use an external wireless adapter
WiFi that can’t connect on a laptop can also be caused by damaged hardware. If this is the case then all the methods above will not work until the hardware is repaired.
If you have free time you can take it to a service center, but if you are very busy then using an external wireless adapter is a very effective way.
External wireless adapters can be found at computer stores at a low price. To use it is also very easy, just connect it to the USB port, and the WiFi on your laptop will work again.
#9. Reset PC (without reinstalling)
Some people suggest that to solve the WiFi problem in Windows 10 that can’t connect, you have to do a reinstall, but this is not a wise choice. Windows 10 has a reset feature and similar features like a factory reset on smartphones that we can use without having to reinstall.
By resetting the PC, the Windows configuration will return to the state after reinstalling, but you can choose not to delete the data on the C drive so that only third-party programs are missing.
Read more:
- Wi-fi Is Often Disconnected on Laptops Here Is The Solution
- 12 Reasons Why WiFi Is Slow And How To Fix It
- What Is The difference between WiFi and MiFi
Conclusion:
Those are some ways that you can try to fix the problem of a Wi-Fi network or Hotspot that can’t connect on Windows 10 PCs and laptops. Hopefully, this helps, if it still doesn’t work, please comment below and explain what kind of problem you are experiencing.
Don’t forget to bookmark and always visit every day Technowizah.com because you can find here the latest Tech Computer Android games How-to Guide Tips&Tricks Software Review etc, Which we update every day.
![8 Ways to Fix The Hosted Network Couldn’t Be Started in Windows 10 [2026] 8 Ways to Fix The Hosted Network Couldn't Be Started in Windows 10](https://technowizah.com/wp-content/uploads/2021/07/8-Ways-to-Fix-The-Hosted-Network-Couldnt-Be-Started-in-Windows-10.jpg)
