9 Ways to Fix No WiFi Networks Found Windows 10 PC – WiFi networks that are within range of your PC appear automatically in the list of available networks. If you have a password to one of the available networks, you can connect it. If the network isn’t secured, you don’t need a password for it just connects.
How to Fix No WiFi Networks Found Windows 10 PC Laptop 2024
If you have a list of available networks open and you see the No WiFi networks found message when you are supposed to see at least one network, here are a few things you can try to fix the problem.
Read more:
- How To Fix api-ms-win-crt-runtime-l1-1-0.dll is missing
- How To Solve All Realtek High-Definition Audio Manager Problems
- How to fix the microphone not working Windows 10
- How to Transfer Windows 10 License to Another Computer
Before you proceed with any of the fixes in this article, take the following actions, and check whether the network appears or not.
- Restart your PC.
- Please check if other devices in the house (tablets, phones, etc.) can detect other Wi-Fi networks
- Restart your computer and reset your Wi-Fi router
- If you’re using a laptop, make sure your physical Wi-Fi switch is turned on
- Check if your Wi-Fi is active by going to the Start button and then going to Settings. Click on Network & Internet and then check whether Wi-Fi is active or not.
- Make sure airplane mode is disabled. To do this, go to the Start button and click on Network & Internet. Open Airplane Mode and make sure it is not active.
If no network appears, here’s how to fix No WiFi Networks Found in Windows 10:
#1. Reset network adapters
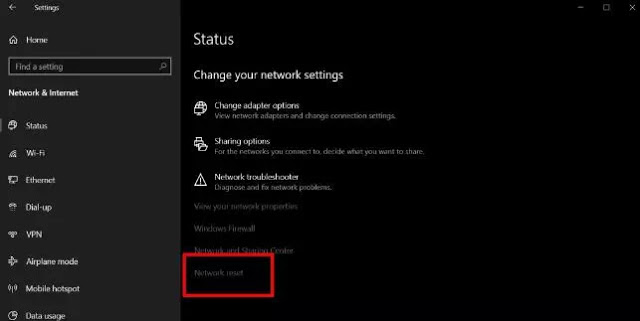
Your network adapter may be experiencing a problem that a system restart cannot fix. In that case, resetting it is a good idea.
1. Open the Settings app.
2. Open the Network and Internet group.
3. Select the Status tab.
4. At the bottom, click the Network Reset option.
#2. Hidden SSID
The SSID or name for the network you want to connect to may be hidden. To be able to connect, you need to contact your system administrator and find out the name and password. Once you know both of them, you can connect to the network.
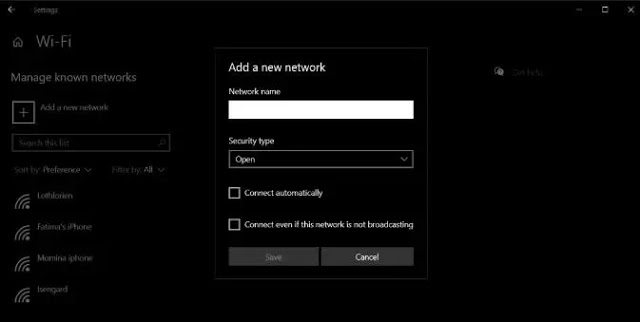
1. Open the Settings app and go to Network and Internet.
2. Select the WiFi tab.
3. Click Manage known networks.
4. Click Add a new Network.
5. In the window that opens, enter the network name, select the security type (check with network admin), and enter the password.
#3. Test network signal
WiFi networks have a limited range and the range is determined by the router used. In general, a typical home router has a maximum range of approximately 50 meters. If your Windows 10 PC is far from the router, then it can’t get a strong enough signal, it won’t show the network.
1. Move your PC as close to the router as possible.
2. Check if the network appears in the list of available networks.
3. If yes, start moving slowly until the network disappears or you return to where it was.
4. Connect to the network.
This solution is temporary as your problem is basically from a weak signal. Try moving a place closer to the router, or try installing additional access points that can improve the router signal.
#4. Update the network adapter driver
Outdated network drivers can prevent Windows 10 from reading available networks. Check and install available driver updates for your network adapter.
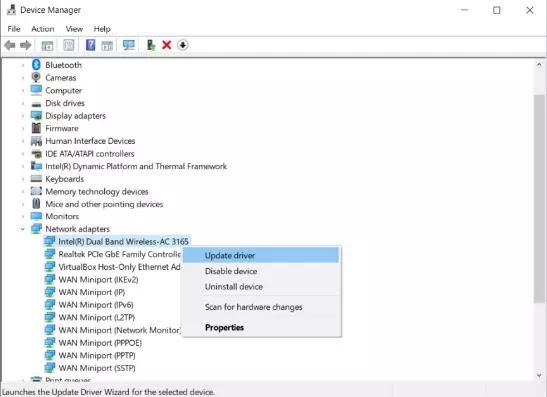
1. Open the Device Manager.
2. Open the Network Adapters group and expand it.
3. Right-click on your network adapter and select Update driver from the context menu.
4. Install any available updates, and start restarting your PC.
#5. Downgrade the network driver
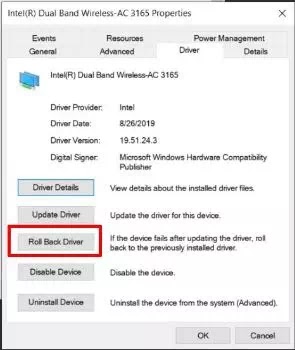
It is possible that a driver update was installed and that is what is causing the problem. In this case, you will have to roll the driver back to an older version.
1. Open the Device Manager.
2. Open the Network Adapters group and expand it.
3. Right-click on your network adapter, and select Properties.
4. Open the Driver tab.
5. Click the Roll Back Driver button.
6. Restart your PC.
#6. Uninstall / disable virtual network adapters
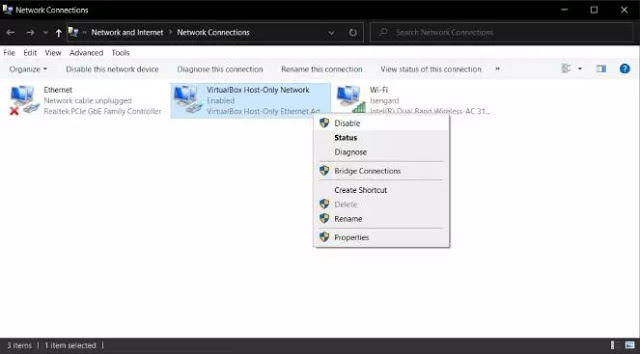
Some applications may install a virtual network adapter on your system. A common example of an application that does this is a virtualization application, for example, VirtualBox. Removing it, or disabling it can fix your network problems. To disable virtual network adapters:
1. Open Control Panel.
2. Open Network and Internet.
3. Select Network and Sharing.
4. Click Change adapter settings.
5. Right-click the virtual network adapter, and select Disable from the context menu.
To uninstall a virtual network adapter, uninstall the application that was installed it.
1. OpenControl Panel.
2. Open Programs.
3. Select Uninstall a program.
4. Open the list of installed applications, select the one that installs the virtual network adapter, and click the Uninstall button.
#7. Disable VPN
The VPN app can modify network settings on a Windows 10 PC and the modifications might result in your system no longer detecting the wireless network.
1. Turn off the VPN service you are using, restart the system, and check the network. 2. After the network appears, connect to one and then enable the VPN service again. 3. If the connection is lost or stops working after activating the VPN, check if the service you are using is prohibited by your ISP or in your country. 4. Try using a different VPN service or try using a VPN that only controls your browser or certain apps rather than network traffic for the entire system.
#8. Run the Internet Connections troubleshooter
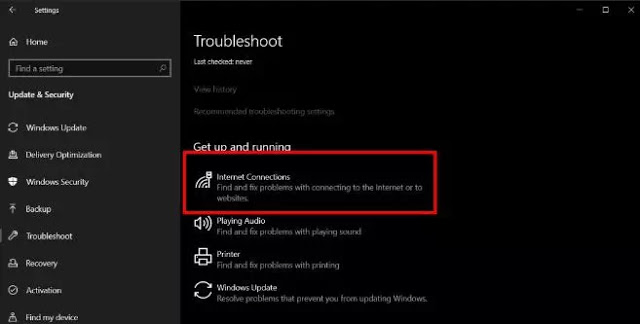
The Internet Connections troubleshooter might be able to find out and fix any faulty settings or those that have been corrupted by other applications and prevent Windows from reading the available networks.
1. Open the Settings app.
2. Open Update and Security.
3. Select the Troubleshoot tab.
4. Select and run the Internet Connections troubleshooter. It might force Windows 10 to show you available networks.
#9. Run the Network adapter troubleshooter
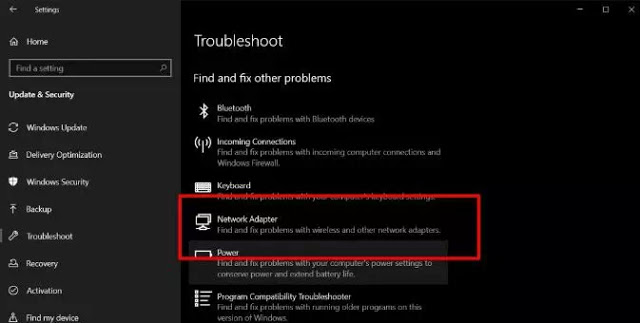
Like an Internet Connections troubleshooter, a Network adapter troubleshooter can also help solve No WiFi Networks Found in Windows 10.
1. Open the Settings application.
2. Open the Update and Security group.
3. Select the Troubleshoot tab.
4. Select and run the Network adapter troubleshooter.
Read more:
- 3 Easy Ways to Activate Microsoft Office
- How to Take Screenshots on Windows 10 Laptop PCs
- Download Best Free VPN for Windows 10 PCs
Conclusion:
Those are some solutions to fix the lack of WiFi networks found in Windows 10. I hope that one of the solutions above can help you solve this problem. If not, you may have to check if the hardware on your PC is damaged. A sign of hardware damage is if other devices can connect to the network you are trying to connect to but your PC is not connected.
Don’t forget to bookmark and always visit every day Technowizah.com because you can find here the latest Tech Computer Android games How-to Guide Tips&Tricks Software Review etc, Which we update every day.


![6 Ways to Fix System Thread Exception Not Handled in Windows 10 [2024] 6 Ways to Fix System Thread Exception Not Handled in Windows 10](https://technowizah.com/wp-content/uploads/2021/07/6-Ways-to-Fix-System-Thread-Exception-Not-Handled-in-Windows-10-218x150.jpg)


![10+ Ways To Take Screenshot on Asus Laptop Windows 10 [2024] How To Take Screenshot on Laptop and PC Windows](https://technowizah.com/wp-content/uploads/2020/06/How-To-Take-Screenshot-on-Laptop-and-PC-Windows-100x70.jpg)
