How to Settings Windows 10 Start Menu Laptop PC – The Start Menu in Windows 10 comes with a more modern look than its predecessor and more complete functions that tend to be easier to use.
How to Settings Windows 10 Start Menu Laptop PC
On the Start Menu, there are shortcuts to the applications on your computer organized into folders and tiles. From there you can also access all programs and directories in Windows 10, open PC Settings, sign out, lock the screen, sleep, and even turn off the computer.
Read more:
If you often use the Start Menu to access applications while working, then the following tips will be useful for you.
How to set the Windows 10 Start Menu
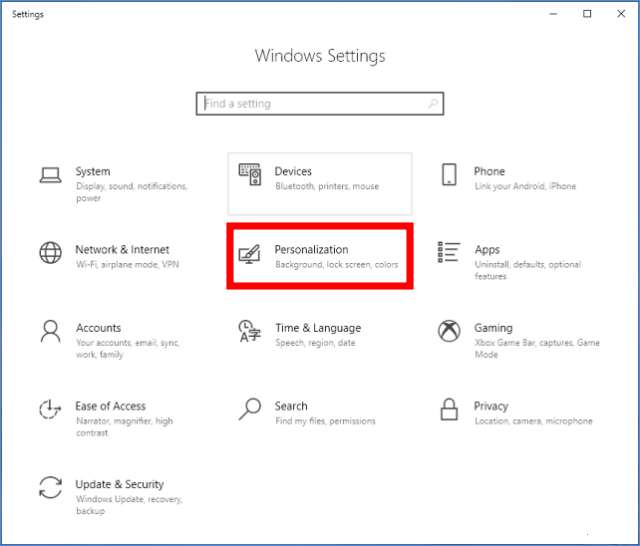
1. Enter Windows Settings
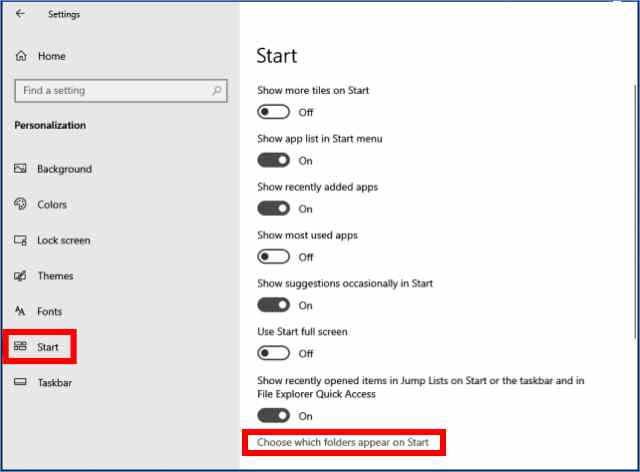
2. Select the Personalization menu
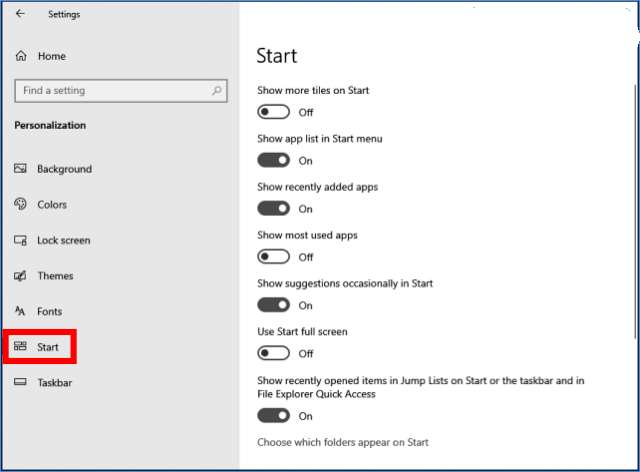
3. Click on the Start tab
4. Select Show More Tiles on the Start
The first option is to Show more tiles on Start, if it is turned on, the number of applications displayed on the tile panel will be more. Please choose to turn it on (On) or off (Off).
5. Select Show app list in the Start menu, recently added apps, and most-used apps
Then you can choose to remove or bring up the following options:
Show app list in the Start menu: serves to display all applications in Windows 10 based on alphabetical order.
The show recently added apps: to display recently installed apps.
Show most used apps: to display the applications most frequently used.
6. Select Show Suggestions occasionally in Start
Turn off this option to remove suggestions and tips from Microsoft that appear on the Start Menu.
7. Use Start fullscreen
Enable this option if you want to display the Start Menu in a full-screen window.
8. Select show recently opened items
Turn off this option to clear the history of recently opened files and applications, both in the Start Menu and in File Explorer.
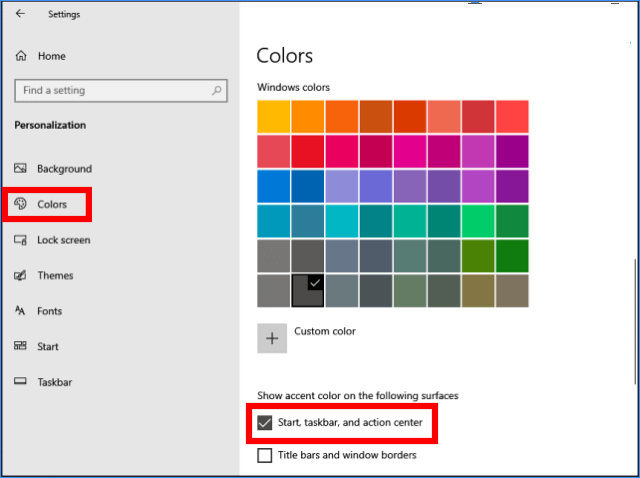
9. Change the Start Menu color as desired
You can also adjust the Start Menu color as you wish. The trick is to click on the Colors tab > Select the desired color> check the Start, taskbar, and Action Center options.
How to organize applications on the Windows 10 Start Menu
The apps displayed on the tile panel in the Start Menu are automatically selected by the system from the first time you install Windows 10. Adding applications to the Start Menu or adjusting its position must be done manually.
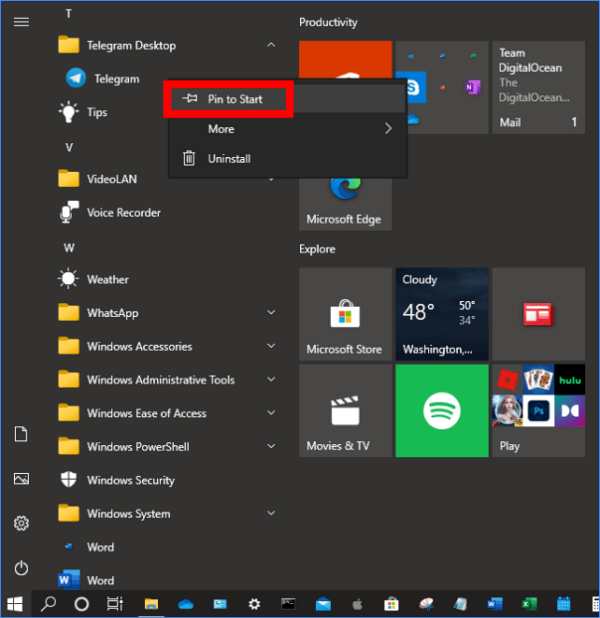
#1. Adding applications to the Start Menu
1. Open the Start Menu by clicking the Windows icon or pressing the Windows key on the keyboard
2. Find the application you want to add to the Start Menu on the applications pane
3. Right-click on the application icon and select Pin to Start
4. Move the position as you wish by drag and drop
5. Repeat the above steps to add more applications to the Start Menu
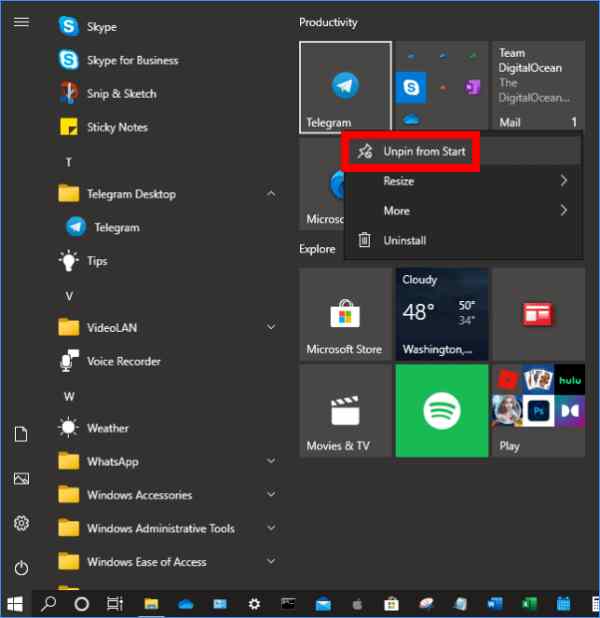
#2. Remove applications from the Start Menu
You can also delete applications in the Start Menu panel as desired. Applications that are considered very rare or even never used should be deleted and replaced with the applications that you use the most.
Follow these steps:
1. Click the Windows icon to open the Start Menu
2. Right-click on the application you want to remove
3. Select Unpin from Start
4. Continue the above steps to remove other applications
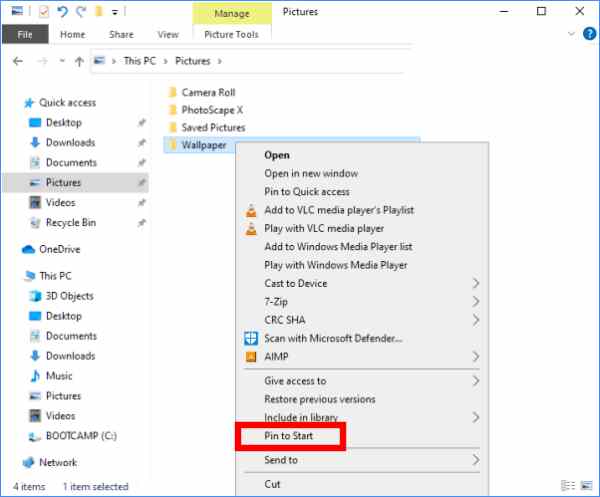
#3. Add and remove folders in the Start Menu
The Start Menu in Windows 10 can also be used as a place to store shortcuts to certain folders on your computer. You can use this shortcut to quickly access folders, especially if the folder is located in a deep directory.
Follow these steps:
1. Open a file explorer
2. Go to the location of the folder
3. Right-click the folder
4. Select Pin to Start
5. The folder shortcut will appear on the tiles panel
You can also display user folders in the toolbar panel on the Start Menu. You do this by going to Settings > Personalization > Start > Choose which folder appears on Start. After that check which folders you want to appear.
#4. Change the icon size in the Start Menu
If you want to include lots of apps on the Start Menu then you need to resize them so that they fit on the tiles panel.
To change the icon size, right-click on the icon > select Resize > select the desired size.
There are four types of sizes that you can choose from, namely Small, Medium, Wide, and Large. You can adjust the application icon size
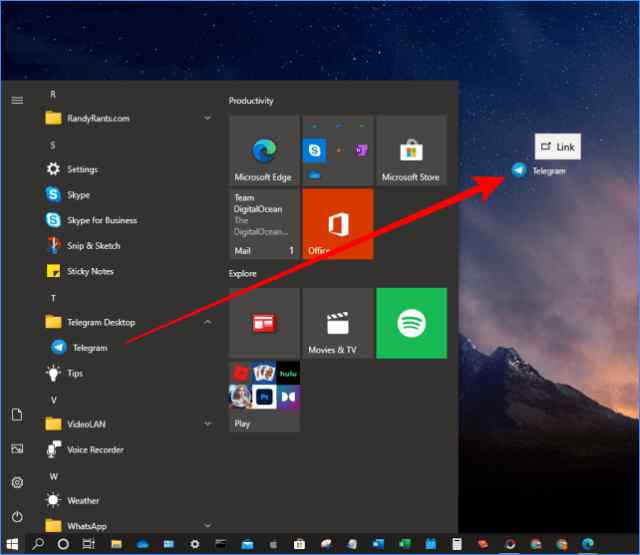
Moves the Start Menu application shortcut to the desktop
Each newly installed application will usually provide an option on whether the user wants to display a shortcut on the desktop or not. This shortcut will be used to open the application.
However, some applications on your computer may not have shortcuts on the desktop. If the application is used frequently enough then you can use the Start Menu to create a shortcut.
Follow these steps:
1. Open the Start Menu
2. Find the application for which you want to create a desktop shortcut
3. Drag and drop the application icon to the desktop
Read more:
- How To Enter Safe Mode In Windows 10/8/7 Laptop PC
- 7 Ways to Fix USB Device Not Recognized / Unreadable USB
- 6 Ways to Fix Wireless Capability Is Turned off In Windows PC
Conclusion:
This is the explanation of how to settings the Windows 10 start menu laptop PC. You can find all the applications on the computer collected in the Start Menu, so you can easily create any shortcuts, including system default programs such as Control Panel, On-screen keyboard, Command Prompt, and so on.
![8 Ways to Fix The Hosted Network Couldn’t Be Started in Windows 10 [2026] 8 Ways to Fix The Hosted Network Couldn't Be Started in Windows 10](https://technowizah.com/wp-content/uploads/2021/07/8-Ways-to-Fix-The-Hosted-Network-Couldnt-Be-Started-in-Windows-10.jpg)
