7 Ways to Fix USB Device Not Recognized / Unreadable USB – In This article, we will provide a solution for those of you who experience USB Device Not Recognized an unreadable and unknown Flashdisk, whether that happens in Windows 10/8/7 or Windows XP.
How To Fix USB Device Not Recognized / Unreadable USB Windows 10 PC Laptop
If you experience this error and receive an error message that says “The last USB you connected to this computer didn’t work, Windows doesn’t recognize it.” Don’t worry, because below we have a solution to solve it in just 7 easy steps.
Read more:
- How to Activate Windows Defender: Windows 10,8,7
- 3 Ways To View And Check Computer IP Address
- 10 Apps To Find and Remove Duplicate Files in Windows
- How to Install & Use iCloud on Windows 10 (Effective)
An unreadable flashdisk is an error that usually occurs in Windows 10/8/7 / XP / Vista when you plug a USB into a PC. This USB device can be either a USB hard drive or a flash drive.
When Windows has such an error, the USB cannot be read on the laptop and consequently cannot open data access. To fix this, follow the steps below:
Fix USB Device Not Recognized/ Unreadable USB Windows 10,8,7 Laptop PC
#1. Restart the Device
Sometimes, a simple reboot can fix the USB Device Not Recognized device. Try restarting or shutting down your PC for a while, then try turning it on again.
Next, try to reconnect your USB device and see the results. If it still doesn’t work, try the next steps below.
#2. Try on another computer
Try pairing your flash drive on another computer. If it still doesn’t work on another PC, then your USB is indeed a problem. Then there are only two options for you, buy another new one or try to repair it.
#3. Remove another USB
Too many USBs on the same computer can also create conflicts that may hinder the device from functioning.
To avoid possible conflicts between the devices, it is recommended that you remove any other USB devices that were attached at the same time and see if the USB you want to use works.
#4. Repair the USB Root Hub
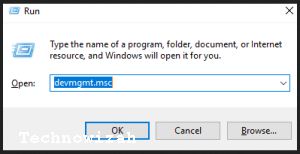
1). Press the Windows logo key and R at the same time. Next type devmgmt.msc.
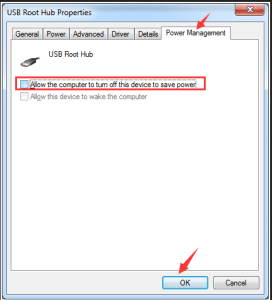
3). Go to the Power Management tab and uncheck Allow the computer to turn off this device to save power. Click OK.
If you have more USB Root Hubs, you will need to repeat this operation several times. Please remember to click OK after each performance.
After setting, plug back in your Flashdisk to see if your computer can read it.
If your Pendrive is still unreadable after this, please check Allow the computer to turn off this device to save power again.
#5. Update the USB Port Driver
If the methods above don’t work for your problem, you may be using the wrong USB driver altogether.
There are two ways you can update the USB port driver, namely: Manual and automatic.
– Manual Driver Update
You can update the USB port driver manually by visiting your PC manufacturer’s website and looking for the latest driver that is correct and suitable for yours.
Make sure to select the only driver that is compatible with your variant of Windows.
– Automatic Driver Update
If you don’t have enough time or computer skills to update the driver manually, you can do it automatically with Driver Easy.
Driver Easy will automatically recognize your system and find the correct and suitable driver you have. You don’t need to know exactly what system your computer is running.
You also don’t have to take the risk of downloading and installing the wrong driver, and you don’t have to worry about making a mistake while installing, here’s how:
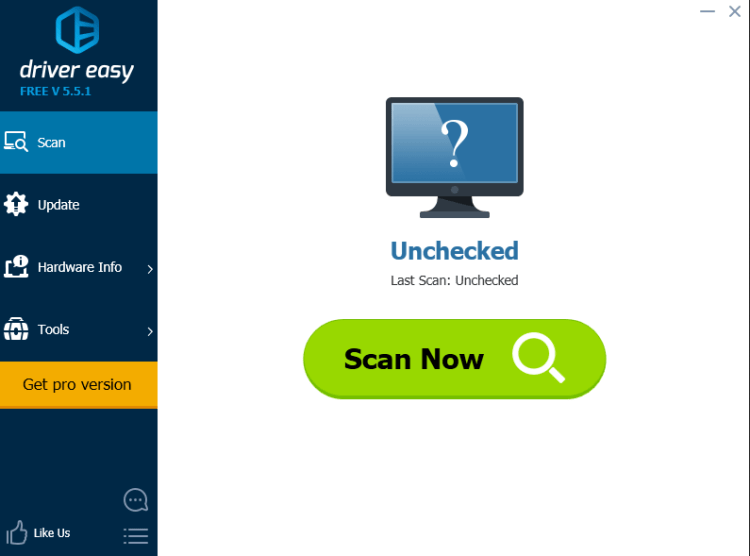
1). Download and install Driver Easy on its official website.
2). Run Driver Easy and click the Scan Now button. Driver Easy will then scan your computer and detect any problem drivers.
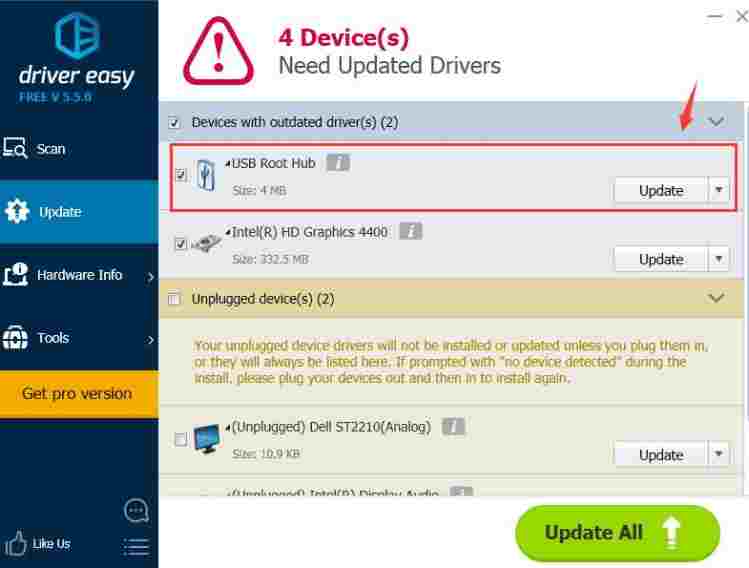
3). Then click the Update button next to the driver marked with a red arrow to automatically download and install the correct version of that driver (you can do this with the FREE version).
Alternatively, click Update All to auto-download and install the correct version of all the missing or outdated drivers on your system (This step requires the Pro version)
You will then be prompted to upgrade when you click Update All.
#6. Change USB Settings
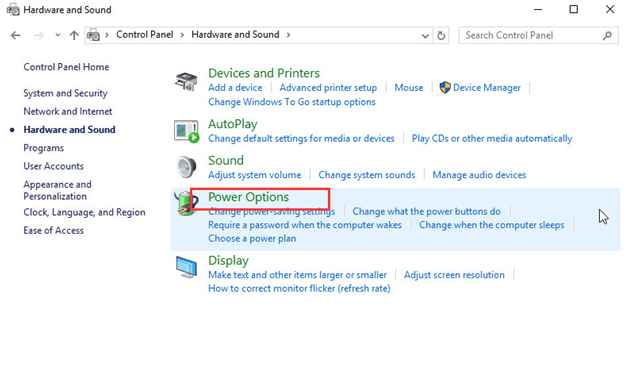
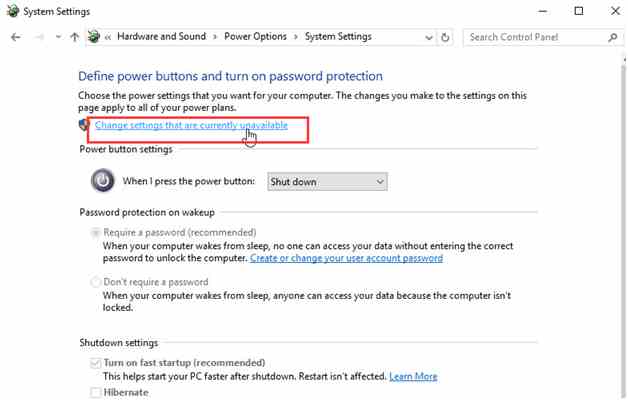
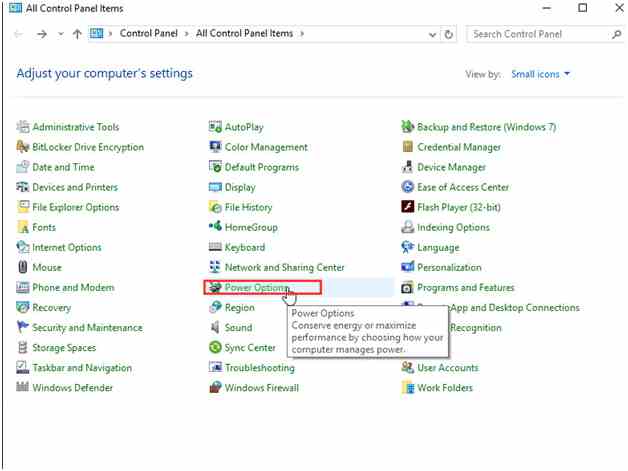
1). Follow these steps: Control Panel > Hardware and Sound > Power Options.
3). Click Change settings that are currently unavailable.
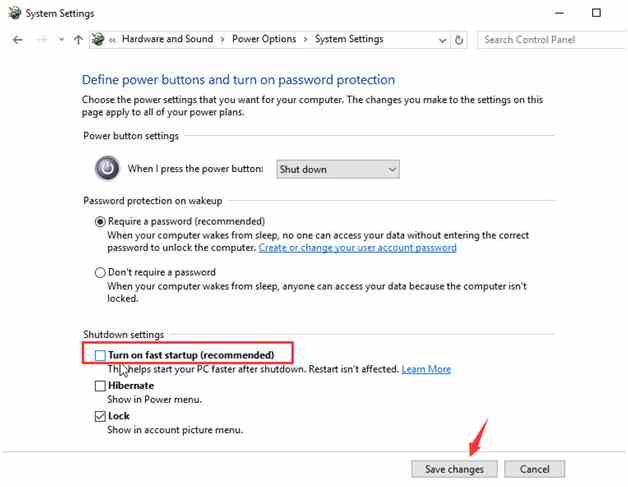
4). Uncheck Turn on fast startup and Save changes.
5). Next Restart your computer and try to plug your USB back in to see if it is working or not.
If your USB device still doesn’t work after this setting, please change the setting again and follow the next method below.
#7. Change the USB Selective Suspend Settings
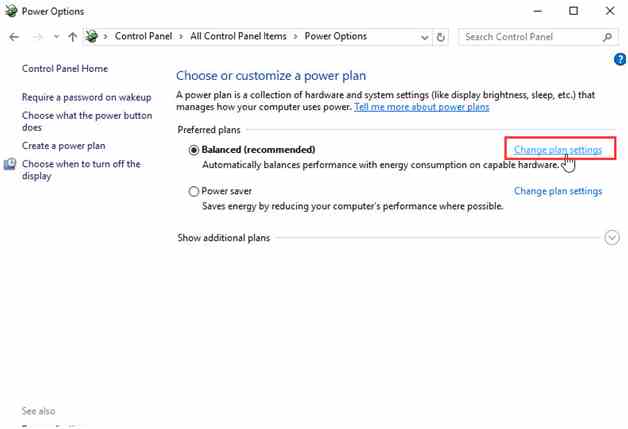
1). Open the Control Panel and click Power Options.
2). Click Change plan settings.
3). Click Change advanced power settings.
4). Go to USB settings and USB selective suspend settings.
Click OK and Apply.
Lost USB Data Recovery
The above are ways that you can use to fix and overcome USB Device Not Recognized. If one of the methods above is successful, you can access the USB and go back to using the data stored on it.
But sometimes, even though the USB Drive can be opened, it doesn’t find any data on it, aka all data stored on it, is lost. How to handle it?
In this guide, USB data recovery can be performed using EaseUS. Even when your USB device is registered in disk management but does not appear on your computer.
This EaseUS program can work properly on Windows 10/8/7 / XP and other versions. Please download first:
– Download EaseUS for PC
– Download EaseUS for Mac
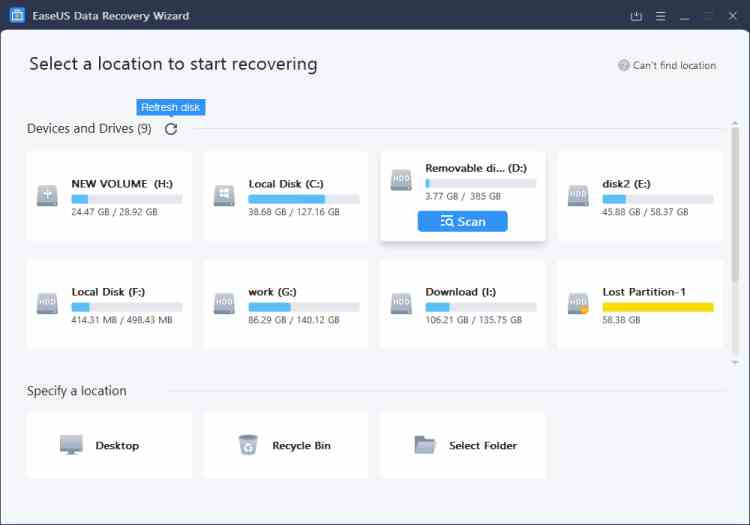
#Step 1: Run the USB Data Recovery Software
Connect the USB flash drive to your computer and run the EaseUS USB data recovery software on your PC. Select your USB drive marked as a removable disk, and click “Scan” to start finding your lost files.
#Step 2: Scan All lost files from the USB
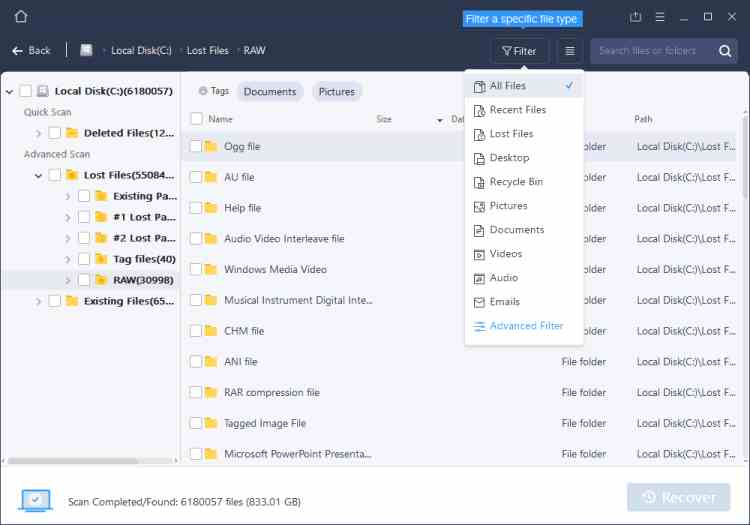
EaseUS Data Recovery Wizard will scan your USB flash drive thoroughly and find all your lost data on it.
After the scanning process, use the Filter feature to filter out specific file types. You can check and preview the USB files found in this program.
#Step 3: Restore All Lost Files from the USB
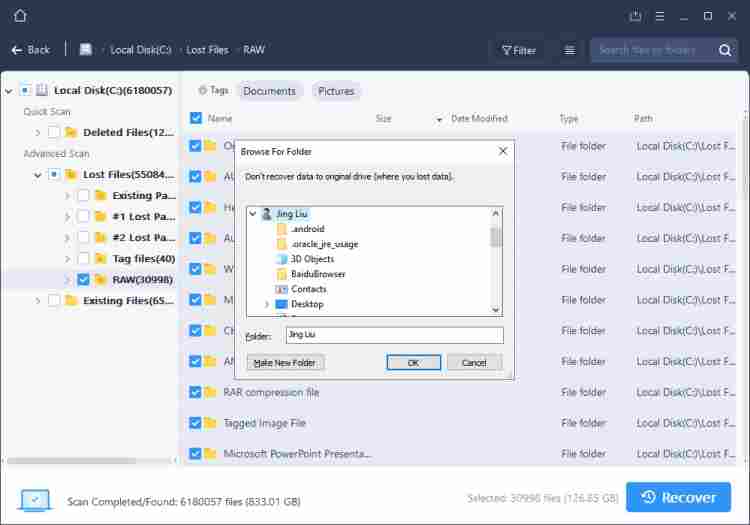
Double-clicking will allow you to preview the resulting file. Select the target file and click “Restore” to save it to a safe location on your PC or another external storage device.
To retrieve data from a USB device, we recommend that you save the captured files to another safe location in case of further problems.
Format USB to NTFS / FAT32 and Re-Create Partition on USB
Some people have serious problems more than once. Some of them experienced the USB Device Not Recognized problem again after being repaired.
If that happens, you can format and re-create a new partition again, the method is:
- Connect USB to PC, right-click on My Computer =>, and select Manage.
- Enter Device Manager, select Disk Management, locate and right-click on your USB which is not working, and select Format volume.
- Complete the Format process and set the file system to NTFS or FAT32.
Now you can check whether the Flashdisk has been read on your laptop or not, if not then continue with the steps below:
- Open Disk Management, right-click on USB, and select Erase Volume, complete the process.
- When the USB shows unallocated, right-click and select New Simple Volume, set the drive letter and file system (NTFS / FAT32), and complete the process.
Read more:
- 6 Ways to Fix Wireless Capability Is Turned off In Windows PC
- What is The Definition of Software Functions Are Discussed
- How to Take Screenshots on Windows 10 Laptop PCs
Conclusion:
This is an explanation of 7 ways to fix USB devices that are not recognized or readable. After this process, the unreadable Flashdisk problem that you experience should be resolved, and you can save data again.


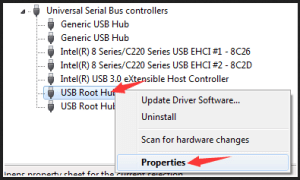
 2). Click the down arrow to open Universal Serial Bus controllers. Right-click on the USB Root Hub option and click on Properties.
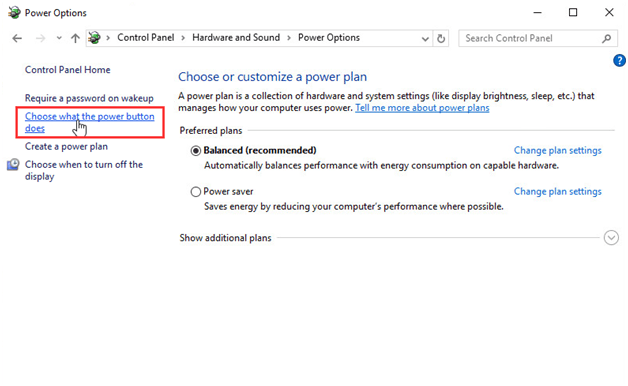
 2). Click Choose what the power button does.
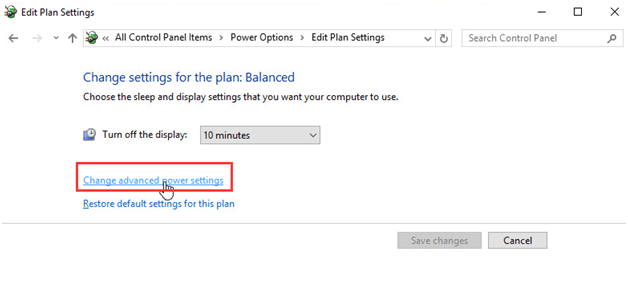
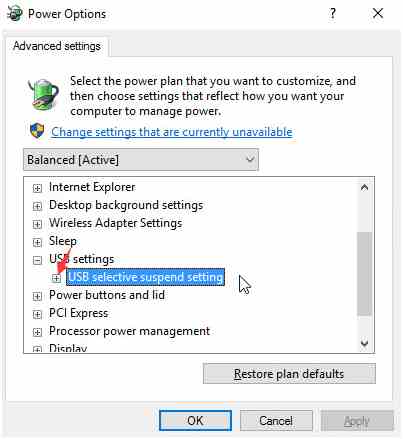 5). Disable Power Buttons and Plugged in Settings.
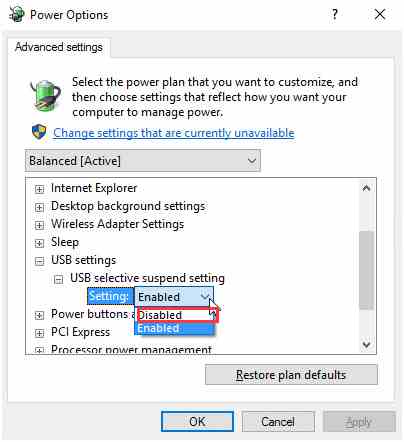


![6 Ways To Fix System Service Exception in Windows 10 [2025] 6 Ways To Fix System Service Exception in Windows 10](https://technowizah.com/wp-content/uploads/2021/08/6-Ways-To-Fix-System-Service-Exception-in-Windows-10-218x150.jpg)


![10+ Ways To Take Screenshot on Asus Laptop Windows 10 [2024] How To Take Screenshot on Laptop and PC Windows](https://technowizah.com/wp-content/uploads/2020/06/How-To-Take-Screenshot-on-Laptop-and-PC-Windows-100x70.jpg)
