- 1 How to Stop Windows 10 Update on Laptop PC
- 1.1 #1. Advantages of Not Updating Windows
- 1.2 #2. Disadvantages of Not Updating Windows
- 1.3 #3. How to Deactivate Windows Update Forever
- 1.4 #3. Disable Using Delivery Optimization Service
- 1.5 #4 Disable Windows 10 Update via Services
- 1.6 #5 Disable Using the WUB Application
- 1.7 #6 Terminating with PowerShell Command
- 1.8 #7 Stopping with Regedit
- 2 FAQ
- 3 Conclusion:
How to Stop Windows 10 Update on Laptop PC
Here’s How To Stop Windows 10 Update on PC Laptop – Windows 10 is what I often see on new laptops on the online and offline market.
👉 Read Also:
- Best Tricks To Activate Windows 10 Permanently Offline
- How to Install and Use iCloud on Windows 10 (Effective)
- How to Get the Windows 10 Update via Windows PC
- How to Transfer a Windows 10 License to Another PC
Among these products, there will be an automatic update feature, which is very annoying. You can turn off Windows Update.
Regarding how to disable Windows 10 updates, you can do it permanently by stopping active services on the Windows network.
There are advantages and disadvantages if you want to following the steps to turn off Windows 10 updates. The following is the explanation below.
#1. Advantages of Not Updating Windows
- You don’t need to worry if your cellphone internet package is sucked in.
- The laptop isn’t slow because the update process is usually in the background.
- There is no notification to update the Windows operating system.
#2. Disadvantages of Not Updating Windows
- Does not have the look and new features provided at the time of the automatic update.
- There is no official support from Windows itself.
- Has several obstacles, including the driver.
- Several components are damaged because the OS doesn’t update.
- Not only damage, but the software that has access to official Windows can no longer be used.
Maybe that’s the only advantage and disadvantage if you don’t update Windows. There are many more, but it’s your right to decide which one to choose, update or not.
If you want to update, you can just come to the free wifi then just update.
But in my opinion, not just yet, if the current operating system can still be used and the problem is only the waste of quota.
You can overcome the Windows update that is running permanently below.
#3. How to Deactivate Windows Update Forever
You will feel irritated if there are continuous notifications about being asked to update Windows 10.
So that Windows doesn’t update automatically, you can immediately do the following tutorial.
#3. Disable Using Delivery Optimization Service
The service menu in Windows is often used to manage all kinds of opportunities.
One of them is to stop Windows from updating continuously.
Therefore you can see the shutdown steps below.
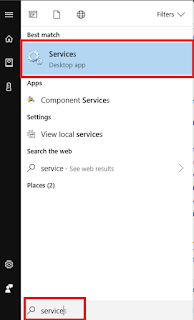
First, you must enter the Windows default service. The trick is to just press the Windows key / Start Menu -> Type Services -> Enter.
Second, you will enter the program. Here you just need to open two programs to shut down.
The first program is called delivery optimization and the second is called Windows update.
Read more: Top cool tech gadgets
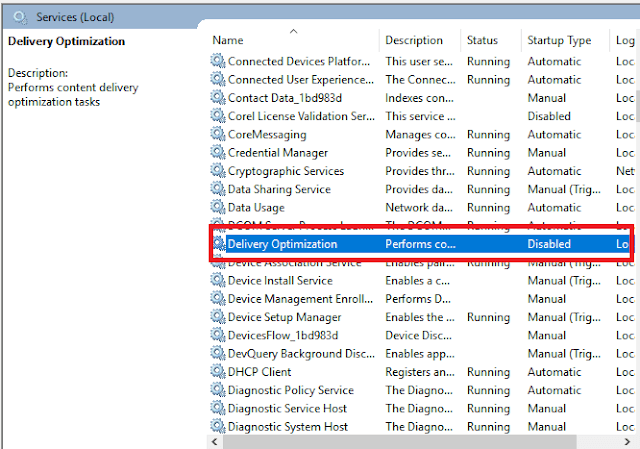
Third, for the Windows auto-update process to stop perfectly, turn off the first program by looking for a program whose name is Delivery Optimization.
Fourth, double-click the program, and a new popup will appear.
Then click on Startup type changed to disable then click on service status changed to stop -> Then click Apply then OK.
Fifth, it’s finished disabling delivery optimization.
Then try step number 2.
#4 Disable Windows 10 Update via Services
If the previous deactivating step was to stop the Delivery Optimization process, then in this second step directly on the Windows Update menu.
This can be useful for overcoming the internet quota on wasteful laptops.
First, the steps you have to do first to stop Windows updates are as follows.
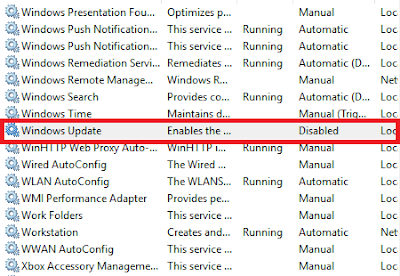
Still in the service menu, scroll down then look for an option called Windows Update.
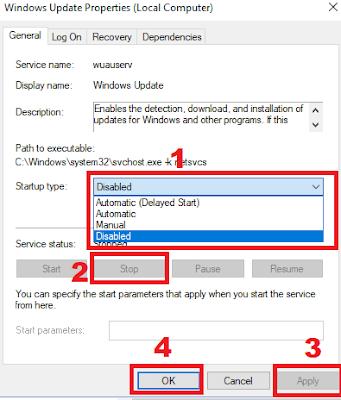
Second, just double-click on the service, and a popup window will appear.
Next, click on the Startup type to be Disable, click Stop then click Apply and OK.
Third, try restarting your laptop now and then entering service again to ensure that the Windows update has been successfully stopped.
If the two services above are still running again, it means that they must be followed up using method number 3.
#5 Disable Using the WUB Application
The third way not to update automatically is that you can use application help. You don’t need to mess around with Windows services to disable it.
The reason is, when using this application you only need to install then press the button in the application, of course, automatic updates have been removed, the tutorial is below:
First, please download the WUB application or Windows Update Blocker via the link here: Download WUB.
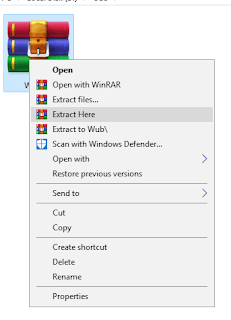
Second, if it’s still in rar form, you must first extract it using WinRAR.
Go to Download Location -> Right Click -> Extract Here -> Done
Third, please enter the WUB v1.1 folder. There is already an application there, take it easy, it’s safe because I’ve used it on my laptop.
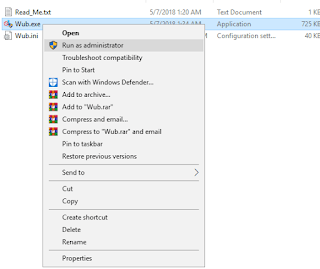
Fourth, right-click on wub.exe, then right-click – Run As Administrator, there will be a prompt, select Yes.
Fifth, select the bullet next to the words Enable service. Don’t forget to check the Protect Service Settings section.
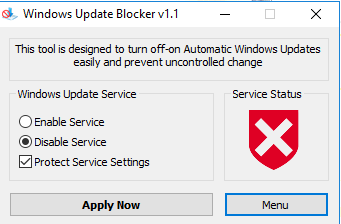
Congratulations Windows, you won’t have any more update notifications and you will save more on your internet quota.
#6 Terminating with PowerShell Command
The PowerShell command itself is a CMD application. Often called CMD instead of the PowerShell command.
How to use CMD to stop Windows 10 updates:
1. Open the start menu.
2. Type CMD.
3. Right-click then Run As Administrator.
4. Enter the following command:
| stop-service wuauserv set-service wuauserv –startup disabled |
5. To be sure, you can check via CMD as well with the following command:
| get-wmiobject win32_service –filter “name = ‘wuauserv'” |
If so, the Start Mode will be disabled and the State will stop.
To restore the windows update service you can use this command:
| wuauserv set-service – manual startup start-service wuauserv |
#7 Stopping with Regedit
The Regedit menu is a collection of pending files that Windows builders can work with.
So that Windows doesn’t update, you can edit a file in the Regedit program.
Generally, it will be like this:
1. Press the Windows icon + R then type Regedit and then Enter.
2. Then find the folder by going to HKEY_LOCAL_MACHINE \ SOFTWARE \ Policies \ Microsoft \ Windows.
3. Then on a blank page on the right, Right-click then New, and finally select Key.
4. Then name the file WindowsUpdate.
5. In the WindowsUpdate folder, right-click -> New -> Key _ gives the name AU.
6. Right-click Key AU to create a DWORD value given the name NoAutoUpdate.
7. Then double-click on NoAutoUpdate set it to 1 and hit OK.
Now it’s turned off and you can check it in Settings> Update & security> Windows Update then check for updates.
FAQ
Is it better to update it or not?
If your storage space and PC hardware components support it.
Better to update it, because the Windows OS will increase stability and security patches.
What versions of Windows 10 can apply this?
You can apply the above method on Windows Pro, Home, Enterprise, and others.
Because the entire appearance of the Windows 10 series is the same, as in this guide.
Read more:
- 9 Ways to Fix No WiFi Networks Found Windows 10 PC
- 6 Ways To Fix a Microphone Not Working Windows 10 PC
- 6 Easy Steps To Enable Hibernate In Windows 10
Conclusion:
If you still experience the same thing, you can use the application to permanently disable the Windows 10 Update Assistant. You can say that permanently there will be no update notification, you are already free from it all.


![8 Ways to Fix The Hosted Network Couldn’t Be Started in Windows 10 [2026] 8 Ways to Fix The Hosted Network Couldn't Be Started in Windows 10](https://technowizah.com/wp-content/uploads/2021/07/8-Ways-to-Fix-The-Hosted-Network-Couldnt-Be-Started-in-Windows-10.jpg)


Thank you for sharing this post and I hope keep posting more articles.