10 Ways to Fix DNS Server Isn’t Responding Error Windows PC – We will try to explain about The DNS Server Isn’t Responding Error with some troubleshooting steps to fix this error.
- 1 10 Ways to Fix DNS Server Isn’t Responding Error Windows 10 PC
- 2 What is DNS Server Isn’t Responding Error on Windows 10?
- 3 How to Fix DNS Server Isn’t Responding Error on Windows 10
- 3.1 #1. Restart the Web Browser
- 3.2 #2. Restart Computer/Router
- 3.3 #3. Reset DNS Settings
- 3.4 #4. Change DNS Server Manually
- 3.5 #5. Enter MAC Address Manually
- 3.6 #6. Install the Latest Drivers
- 3.7 #7. Disable Unused Network Adapters
- 3.8 #8. Disable Antivirus And Firewall
- 3.9 #9. Disable Windows Update Peer-To-Peer Feature
- 3.10 10. Wait for the ISP to fix it
- 4 Conclusion:
10 Ways to Fix DNS Server Isn’t Responding Error Windows 10 PC
What is DNS Server?
DNS stands for Domain Name System. It is an important part of the internet for translating domain names like monitortechnology.com into machine-readable IP addresses.
Read more:
- 8 Ways to Fix Mouse Scroll Not Working in Windows 10 PC
- 5 Ways to Fix Problem Resetting Your PC on Windows 10 Laptop
- 10 Lightest and Best Android Emulators for PC and Mac
- 6 Ways to Fix Werfault.exe Application Error in Windows 10 PC
Simply put, every time you enter a URL in a web browser, the DNS server looks for the IP address associated with the domain name. After matching the IP address with the Domain. So here DNS plays an important role in connecting you to websites.
What is DNS Server Isn’t Responding Error on Windows 10?
When you try to connect your computer or device to the internet, sometimes you face problems accessing any website. You get errors like ‘DNS server isn’t responding, ‘DNS Not found’, etc. It causes you to not be able to connect to any site even after getting internet access.
It also signifies that your device failed to connect to possible hosts for various reasons. The problem may be with the device configuration, or the DNS server is not available. But usually, this error mostly occurs because of DNS conflicts.
How to Fix DNS Server Isn’t Responding Error on Windows 10
If you get an error message like ‘DNS server isn’t responding’ but you don’t know how to fix it, don’t worry. In this article, we will share some of the best methods to fix DNS servers that aren’t responding to errors on Windows 10 computers.
This method can fix most of the DNS-related issues on Windows 10 computers. So, let’s check how to fix the ‘DNS Server Not Responding error message.
#1. Restart the Web Browser
This is the first thing you should do after getting DNS-related errors. You just need to restart your web browser. A simple restart can fix most browser-related issues including the DNS server isn’t responding. So, make sure to restart your web browser before following the next method.
#2. Restart Computer/Router
If restarting the browser doesn’t help, then you should restart your Windows 10 PC. Also, make sure to restart the router. Restarting the device will fix many problems automatically. After restarting, try again to see if you still get the DNS error or not.
#3. Reset DNS Settings
Windows 10 tends to save links to websites you visit. This is done to prevent DNS lookups every time and this can increase the loading speed of a site. Sometimes DNS cache gets corrupted and because of that, we can see errors like ‘DNS Server isn’t responding. Follow the steps below to do this:
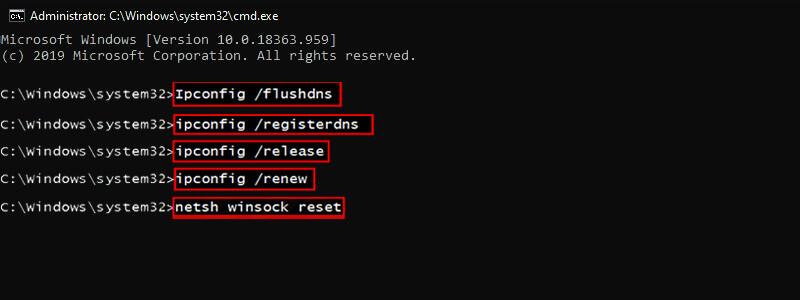
1. Open Command Prompt, you can use the Windows key + R shortcut then type CMD or you can search in the Windows search menu.
2. After the Command Prompt window opens, type the following commands one by one:
- Ipconfig /flushdns -> press Enter.
- ipconfig /registerdns -> press Enter.
- ipconfig /release -> press Enter.
- ipconfig / renew -> press Enter.
- netsh winsock reset -> press Enter.
3. Finally, restart your operating system to see the changes.
#4. Change DNS Server Manually
As we know, every website that we search on the web browser is resolved using DNS Server. When you try to access a certain website, you will automatically connect to your ISP’s DNS server.
Sometimes, some sites fail to load when the DNS server fails to respond. In this case, you need to change your DNS server to OpenDNS or Google DNS. This is a fairly simple step, and you can do it by following these steps:
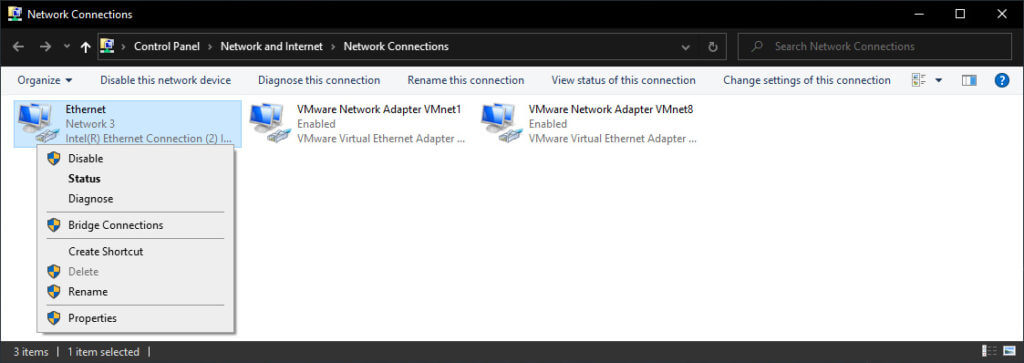
1. Open Network Connections. You can do this by pressing Windows Key + X on your keyboard and selecting the Network Connections option.
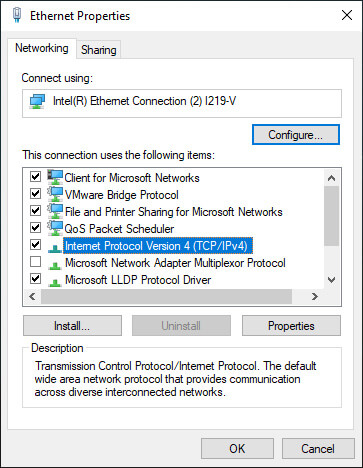
2. Find the network connections you are using, right-click, and select Properties from the menu.
3. When the Properties window opens, select Internet Protocol Version 4 (TCP/IPv4) and click the Properties button.
4. Now select the option Use the following DNS server addresses.
5. In the Preferred DNS server field enter 8.8.8.8. As for the Alternate DNS server, you must enter 8.8.4.4. If you want, you can also use 208.67.222.222 as Preferred and 208.67.220.220 as an Alternate.
6. When finished, click OK to save changes.
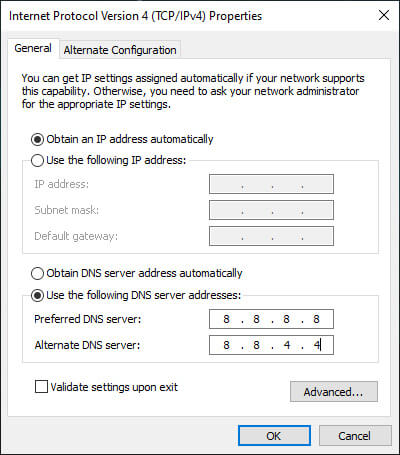
7. Finally, disable the network adapters, then re-enable them.
Once you are done changing the DNS server, check if the problem is resolved. Bear in mind that changing the DNS server, might make your Internet connection a little slower depending on your location, so you may want to opt for a different DNS server.
#5. Enter MAC Address Manually
To enter your MAC address manually, you have to find it first. To do this, follow these steps:
1. Press the Windows key + R then type cmd, then press CTRL+ SHIFT + Enter to open cmd in administrator mode.
2. When the Command Prompt window opens, enter the command ipconfig /all and press Enter.
3. A list of information will now appear. Find the Physical Address and write it down.
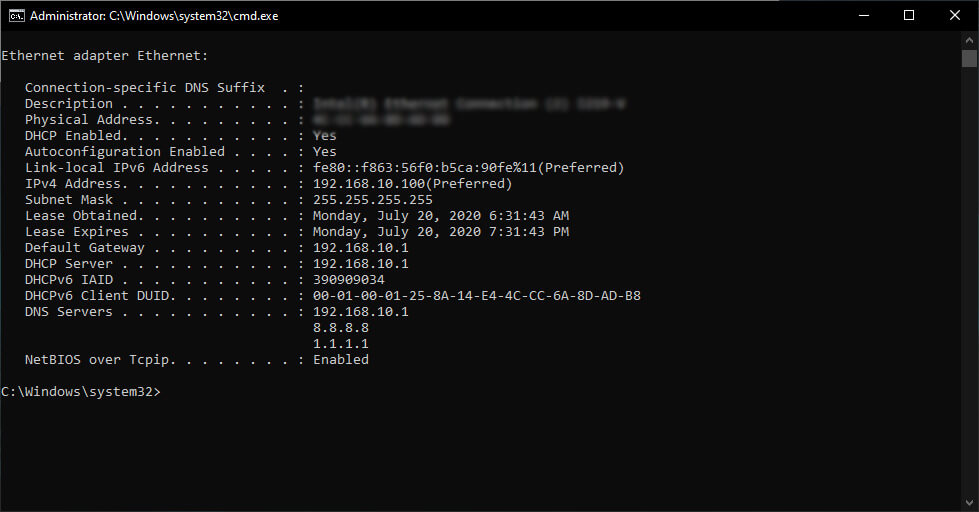
4. Close Command Prompt.
After knowing the MAC address, now you need to configure your network connections. To do this, follow these steps:
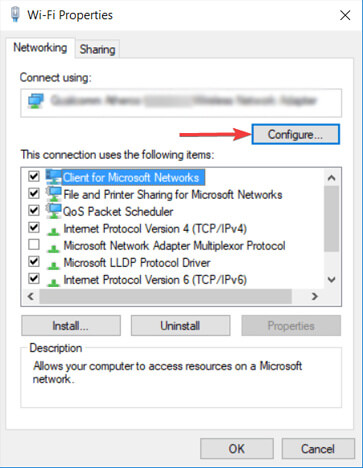
1. Open the Network Connections window. Find your connection and open its properties.
2. When the Properties window opens, click Configure.
3. Go to the Advanced tab and select Network Address from the Property list.
4. Now select Value and enter the MAC address that you got from the Command Prompt.
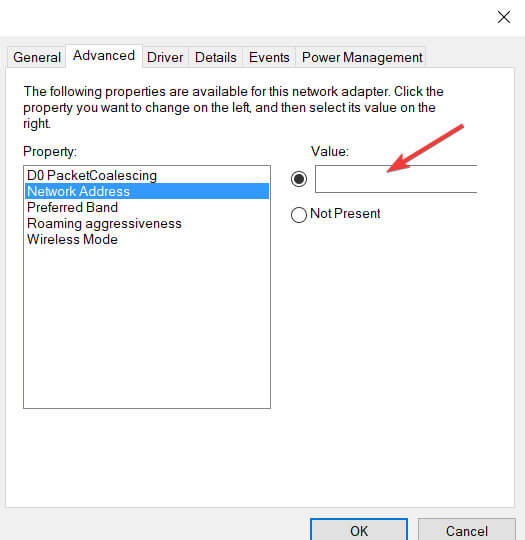
5. Click OK to save changes.
#6. Install the Latest Drivers
Your network adapters depend on drivers to function properly, and if you’re having issues with them, it’s probably because of your drivers.
To fix DNS server errors on Windows 10, you have to visit the website of your network adapters manufacturer, download the latest drivers and install them on your PC.
Downloading drivers manually can cause damage to your computer if you download the wrong version. Admin highly recommends doing it automatically. You can use an application like Driver Booster.
But if you can’t access the Internet at all, it might be caused by an unavailable DNS server, so you have to download the driver on a different device and install it on your PC.
#7. Disable Unused Network Adapters
Some users have claimed that they fixed DNS errors and regained access to the internet by disabling unused network adapters. Just follow some simple steps given below to disable the network adapter in Windows 10.
1. Open the Network Connections window and disable all connections except the active network connection.
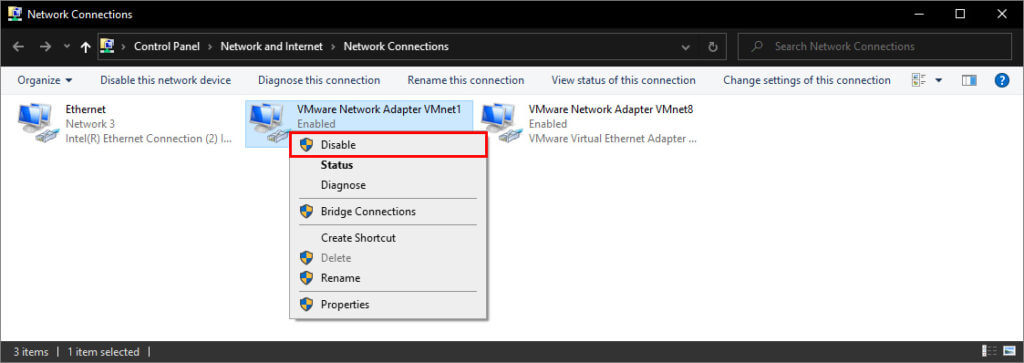
2. To do that, simply right-click the connection you want to disable and select Disable from the menu.
#8. Disable Antivirus And Firewall
Enabling an antivirus and firewall is necessary if you want to protect your PC from malicious users, but sometimes your antivirus and firewall can interfere with your Internet connection. To fix DNS server connection issues on Windows 10, try temporarily disabling your antivirus and firewall apps.
Keep in mind that your PC will still be protected by Windows Defender even if you disable your antivirus, so there’s no need to worry about your security.
If your antivirus or firewall application is causing this problem, make sure to change its configuration or switch to another application.
You can also try disabling the firewall on your router. This is a rather dangerous solution. Because by disabling the router’s firewall, your PC will be really vulnerable. If you decide to do so, simply disable your router’s firewall temporarily and check if that fixes the problem.
If the problem is your firewall, you need to turn it back on and check your firewall configuration for the source of the problem.
#9. Disable Windows Update Peer-To-Peer Feature
Windows 10 has a new feature that helps save download bandwidth. This is a new peer-to-peer (P2P) delivery update mechanism. Using the P2P option, you can download a Windows update once, then use that machine to deploy the update to all computers on your local network.
You can also download Windows updates from other users in your area. This feature can interfere with DNS, and disabling it might fix the “DNS server is not responding” error. To do this, follow these steps:
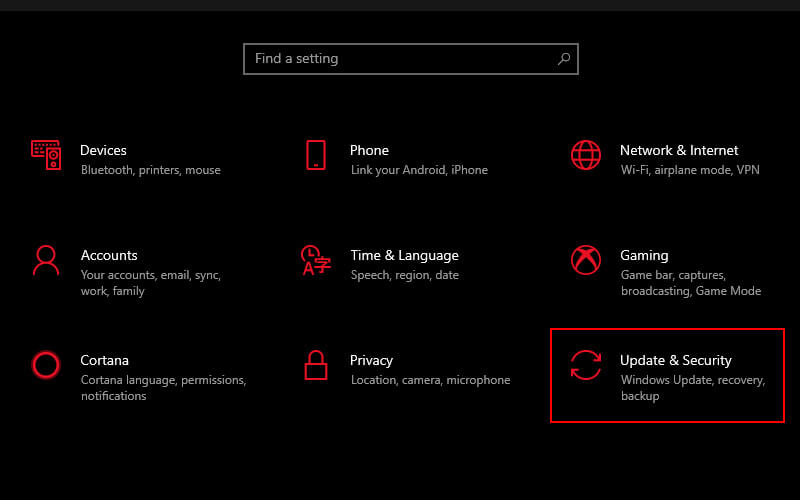
1. Open the Windows Settings app and select “Update & Security”.
2. Find “Advanced options” under “Update settings” and click it.
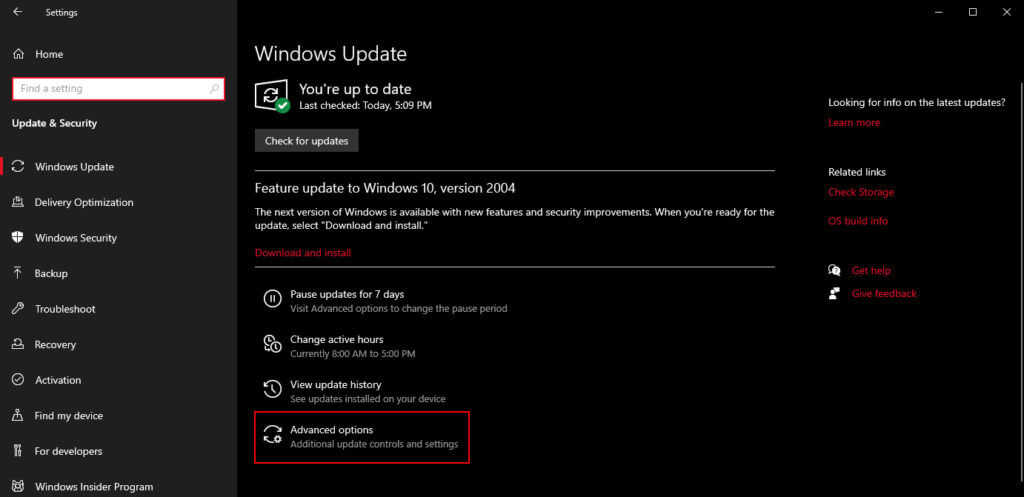
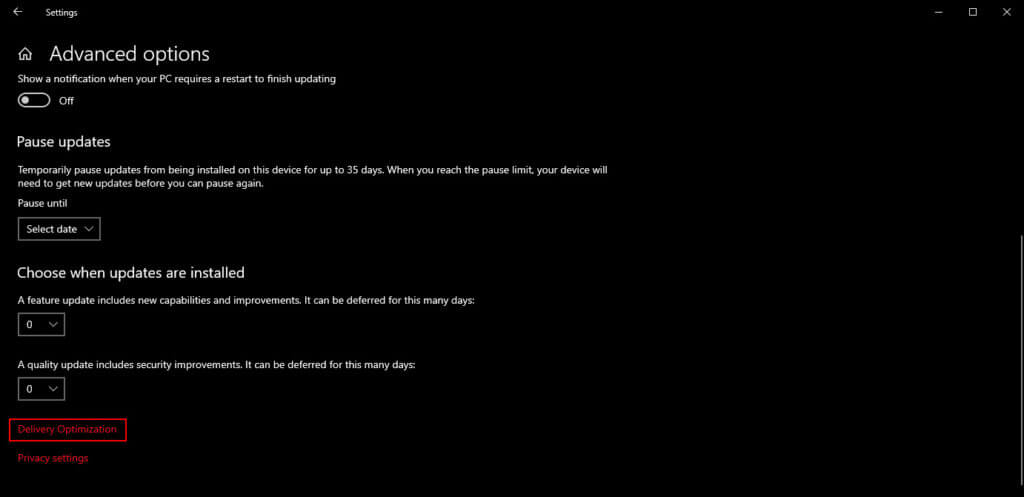
3. In the Advanced options window, click “Delivery Optimization”.
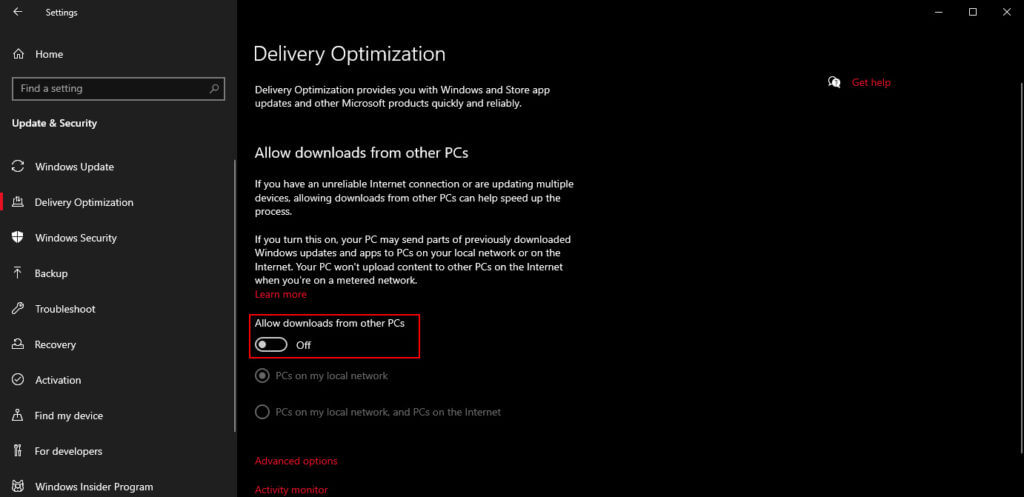
4. In the Delivery Optimization window, turn off the “Allow downloads from other PCs” option. Check if the “DNS server is not responding” error is gone.
10. Wait for the ISP to fix it
Sometimes DNS server is not responding errors can be caused by your ISP. Your ISP may be experiencing some issues, so you may have to wait a few hours while your ISP resolves the technical issues.
The DNS server is not responding error will prevent you from accessing the Internet, but you should be able to fix it by using one of the solutions above.
Read more:
- 5 Ways to Fix Mouse Double Click Issues on Windows 10 PC
- How to Turn Off Laptop Keyboard on Windows 10 PC
- 8 Ways to Fix Windows 10 Start Menu Not Working PC
Conclusion:
This is the explanation of 10 ways to fix the DNS server that isn’t responding to errors on a Windows PC, We hope that the method described above helped you fix the “DNS server is not responding” error and you can now connect to the Internet without any network connection issues.
If none of the solutions above work, the error may be caused by your Internet Service Provider. Wait for your ISP to fix the technical problem and try connecting to the internet again after a few hours
![8 Ways to Fix The Hosted Network Couldn’t Be Started in Windows 10 [2026] 8 Ways to Fix The Hosted Network Couldn't Be Started in Windows 10](https://technowizah.com/wp-content/uploads/2021/07/8-Ways-to-Fix-The-Hosted-Network-Couldnt-Be-Started-in-Windows-10.jpg)
