8 Ways to Fix Windows 10 Start Menu Not Working – Is now your Windows 10 Start menu search bar can’t be opened or clicked? If so, take it easy, because this time the admin will provide several ways to overcome the Windows 10 Start Menu not working so that you can use it normally again.
How to Fix Windows 10 Start Menu Not Working
If you want to do a quick search on your Windows 10 PC, you use the Start Menu. But when you try to click on the search bar, you find that the feature doesn’t work.
Read more:
- 15 Best PSP Emulators for Android iPhone Windows PC
- 5 Best Free Antivirus for Windows 10 Laptop PC (100% Free)
- 10 Best Free Calendar Apps for Windows PC Laptop
- 11 Best Download Managers For Windows PC Laptops
Make no mistake, even though Windows 10 is a phenomenal operating system, it is still prone to many errors, such as the Start menu search not working. In the following, you will learn how to fix Windows 10 Start Menu not working.
How to Fix Windows 10 Start Menu Not Working
While there’s still no definitive explanation as to what causes the Windows 10 Start menu search to stop working, we’ve rounded up some of the best methods to get rid of it, starting with removing the latest Windows Update.
#1. Uninstall Windows 10 Updates
Updates play an important role in the Windows 10 environment. Regular updates are necessary to fix all kinds of bugs that appear in any software, and more importantly, to fix security holes that make programs a target for malicious hackers.
But often, updates can also be the cause of some system crashes in Windows 10. So, if your Windows 10 Start menu search doesn’t work after updating, you need to uninstall the update. To get started with rolling back updates, follow the steps below:
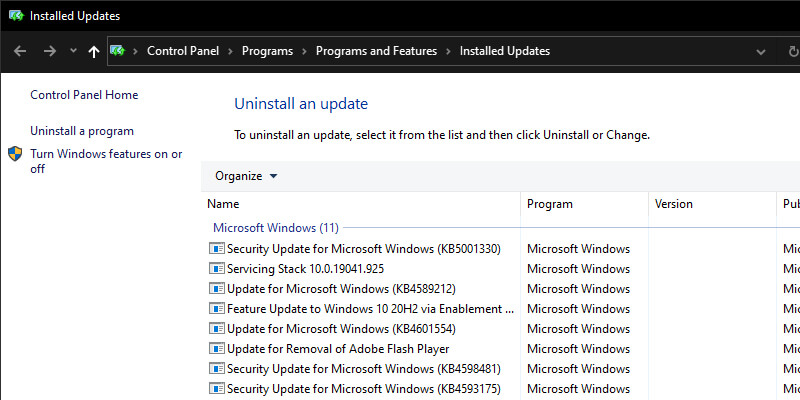
- Go to Windows Settings > Update & Security > Windows Update.
- Once there, click View update history > Uninstall updates.
- From the list of updates, right-click on the latest update and click uninstall to remove the update.
If the Start menu search starts working after uninstalling the update, then the update is the cause of the problem. But wait, does this mean you can’t update Windows 10 anymore? Not exactly. Microsoft is famous for releasing buggy updates.
Whenever a new update comes, usually it brings a lot of problems with it. But since updates are important for security, you can’t avoid installing them either. In such a situation, you can use the Windows search tool. free. As soon as Microsoft fixes the bug, you can start using the Windows search bar again.
#2. Run SFC System Scan
All systems are susceptible to accidental data loss, which will result in the breakdown of important functions. You can use an SFC (System File Checker) scan to fix your computer in such situations. This is a free tool from Microsoft designed to find and repair corrupted Windows 10 files.
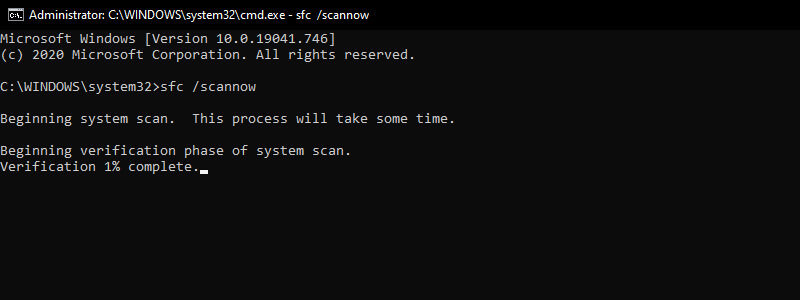
- Press Windows key + R type cmd then press CTRL + SHIFT + Enter to open Command Prompt as administrator.
- Once the Command Prompt opens, type the command sfc /scannow and press Enter.
- SFC will check your entire computer for corrupted files and other problems.
If it finds anything, it will try to repair the corrupted files. Give it a few minutes for the scan and repair to complete, and if Windows 10’s Start menu search doesn’t work due to corrupted system files, the problem will be fixed for good. If not, don’t worry, you can move on to the next method.
#3. Reset File Explorer
File Explorer, formerly known as Windows Explorer, is a file manager application that provides a graphical user interface for managing Windows file systems. To make sure that File Explorer doesn’t affect the smooth running of the Start menu search, it’s not a bad idea to reboot it. Here’s how you do it:
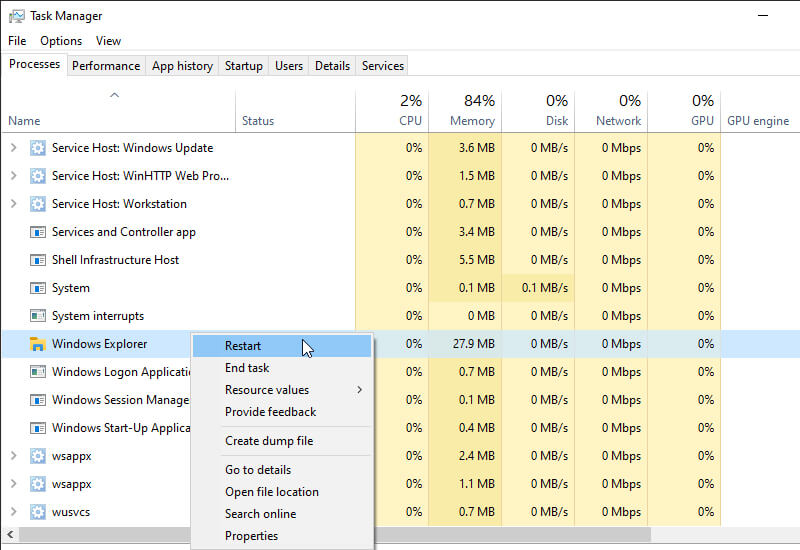
- Press Ctrl + Alt + Delete to open Task Manager. Next, click on the Task Manager option.
- Click More Details to see all programs and background processes running in the background.
- Right-click on Windows Explorer and select Restart.
File Explorer along with the Start menu search box will reboot quickly. But if your Windows Start menu search is still not working, don’t give up just yet. Try one of the other fixes below.
#4. Turn off Cortana
Due to unknown issues, Windows programs are prone to crashing. If you are using Cortana for your search, maybe your Start menu search is not working due to some issues with Cortana. To make sure that’s not the case, a quick restart will probably fix the problem. To do this, follow the instructions below:
- Press Ctrl + Alt + Delete and select Task Manager.
- Right-click the Cortana process and select End Task.
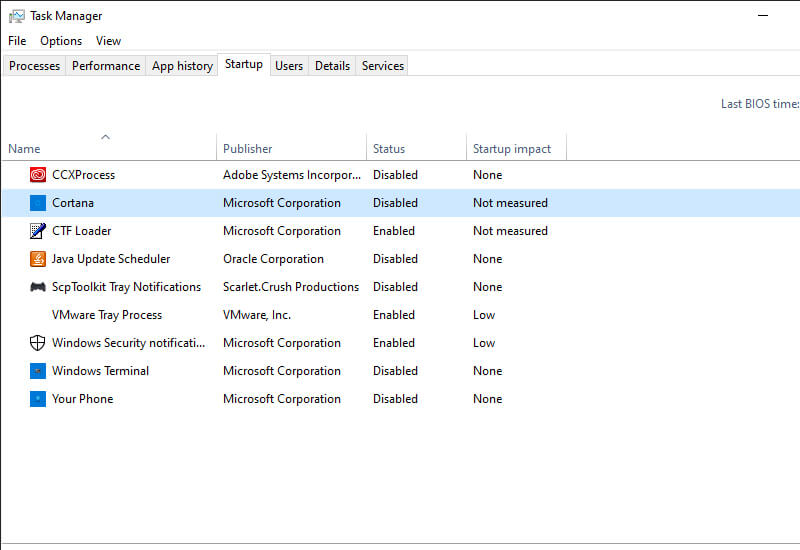
- Still in the Task Manager, go to the Startup section.
- Right-click on Cortana then select Disable.
- This will close or kill the Cortana app.
If Cortana is the cause of the problem, then you should not face any problems with the Start menu search after this.
#5. Reset the Entire Start Menu Search Bar
This guide contains many resets. If your Start menu search is still not working, then you can try a reset. Note that you have to reset all the pre-installed and later installed apps along with the Start menu. For that, you have to use Windows PowerShell (with administrative privileges) for this one.
- Press the Windows key + R to open the Run box. There, type PowerShell and press CTRL + SHIFT + Enter.
- In the PowerShell terminal, type the following command: Get-AppXPackage -AllUsers | Foreach {Add-AppxPackage -DisableDevelopmentMode -Register “$($_.InstallLocation)\AppXManifest.xml”}
- This command will install native Windows applications, including the Start menu search.
Wait for the command to be fully executed, and once it’s done, restart your computer for the changes to take effect. Windows 10’s start menu search should work now.
#6. Open Windows Search Service
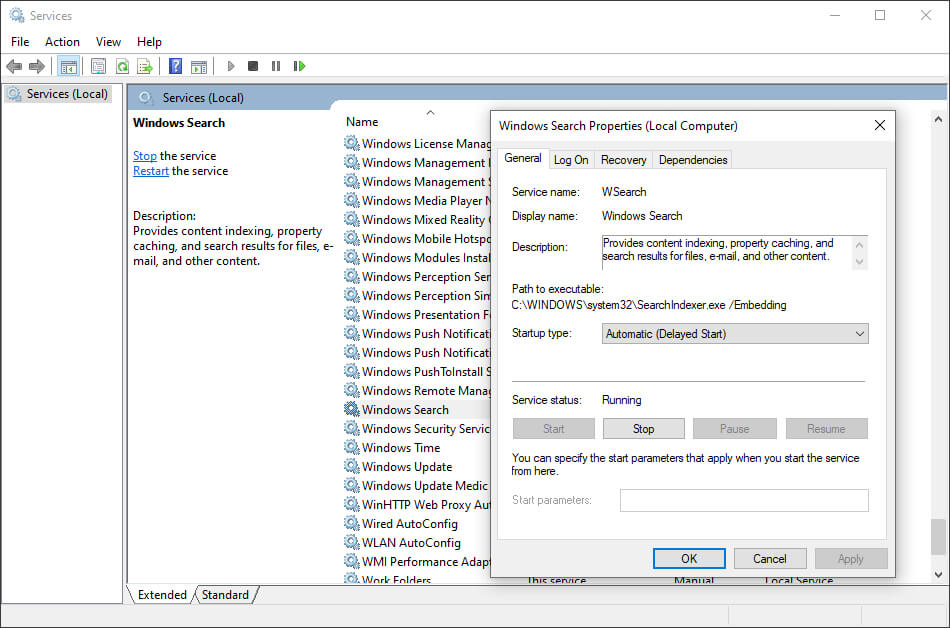
Another possible reason your Start menu search is not working is that the Windows Platform Search service that indexes content on your Windows computer has stopped working. To make sure that’s not the case, open Windows services.msc. Here’s how you do it:
- Press the Windows Key + R shortcut to open Run, type services.msc, and press Enter.
- Find the Windows Search program in the list and check its status, it should be set to running. You have to start again otherwise.
- Right-click on Windows search and select Properties. From there, click Start to start the service e. Also, set the Startup type to Automatic.
- Finally, click OK to apply the changes.
#7. Run Windows Troubleshooter
Windows Troubleshooter is another free utility from Microsoft. This can be useful for dealing with minor bugs on your Windows device, such as update issues, app crashes, and more. Running the Troubleshooter will help you fix the Start menu search problem. Follow the steps below to do this:
- Press the Windows key + R to open the Run window.
- Type control and press Enter to open the Control Panel.
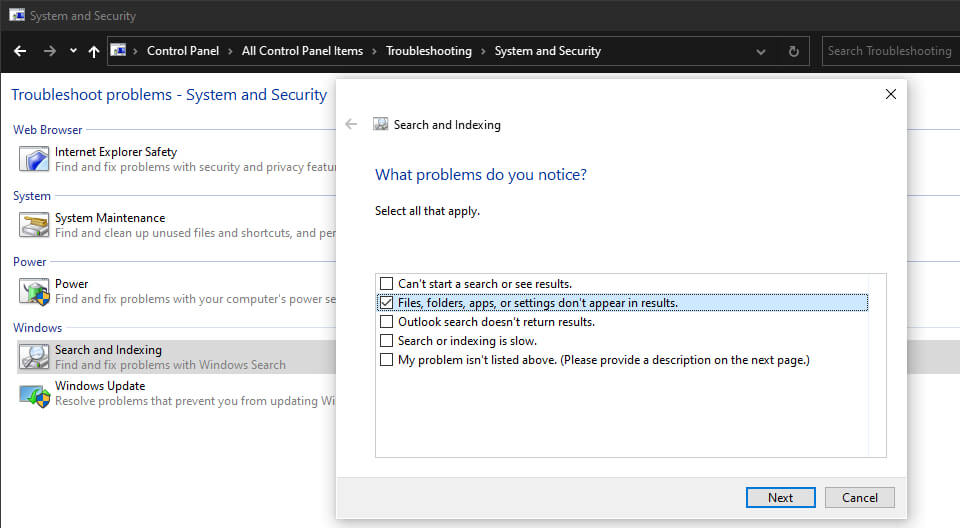
- Click Troubleshooting > System and Security > Search and Indexing.
- Now, click Next and check Files, folders, apps, or settings don’t appear in the search result.
- Click Next to continue scanning.
This tool will automatically scan and fix any problems it finds, including fixing the Start menu not working properly.
#8. Do a Factory Reset
Alright, so this is the last method. And with good reason too. Remember, only continue with this solution after you have tried all the methods from above. Why? Because Factory Reset does exactly what it says in its description: it will wipe your Windows operating system and then install it again. This will make your Windows like new.
You can apply Factory Reset in two ways. First, you can do a full reset and delete the operating system and all files from your system, or the second method, you can keep your files and only the operating system will be deleted.
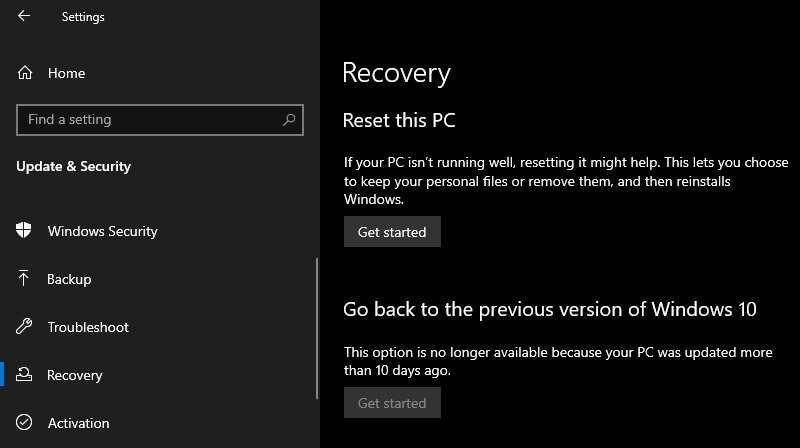
- To get started, go to Settings > Update & Security > Recovery. Under the Reset, this PC heading, click Get Started.
- Select Reset settings and follow the simple steps to complete Factory Reset.
- Factory Reset will format your entire PC to make it almost new, without any additional files and applications
Read more:
Conclusion:
This is the explanation of 8 ways to fix the Windows 10 start menu not working, I Hope this short guide helped you fix your problem. Although the cause of the error is not known with certainty, now you know how to get rid of it.





![6 Ways To Fix System Service Exception in Windows 10 [2025] 6 Ways To Fix System Service Exception in Windows 10](https://technowizah.com/wp-content/uploads/2021/08/6-Ways-To-Fix-System-Service-Exception-in-Windows-10-218x150.jpg)


![10+ Ways To Take Screenshot on Asus Laptop Windows 10 [2024] How To Take Screenshot on Laptop and PC Windows](https://technowizah.com/wp-content/uploads/2020/06/How-To-Take-Screenshot-on-Laptop-and-PC-Windows-100x70.jpg)
