6 Ways To Fix Microphone Not Working Windows 10 PC – Initially, a microphone (or microphone in English) was used to amplify the human voice to be heard in front of the public.
- 1 How to Fix Microphone Not Working Windows 10 PC Laptop 2024
- 2 fix the Microphone not working Windows 10
- 2.1 Solution # 1: Run the Windows Troubleshooter
- 2.2 Solution # 2: Make sure the Microphone is Enabled
- 2.3 Solution # 3: set your microphone as the default device
- 2.4 Solution # 4: make sure the microphone is not muted
- 2.5 Solution # 5: Reinstall or update your Microphone driver
- 2.6 Solution # 6: Restart Windows Audio Service (Windows Audio Service)
- 3 Conclusion:
How to Fix Microphone Not Working Windows 10 PC Laptop 2024
The earliest loudspeakers were called megaphones, but today, microphones are used to record voice, provide voice recognition features, and talk to friends, family, and colleagues using various apps and devices.
Read more:
- How to Transfer Windows 10 License to Another Computer
- 3 Easy Ways to Activate Microsoft Office 2010
- How to Take Screenshots on Windows 10 Laptop PCs
- Download Best Free VPN for Windows 10 PCs
Most modern computers and laptops have built-in microphones so you don’t have to connect additional devices to your computer.
Despite the popularity of microphones, many users have had problems with them – the microphone doesn’t record sound, doesn’t make a sound, can’t use Skype and other similar apps, etc. This issue became more common after the Windows 10 Creators update was introduced.
Various reasons cause a microphone’s technical problem (either internal or external): the wrong driver has been installed; problems with the Windows operating system; hardware problems, etc.
First, make sure the microphone hardware is functional and not damaged. Connect the microphone to another computer. It would be even better if the other computers were not running the same version of the Windows operating system.
For example, if you are using Windows 10, we recommend that you test your microphone on a computer running Windows 7, and so on. If the microphone does not work when connected to another computer, the microphone itself may be damaged.
If possible, connect a different microphone to your current computer and see if that works. This will help you determine if the problem is with the computer or microphone. If you are using a desktop computer and an external microphone, try plugging it into the backport of the computer. In some cases, the front ports don’t always work.
If you have tried to connect your microphone to another computer and it is working which means the problem is with your computer, then please read the guide below to find out how to fix microphone problems. These steps also apply to laptop computers with built-in microphones.
fix the Microphone not working Windows 10
Well, my fellow Windows users here, I will spoil you with 6 solutions to fix if the Microphone on your Windows doesn’t work.
Please try one of them and hopefully, one of the following solutions will solve your Microphone problem.
Solution # 1: Run the Windows Troubleshooter
Windows includes a Troubleshooter or troubleshooting feature that is designed to quickly diagnose and automatically solve various computer problems.
The Troubleshooter is not designed to fix all problems, but it can provide a report on the cause of the problem, so it’s a good place to start if you encounter problems with your computer or operating system, including microphone problems.
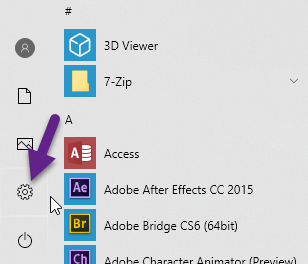
- To start the Troubleshooter, go to Settings type in “Troubleshoot” and select “Troubleshooter Settings” from the list.
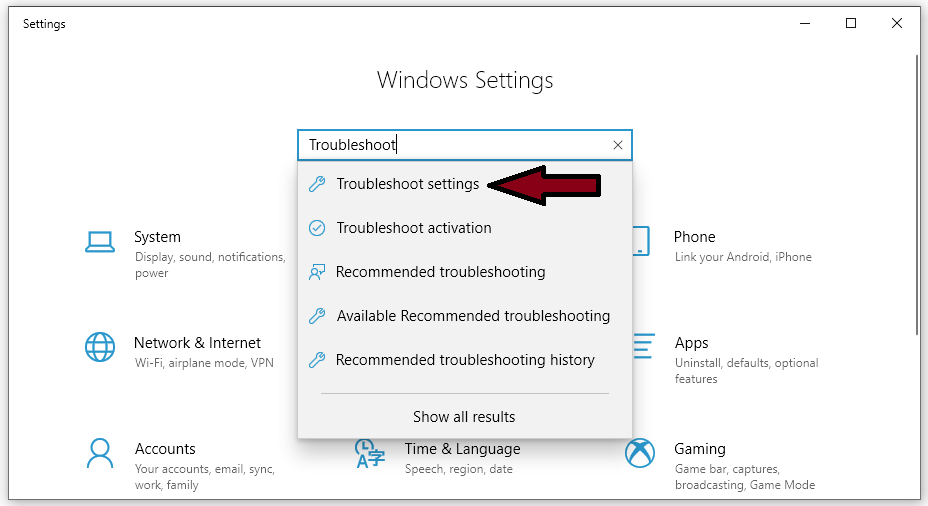
- Find “Recording Audio” underneath it says “Find and fix problems with recording sound” and select it. Click “Run Troubleshooter” and follow the instructions.
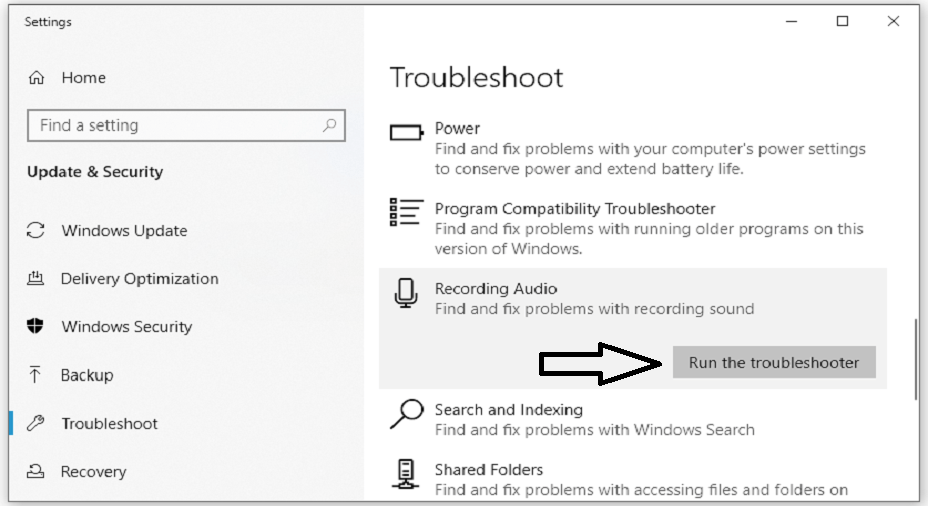
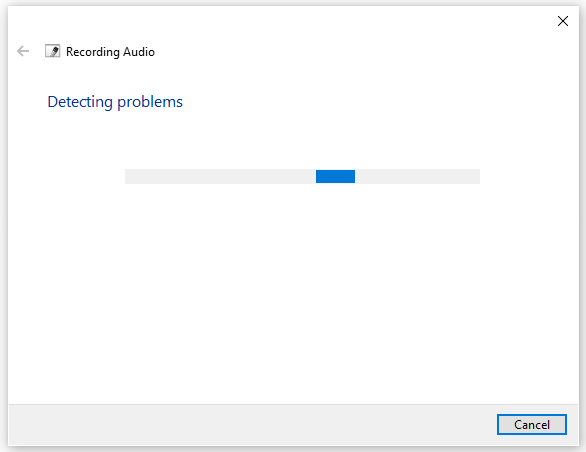
See if the Windows Update Troubleshooter can solve the problem with the external or internal microphone. Additionally, run the “Speach” Troubleshooter.
Solution # 2: Make sure the Microphone is Enabled
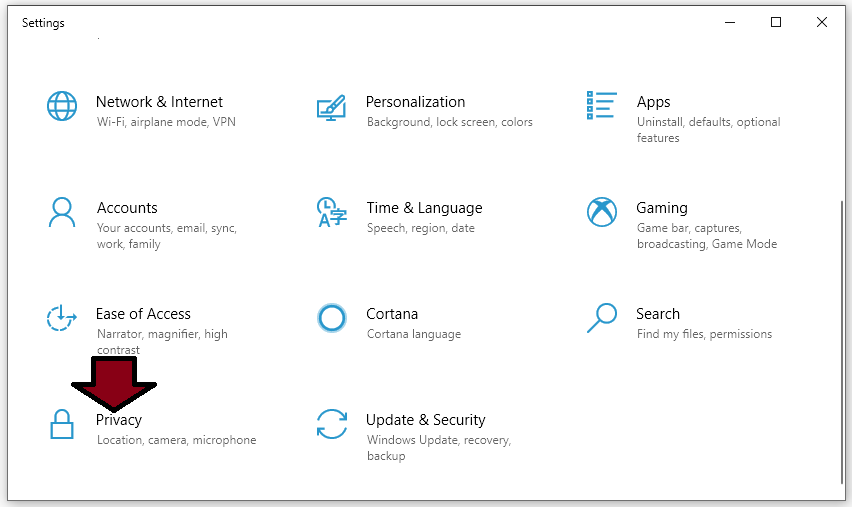
- Make sure your microphone on the Windows 10 operating system is enabled. It might just be turned off – this is the reason why it doesn’t work. To see if it’s enabled in Windows, go to Settings, find, and click on “Privacy”.
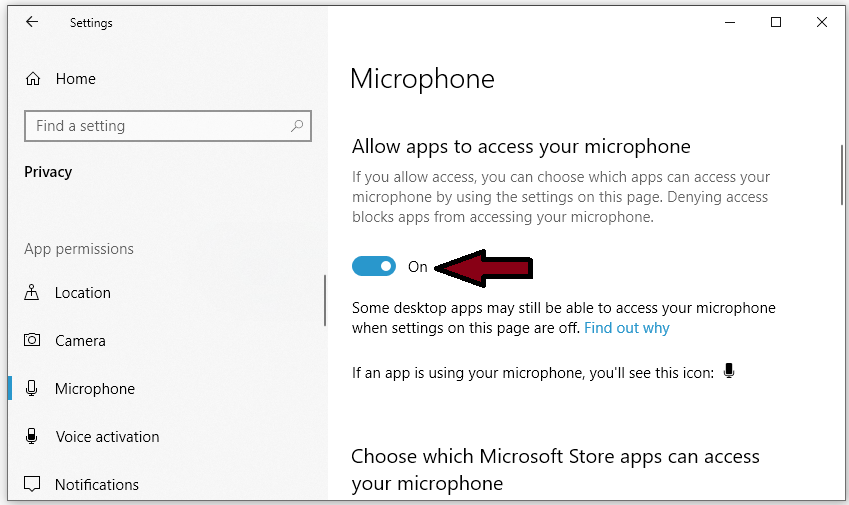
- In the Privacy Settings window, find and select the “Microphone” section in the left pane. Make sure that the switch under “Let apps use my microphone” or “Allow apps to access your microphone ” is in the “On” position. If you are using the microphone with a particular application, check if you are giving that application access to the microphone. Find the application in the list and check if the switch has been switched to the “On” position. See if this solves the problem with the microphone.
Solution # 3: set your microphone as the default device
If an external microphone is connected to your computer, this doesn’t mean it’s set as the default device – you may need to do this manually.
Physically connecting your headset to a PC running SmartSDR for Windows is the first step. Now to turn it into the Windows default playback and recording device the way is as follows.
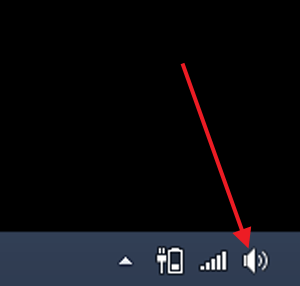
- The simplest and fastest way to change your microphone device is the same as in Windows 7 and Windows 8. x. Find the Sound icon in the notification area (lower right corner of your screen) and right-click or press and hold.
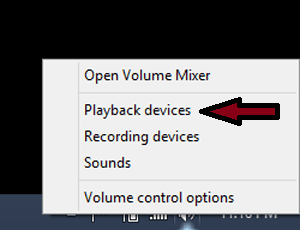
- You will see a menu offering several options: Open Volume Mixer, Playback devices, Recording devices, Sounds, and Volume Control options.
- Select Playback Devices to open the Sound Control Panel.
- Open the Sound Control Panel, as described above, and click on the Recording tab. Here you will see any audio devices you have that can be used as a microphone.
- Again, your current default device is marked with a green checkmark. Select your Microphone and click Set Default.
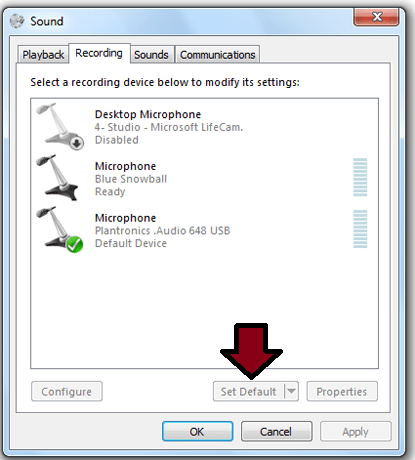
You can select (click) on any available device, then select Set Default. When you’re happy with your new choice, click OK, and you’re done.
Solution # 4: make sure the microphone is not muted
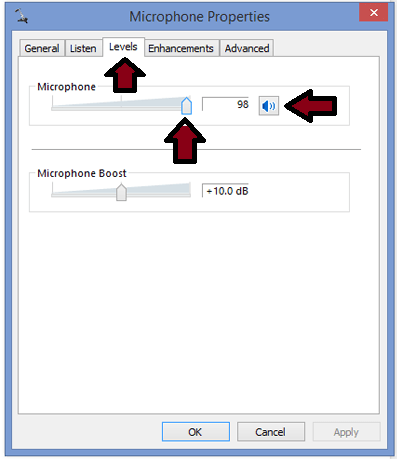
- Another reason for the ‘microphone problem’ is that it is simply turned off or the volume is set to a minimum. To check, right-click the speaker icon on the Taskbar and select “Recording devices”. Select the microphone (your recording device) and click “Properties”.
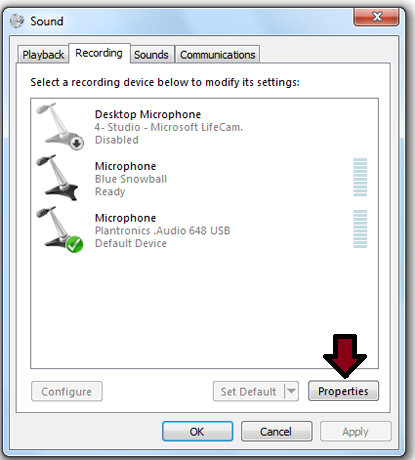
- In the Microphone Properties window, click the “Level” tab and make sure that the speaker icon doesn’t have a red mark next to it and that the volume is set to 100. Check changes if needed and click “Apply”. See if the microphone problem persists.
Solution # 5: Reinstall or update your Microphone driver
A device driver is software that provides information to the Windows operating system and other software about how to interact with certain hardware on the computer.
Drivers act like translators between software and hardware because they are often made by various manufacturers, companies, or individuals. Drivers allow software and hardware to communicate smoothly.
In most cases, the computer can’t send and receive data properly without drivers. If the appropriate driver is not installed, the device may not function properly.
You can try to remove the driver and then let Windows reinstall the driver automatically, or you can try to update the driver manually (or try both methods).
- To reinstall the Microphone driver, press the Windows logo + X on the keyboard and select Device Manager

- In the Device Manager window, double-click “Audio Input And Output” (or click the arrow) to open that section. Right-click the recording device (your microphone) and select “Uninstall Device” from the contextual menu.
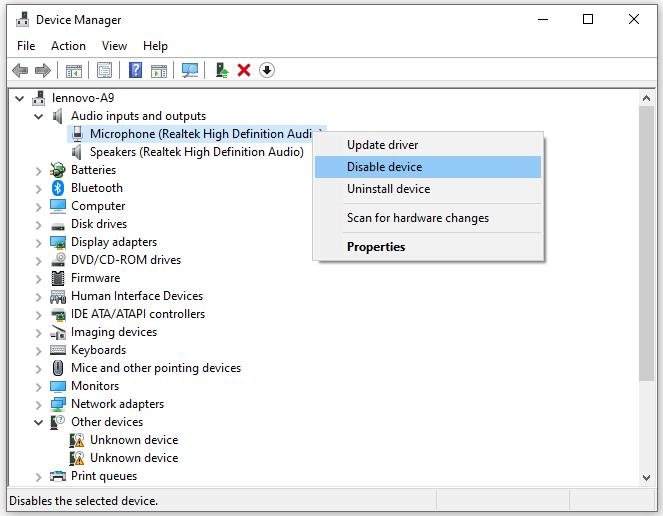
- Restart the computer and Windows will reinstall the missing drivers.
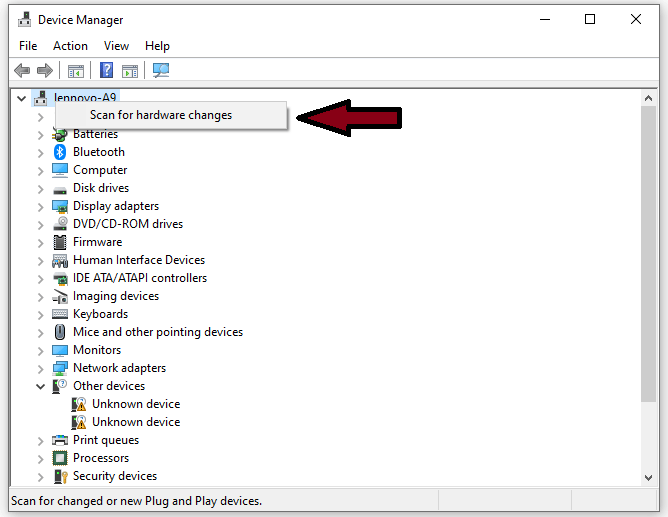
- If for some reason Windows fails to reinstall the drivers, you can force the system to reinstall by going again to the Device Manager and right-clicking the computer name (it should be first on the list). Select “Scan For Hardware Changes” and Windows will install the missing drivers.
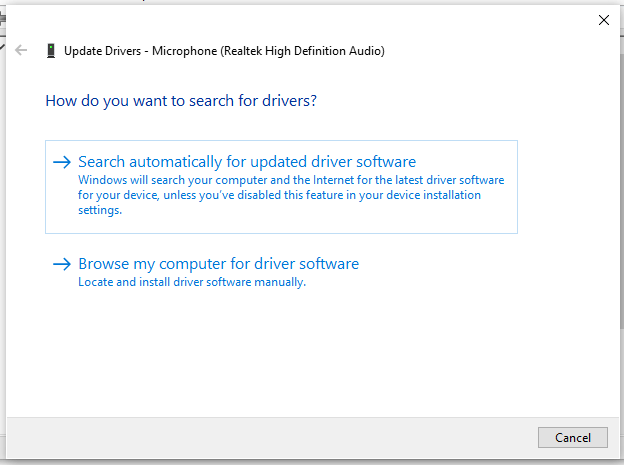
- If you wish to update your driver manually or automatically, right-click the recording device in Device Manager and select “Update driver” from the contextual menu.
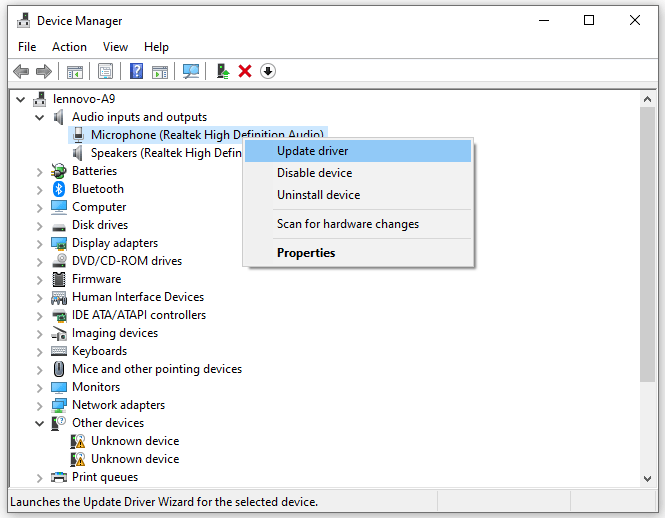
You will be asked if you want to search for the automatically updated driver software or search your computer for driver software. If you choose the first option, Windows will search your computer and the Internet to find the latest software for your Microphone.
If you choose the second option, you will have to manually locate and install the driver. To use this option, you must have the drivers downloaded earlier to your computer or a USB flash drive.
Another way to update or install a new driver for the microphone is to do it using third-party software such as Snappy Driver Installer. You will need a computer with a working internet connection to download it.
Snappy Driver Installer (SDI) is a powerful free driver updater tool for Windows that can save its entire driver collection offline.
Having offline drivers gives Snappy Driver Installer the ability to have access to fast driver updates, even if there is no active Internet connection on your computer.
Snappy Driver supports Windows 10, Windows 8, Windows 7, Windows Vista, 32-bit, and 64-bit, and also works with Windows XP.
Drivers will be downloaded via Snappy Driver Installer in ‘driverpacks’, which is a collection (package) of drivers for various hardware devices such as sound devices, video cards, network adapters, etc. It can also display duplicate drivers and invalid drivers.
Solution # 6: Restart Windows Audio Service (Windows Audio Service)
Windows services (also known as services.MSC) are used to modify how Windows services (services) run on your system.
This service is responsible for running the available programs and managing many system settings and resources. You can change service settings for security, troubleshooting, and performance-related reasons.
Windows Audio Service manages audio for Windows-based programs. If this service is stopped, audio and effects devices will not function properly. If disabled, any services that depend on it will fail to start.
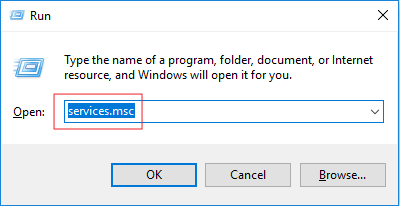
- To restart the Windows Audio service, press the Windows key + R on the keyboard or type run in Search and click the “Run” result to open the Run dialog box. Once open, type services.MSC and press Enter on your keyboard or click OK.
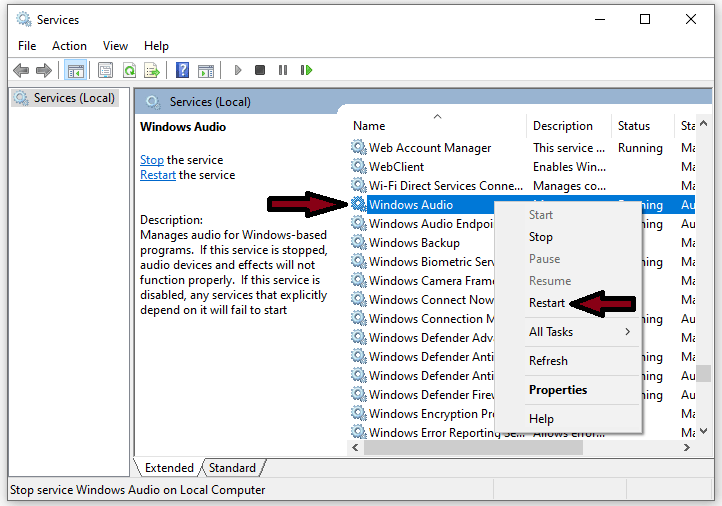
- In the Services window, you will see a list of Windows services. Find the “Windows Audio” service and right-click it. Choose “Restart” from the contextual menu. Alternatively, you can select “Stop” and then right-click again and select “Start”. Check if this solves the microphone problem.
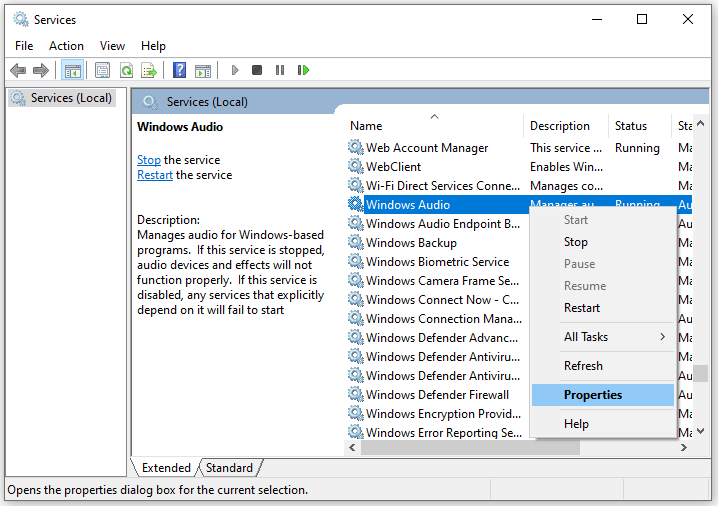
- If that doesn’t work, right-click the “Windows Audio” service and select “Properties” from the contextual menu.
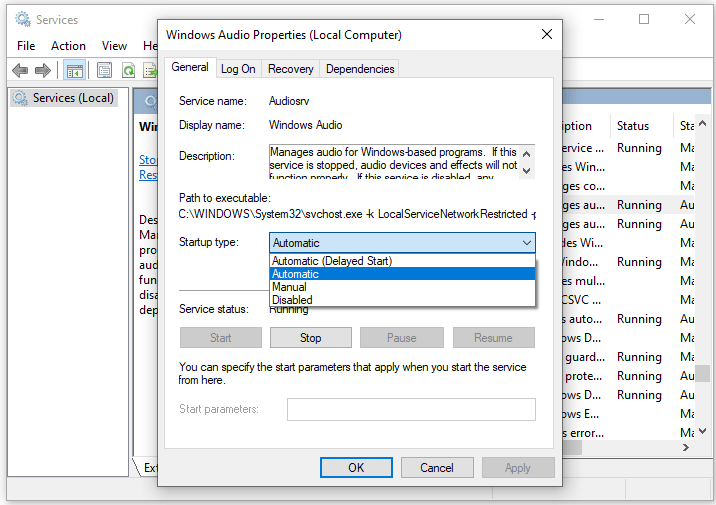
- In the Windows Audio service properties window, check if “Startup Type” is set to “Automatic”. If not, set it to Automatic and click “Apply” to save changes. Restart the computer and see if this solves the problem.
Read more:
- How to Fix Windows Update Error 0x800703ee
- 6 Ways To Speed Up Slow Internet Connection in Windows
- Wi-fi Is Often Disconnected On Laptops Here Is The Solution
Conclusion:
So, friends, that’s on above how to fix a microphone not working Windows 10, I hope the above set of solutions was helpful and that you were able to resolve the problem with your microphone. If you are aware of another method that resolves this issue, not mentioned in our guide, please share it with us by leaving a comment in the section below.
![8 Ways to Fix The Hosted Network Couldn’t Be Started in Windows 10 [2026] 8 Ways to Fix The Hosted Network Couldn't Be Started in Windows 10](https://technowizah.com/wp-content/uploads/2021/07/8-Ways-to-Fix-The-Hosted-Network-Couldnt-Be-Started-in-Windows-10.jpg)
