How to Limit User Access in Windows 10 Laptop PC – In one computer, there should only be one account with full access (administrator) while the other user accounts are normal users. This is important to maintain the security of the computer, as well as to ensure that other users do not make mistakes that could damage the system or worse introduce viruses.

How to Limit User Access in Windows 10 Laptop PC 2024
When using Windows 10 for work, browsing the internet, or playing games, we recommend that you use a regular or regular user. This is recommended for security purposes as regular users will have a limited ability to make changes at the administrator level.
Read more:
Use the administrator user when you want to install software, update, or change certain configurations on the system. Apart from that, use a normal user account.
How to restrict user access in Windows 10 PC
1. Enter Windows Settings
The first step is to click on the Start button and then click the Settings button (gear icon)
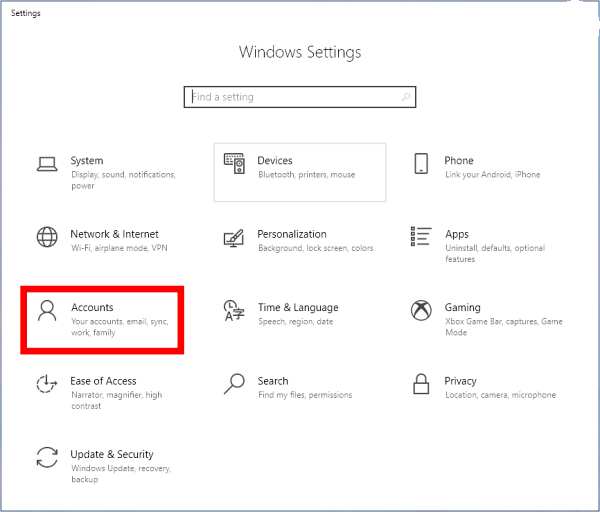
2. Select the Accounts menu
In the Settings window click on the Accounts menu option
3. Click the Family and Other Users tab
On the left panel click on the Family and Other Users tab
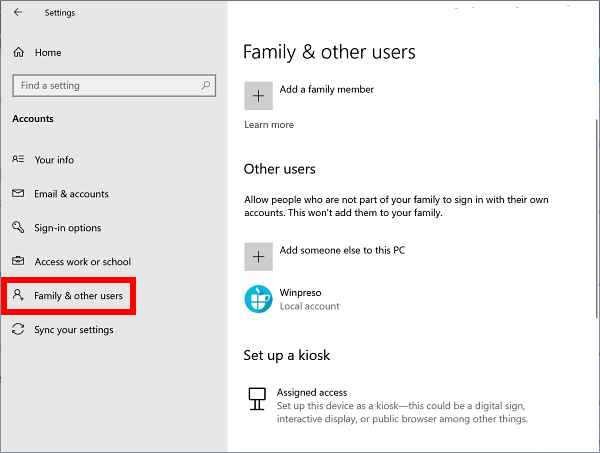
4. Select the user you want to restrict access to
Notice on the right-hand panel, that there will be a list of users on your Windows 10. Click on the user you want to restrict access to.
5. Click the Change account type button
Then click on the Change account type button below it.
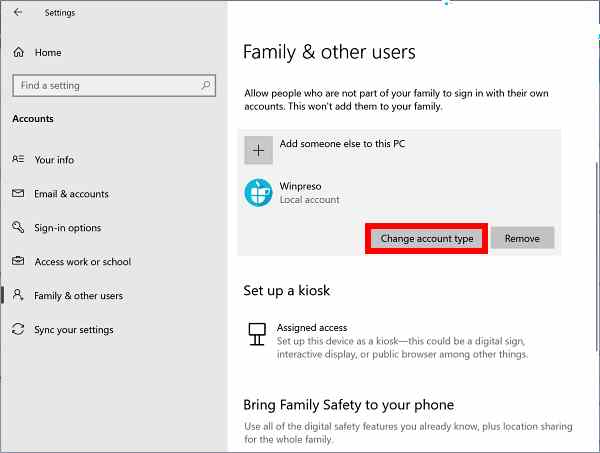
6. Select Standard User
Finally, select the Standard User option then click OK.
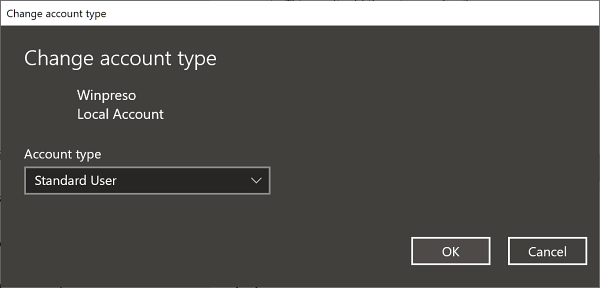
A standard user is a user with limited access. This type of user can use all existing programs, and save files in the user folder or data partition, but cannot change computer settings or install new applications.
Using the Control Panel
Restricting user access in Windows 10 can also be done through the Control Panel. Settings via Control Panel provide more complete features than Windows Settings.
Through the Control Panel, you can change the username, change the user type, restrict access, and make arrangements for other users on the computer.
Follow these steps:
- Open Control Panel by clicking on the Start button then typing: control > clicking on Control Panel which appears on the Start menu
- In the Control Panel window, make sure you are using the View by Smalls icon mode
- Select the User Accounts menu
- Then click on the Manage another Account menu
- Select the user you want to restrict access to
- Click on the Change the Account type menu
- Check the Standard option
- Click the Change Account Type button
- Close all settings windows
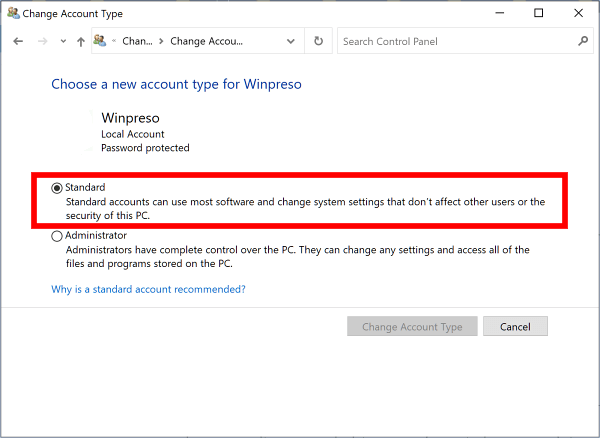
By using the method above you can limit the access of other users on the computer. This is quite effective for computers used by several people such as office computers.
How to create a user with limited access in Windows 10
You can also create a new user with limited access. If you have a laptop or PC that you have to share with other people, such as a boarding house friend, coworker, or relative, you should separate the user used for logging in.
This is so that they don’t mess up the files in the user folder or the Windows 10 configuration as a whole. You can create a new user with the standard user type which cannot make changes to the system or install new applications.
Follow these steps:
- Enter the Windows 10 Settings menu
- Select the Accounts menu
- Select Family & other users
- Click the Add someone else to this PC button
- Select I don’t have this person’s sign-in information A
the window for Microsoft account login will appear, skip this step and create a local user without a Microsoft account to make it simpler, click on the option I don’t have this person’s sign-in information. - Select Add a user without a Microsoft account
Windows will still ask us to enter Microsoft email, click on the Add user without a Microsoft account option to skip this step. - Enter the username and password.
Next, enter the username for the new user and the password, then click the Next button. Fill in other data to complete.
When finished creating an account in the way above, provide a username and password to the person who will use your computer. Every time they will use it, tell them to log in using that account.
Read more:
- How To Enable or Disable Caps Lock key in Windows 10
- How to Use Administrative Tools in Windows 10
- How to Uninstall Avast to Clean the Roots in Windows 10
Conclusion:
That’s how to limit user access in Windows 10, it’s quite easy, right? Good luck and hope it helps. If there are difficulties you can tell them in the comments column.
Don’t forget to bookmark and always visit every day Technowizah.com because you can find here the latest Tech Computer Android games How-to Guide Tips&Tricks Software Review etc, Which we update every day.


![6 Ways to Fix System Thread Exception Not Handled in Windows 10 [2024] 6 Ways to Fix System Thread Exception Not Handled in Windows 10](https://technowizah.com/wp-content/uploads/2021/07/6-Ways-to-Fix-System-Thread-Exception-Not-Handled-in-Windows-10-218x150.jpg)


![10+ Ways To Take Screenshot on Asus Laptop Windows 10 [2024] How To Take Screenshot on Laptop and PC Windows](https://technowizah.com/wp-content/uploads/2020/06/How-To-Take-Screenshot-on-Laptop-and-PC-Windows-100x70.jpg)
