Install TWRP 3.3.1+How to ROOT Samsung Galaxy A10 – Even though it is long and complicated, installing a custom recovery and rooting the Samsung A10 cellphone is not a difficult matter to implement. In this case, two options can be selected, the first Root via TWRP and the second without TWRP.

Install TWRP 3.3.1+How to ROOT Samsung Galaxy A10 [2024]
However, precision is needed in doing so, otherwise, the process will fail and can cause permanent damage to the device.
Read more:
- 7+ Ways to Root Android with PC Until Success (100% Work)
- [100% Work] How to Root Asus Zenfone GO without PC 2021
- How to Use Lucky Patcher Without Rooting Device 2021
- 2 Ways to Root Oppo A3s without PC (100% WORKS)
Install TWRP and Root the Galaxy A10 itself apart from having many benefits, it also has many risks that must be borne. For that, before deciding you want to do it, you should first consider it.
#1. Benefits & Risks of Installing TWRP / ROOT Samsung A10
So, to make it easier for you to make a decision, here are some of the advantages (benefits) and disadvantages (risks) of installing TWRP / Root Samsung Galaxy A10 (SM-A105F, SM-A105FN, SM-A105G, SM-A105M) Android Q 10 / Pie 9.0.
1.1. Benefits
- Install a custom ROM via TWRP
- Flash various mod zip files.
- Flashing the Xposed Module.
- Flash an image file.
- Root and Unroot.
- Backup & Restore ROM / System / Nandroid.
- Factory reset / hard reset.
- Wipe data, cache, and Dalvik.
- Access all files present in the root directory of the device.
- Improve performance through overclocking.
- Save battery power by underclocking.
- Remove built-in apps/bloatware.
- Can block ads that often appear.
- View, edit, or delete any system files in the root directory.
- Internal storage space is more relieved.
1.2. Risk
- Weak security system so that it is easily attacked by viruses/malware.
- Store / official warranty is lost.
- Causes permanent damage to the device.
- It May result in a bootloop.
#2. INSTALL TWRP & ROOT Samsung A10
There are two methods you can take to root Samsung A10. First flash via TWRP custom recovery and second root without Recovery. The method via TWRP requires you to replace the default / parik recovery (CWM) with TWRP custom recovery so you can flash the root file.
While root without TWRP can be applied via the ODIN flashtool application. So you just have to choose which method to use. Now to start the process, here are the steps.
2.1. Preparation
- To install TWRP and Root, you need a laptop or PC.
- A USB cable to connect your phone to a computer.
- OEM Unlock and USB Debugging are enabled.
- Download one of the following TWRP files and save it on your computer.
- SAMSUNG_USB_Driver.exe (install on the computer).
- ODIN3_v3.13.3.zip (extract on the computer).
- Magisk Manager.apk (install on mobile).
- Magisk_Root.zip (save on phone).
- DM / No-Verity.zip (save on phone).
- Multi-disabler-Samsung-v2.2.zip (save on phone).
- Additional files for ROOT WITHOUT TWRP option.
- 7-zip application (Install on the computer).
- ZArciver application (Install on HP).
- Firmware / ROM for Samsung Galaxy A10:
Select according to device model number or country.
2.2. Root via TWRP Recovery
Before starting root, you need to install a custom recovery first to be able to flash root files such as Magisk Root, Super SU, and so on.
2.2.1. Install TWRP
- Turn off the Galaxy A10 device until it is completely dead.
- Boot into Downloading mode. In this case, two options can be done:
- Option # 1: Press and hold POWER + VOL UP + VOL DOWN.
- Option # 2: Press and hold VOL UP + VOL DOWN then plug the USB cable that is already connected to the computer (while still pressing the Vol Up + Vol Down buttons).
Release the buttons when the screen displays “Warning”.
- At the Warning screen, press the Volume Up button to continue to the Downloading Mode main menu.
- Open the computer then run the ODIN application by running as administrator.
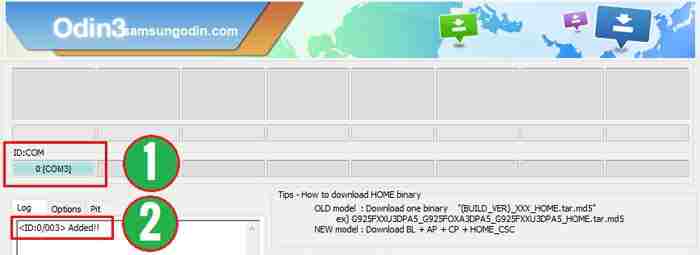
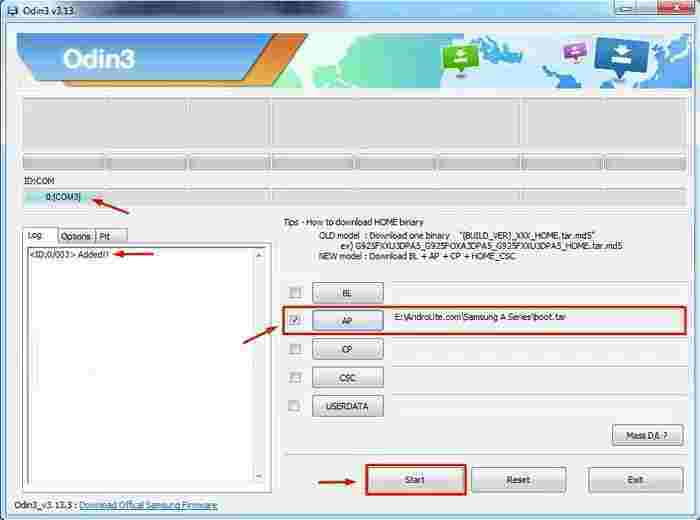
- Make sure Odin has detected your Galaxy A10 device by seeing the message ‘ Added !! ‘on the’ Log ‘tab or there is a port address under ID: COM.
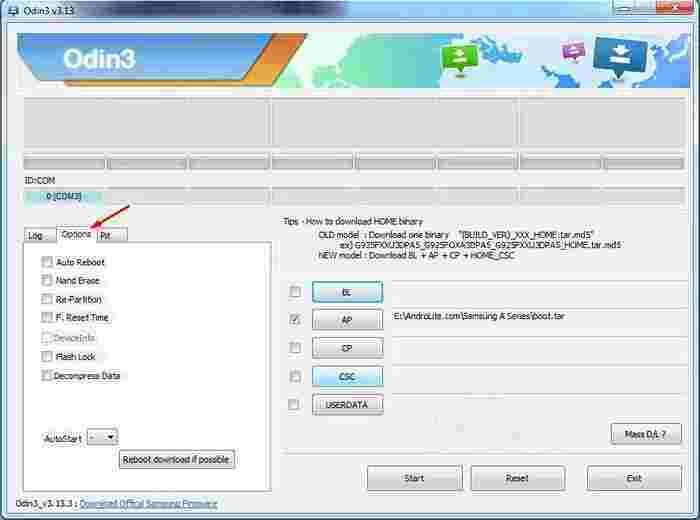
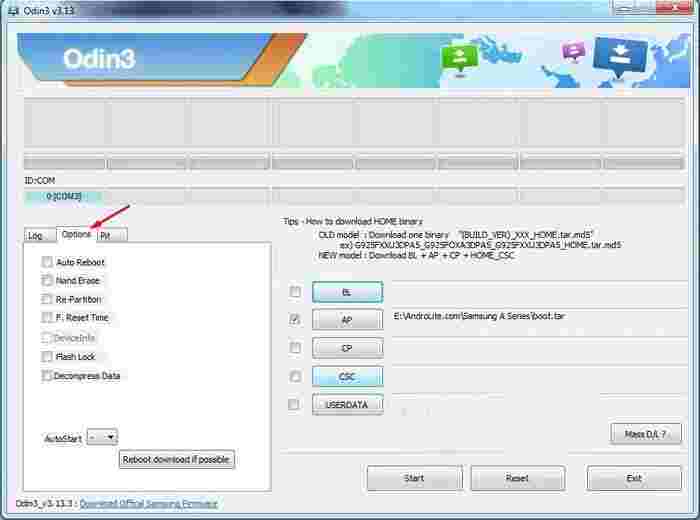
- Next, click the ‘ Options ‘ tab. Remove all ticks ( ✓ ) in the column.
- Click the ” AP ” button then locate and select the TWRP-3.3.1-A10.img / TWRP-3.3.1-A10.tar file that is on the computer.
- To start the TWRP installation process, please click the ‘ Start ‘ button and wait for it to finish.
- When finished, please unplug the USB cable that connects the phone to the computer.
- To exit Download Mode and boot into TWRP for the first time, please press and hold the ” POWER + VOL DOWN ” button. When the screen is blank/black, immediately release the Volume Down button then move your finger to the Volume Up button while keeping the Power button pressed.
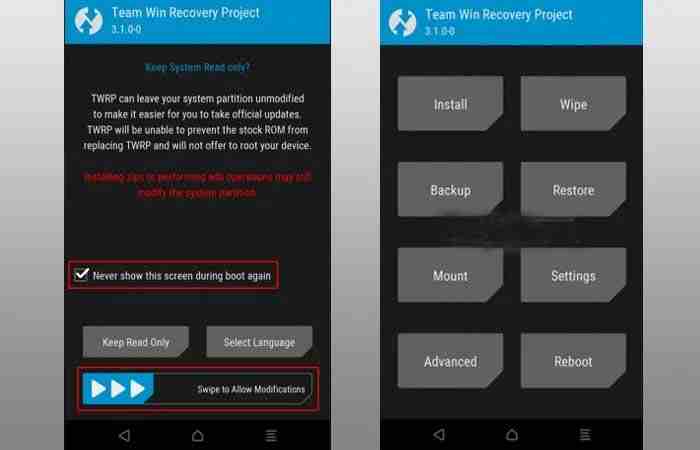
- When in the TWRP start menu, check “Never show this screen during boot again” then wipe to the right on “Swipe to allow Modification”.
- Next, tap Wipe » Format Data » type ” Yes ” » OK and wait for the process to finish.
- To prevent bootloop when the phone restarts, flash the Dm / No-verity.zip and Multi-disabler-Samsung-v2.2.zip files. The trick is to tap Install > Select Storage > then find the two files. After that, swipe right on ” Swipe to confirm flash ” to start flashing and wait for it to finish.
- At this point, you can reboot the system.
- Done.
2.2.2. Root via TWRP
- Turn off the device until it is totally off.
- Next, please Boot the phone into TWRP Recovery mode:
- Option # 1: Press and hold POWER + VOL UP.
- Option # 2: With the phone turned on, press and hold the ” POWER + VOL DOWN ” button. When the Samsung boot logo appears, release the Volume Up button then move your finger to the Volume Up button while keeping the Power button pressed.
- If you are already on the TWRP menu, then tap Install.
- Flash the following three files (in order). To do this, tap Install » Select Storage » Find & Select Files :
- Magisk_Root.zip
- DM / No-Verity.zip
- Multi-disabler-Samsung-v2.2.zip
Swipe right on “Swipe to confirm flash” to start the flashing process.
- Next, please select Reboot » Reboot to System.
- To set up Magisk, please install Magisk_Manager.apk on your cellphone.
- To check the root status, please download the Root Checker application and then run it.
- Done.
2.3. Root WITHOUT TWRP
Slightly different from the method above, rooting without TWRP recovery is also one of the best options for rooting. How to? Here’s the complete tutorial.
- Extract Firmware / ROM using the 7-Zip application. From the extract, right-click on the AP_A105FXX.tar.md5 file, select 7-Zip » Open Archive.
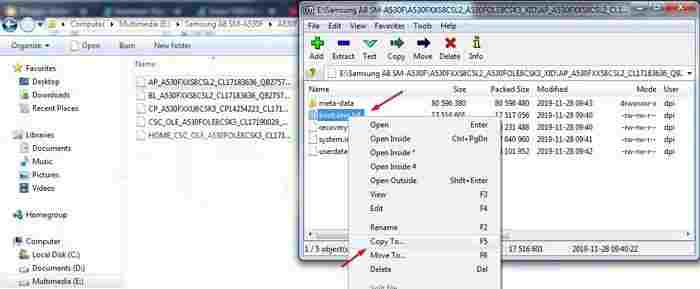
Inside the 7-Zip application, right-click on the file boot.img.lz4 » Copy To. This file will be moved to the extracted firmware folder. Move (Copy) this file to the external memory of the phone.
- Run the ZArchiver application. Tap on the boot.img.lz4 file then selects Extract Here. Now in the same place, you will see 2 files with different extensions, first boot.img.lz4 and second boot.img. Please delete boot.img.lz4.
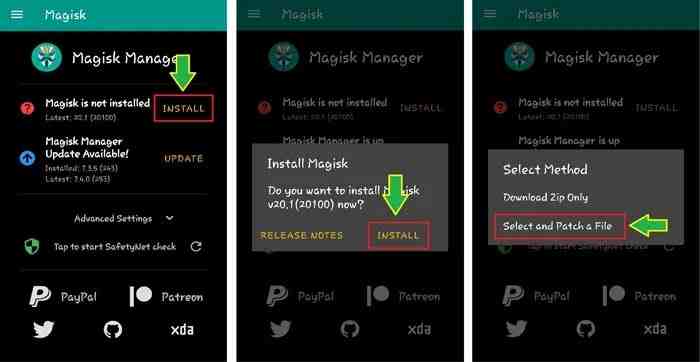
- Install magisk_manager.apk then run it. Tap Install which is beside Magisk is not installed. Tap again Install » Select and Patch a File » Find the boot.img file and wait for the flash process to complete.
To see the patched boot.img file, please go to Internal Memory> Download> Magisk_patched.img.
- Then copy back the Magisk_patched.img file to the computer then rename it to boot.img.
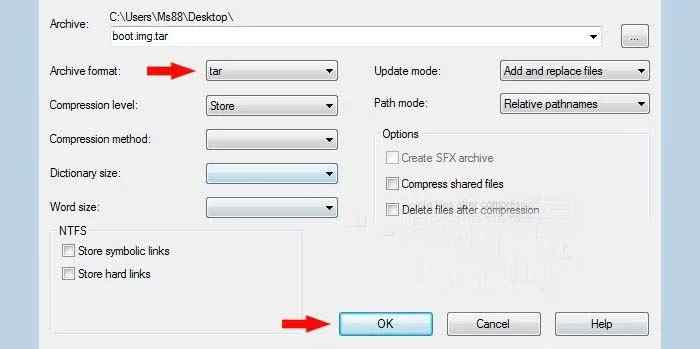
After that, right-click on the file boot.img » 7-Zip » Add to archive. In the Archive Format column, select tar then clicks OK.
- Turn off the phone then Boot into Downloading Mode. In this case, there are two options that can be done:
- Option # 1: Press and hold POWER + VOL UP + VOL DOWN.
- Option # 2: Press and hold VOL UP + VOL DOWN then plug in the USB cable (while still pressing the Vol Up + Vol Down buttons).
- In the Warning screen, press and hold the VOL UP button for approximately 10 seconds or until it enters the ” Unlock Bootloader? ” Continue by selecting the ” Yes ” option by pressing the ” VOLUME UP ” button.
- When the screen displays the message ” The phone’s bootloader is unlocked … “, please press the ” POWER ” button to continue. Wait for the phone to finish erasing data (Erasing).
- When finished, the screen will return to the message ” The phone’s bootloader is unlocked … “. Again press the ” POWER ” button to continue or wait for the phone to restart itself.
- When the cellphone is completely turned on, please do the initial configuration just like the new cellphone, but DO NOT “Sign in” or create a new Google and Samsung account (skip it if you get it).
- Turn off the device again then boot back into Downloading Mode. The method is the same as step # 2 above. At the Warning screen, press the Volume Up button to continue to the Downloading Mode main menu.
- Run the ODIN application run as administrator.
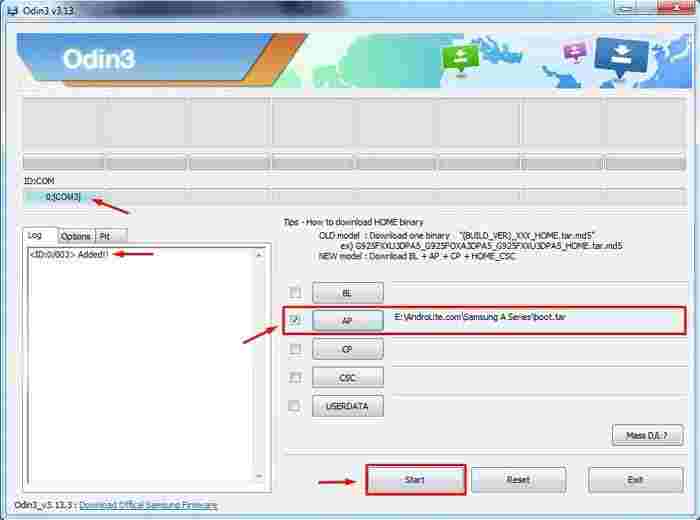
- Make sure ODIN has detected the device by seeing the ‘ Added !! ‘on the’ Log ‘tab or there is a port address under ID: COM. Remove all the checkmarks on the ‘ Options ‘ tab.
- Click the AP button then locate and select the boot.tar file. Click ‘ Start ‘ to start the rooting process and wait for it to finish.
- If successful, please unplug the USB cable that connects the cellphone to the PC and reboot the phone by pressing and holding the ” POWER + VOL DOWN ” button. Release both keys when the Samsung boot logo appears.
#3. Samsung A10 Bootloop Solution
If the device has a bootloop (stuck / stops only at the Samsung boot logo) when applying the tutorial above, several solutions can be done.
- Re-flash Firmware.
- Do a factory / hard reset via Recovery.
- Make sure to flash the Dm / no-verity and Multi-disabler-Samsung-v2.2.zip files as soon as the twrp installation is complete.
The guidelines above can be applied to all series/models of the Samsung Galaxy A10, namely SM-A105F / DS, SM-A105FN / DS, SM-A105G / DS, SM-A105M / DS, whether it is still running the Android Pie v9.0 OS or the latest version is currently Android Q 10.0.
Read more:
- How to Uninstall Avast to Clean the Roots in Windows 10
- How To Root Android With KingRoot: Best In 2021
- How to Root Andromax G2 AD681H on Android
Conclusion:
Well, that’s the most complete tutorial on how to install TWRP and ROOT Samsung Galaxy A10 on this occasion. Hopefully, this tutorial is successful for you to apply. But if you have any questions, feel free to leave a comment.
Don’t forget to bookmark and always visit every day Technowizah.com because you can find here the latest Tech Computer Android games How-to Guide Tips&Tricks Software Review etc, Which we update every day.



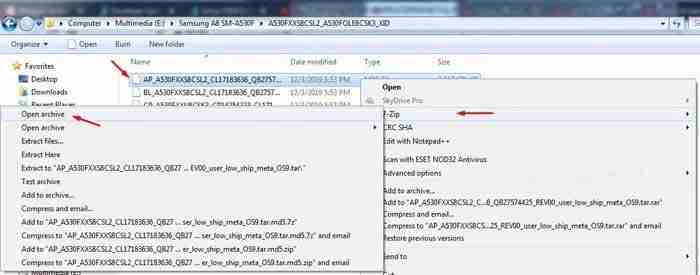 Inside the 7-Zip application, right-click on the file boot.img.lz4 » Copy To. This file will be moved to the extracted firmware folder. Move (Copy) this file to the external memory of the phone.
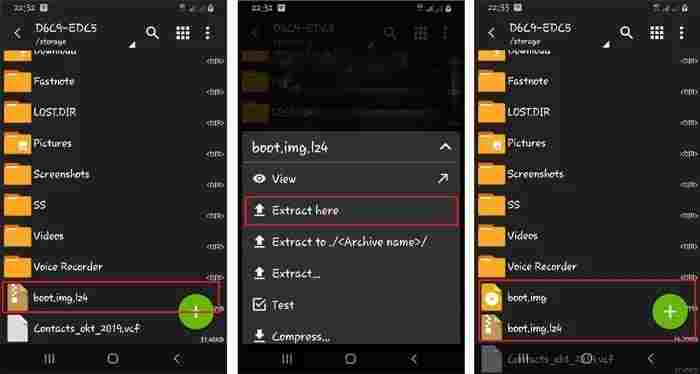
 To see the patched boot.img file, please go to Internal Memory> Download> Magisk_patched.img.
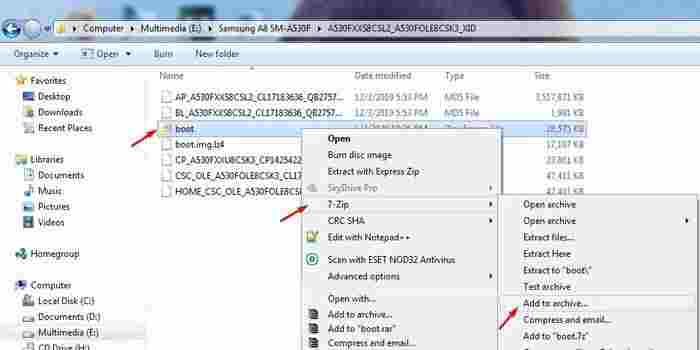 After that, right-click on the file boot.img » 7-Zip » Add to archive. In the Archive Format column, select tar then clicks OK.

![The Latest IDM Serial Number Collection 2024 [100% Working] The Latest IDM Serial Number Collection 2021 [100% Working]](https://technowizah.com/wp-content/uploads/2021/08/The-Latest-IDM-Serial-Number-Collection-2021-100-Working-218x150.jpg)


![10+ Ways To Take Screenshot on Asus Laptop Windows 10 [2024] How To Take Screenshot on Laptop and PC Windows](https://technowizah.com/wp-content/uploads/2020/06/How-To-Take-Screenshot-on-Laptop-and-PC-Windows-100x70.jpg)
