6 Easy Steps To Enable Hibernate In Windows 10 – Hibernate is a feature of Windows systems since the release of Windows XP by Microsoft. Generally, Hibernate is used when the computer battery is in a critical state, and we want to stop processes on the system without eliminating or stopping the previous computer’s activities.

How to Enable Hibernate In Windows 10 Laptop PC
Hibernate is often likened to Windows’ Sleep feature, both of which temporarily stop the computer system. It’s just that, on Sleep, the computer is not completely turned off.
Read more:
- 6 Ways To Fix Windows License Will Expire Soon
- Best Tricks To Activate Windows 10 Offline Permanently
- 13 Best Free Laptop PC Screen Recorder Applications
- How To Activate Office 2016 Permanently: Quick Ways
As for Hibernate, the computer is temporarily turned off and still leaves the activities on the previous computer when it is turned on. So, we can say that the Hibernate feature is more battery-friendly than Sleep.
In this article, we will add the hibernate option in Windows 10.
Follow the Steps: below.
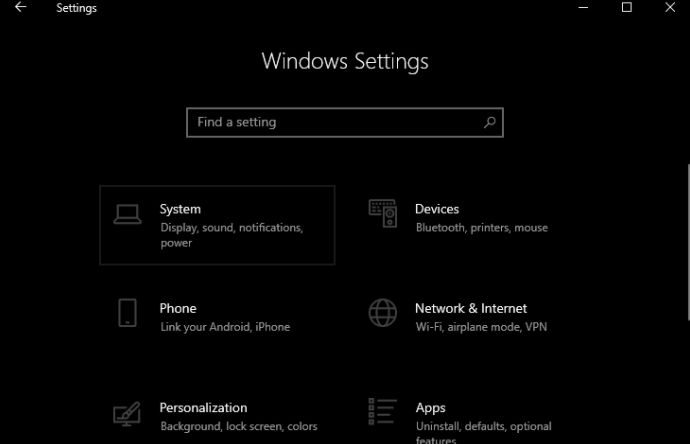
1. Open the Windows Settings option (either by pressing WIN + I on the keyboard or by pressing the gear logo in the Windows Start section).
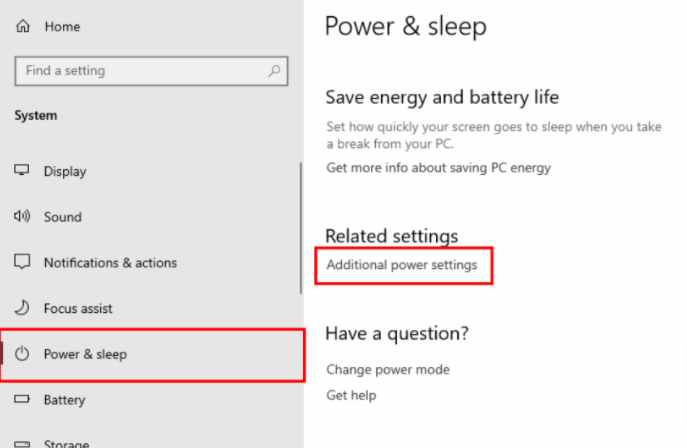
2. Select the System option on the Settings page. Then, in the Power & Sleep section, click the Additional power settings option located in the Related settings column.
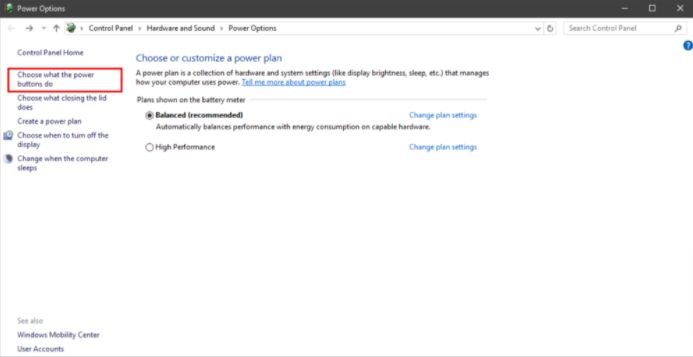
3. Later, a new page will appear in the form of battery power settings in the Control Panel. Then, select the option Choose what the power buttons do on the left side of the page.
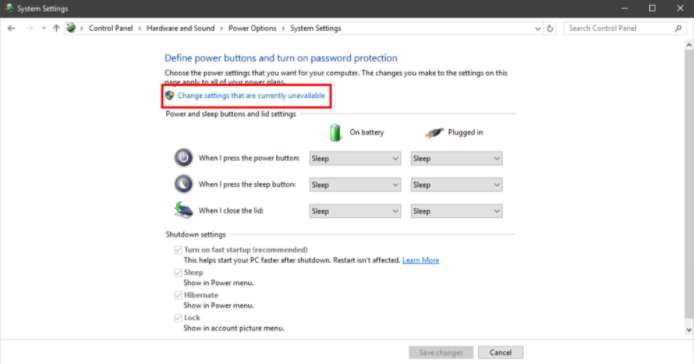
4. Click the Change Settings option that is currently unavailable.
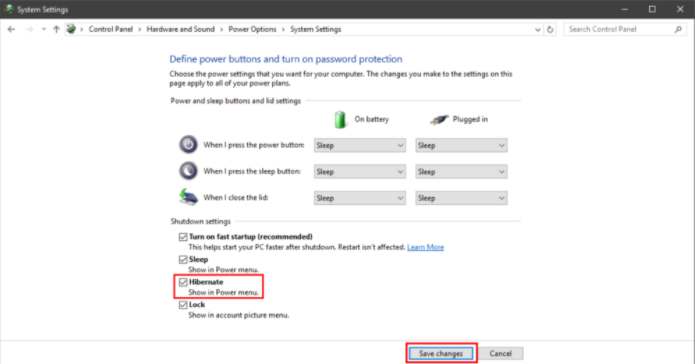
5. In the Shutdown settings, check the Hibernate option in the column provided. Then, click the Save Changes button.
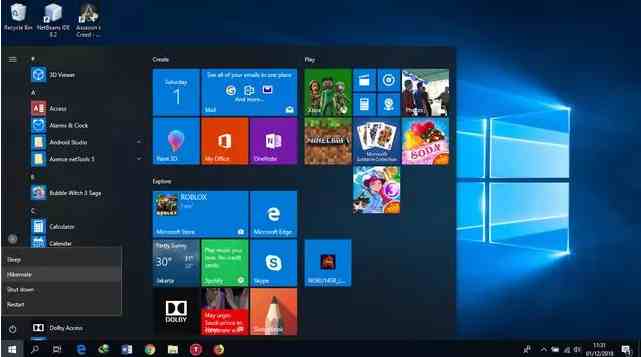
6. To ensure that the Hibernate feature has been activated, on the Start page, the Hibernate option will appear in the Power column.
#2 How to Enable the Hibernate option in Windows 10
First, log in with a user account that is an administrator on your Windows 10 PC, laptop, or tablet. Then, open the Control Panel and go to Hardware and Sound.
Look for Power Options and click or tap them.
In the left column, click or tap the link that says: ” Choose what the power button does.”
You may see various Shutdown settings, including Hibernate, being disabled, like no other.
Click or tap the link that says: “Change settings that are currently unavailable.”
This action makes Shutdown settings editable. Check the box next to Hibernate, and hit Save Changes.
You can now close the Control Panel.
You can now use the Hibernate option in Windows 10
The Hibernate option is now available in the Windows 10 Power menu, as you can see below. To use it, click or tap Start, then Power, then Hibernate.
Would you rather use Hibernate than Sleep?
We like the Hibernate option, and we prefer Sleep sometimes. You most likely do, and that’s why you’ve read this tutorial. Before you close, let us know why you prefer Hibernate, and how often you use it. Comment below and let’s get into it.
Read more:
- How to Fix Windows Update Error 0x800703ee
- How to Best Secure your Windows PC in 2021
- 11 Best Free Video Editing Applications For Windows
Conclusion:
That’s the article on how to use the hibernate feature in Windows 10. Hopefully, this is useful.
![8 Ways to Fix The Hosted Network Couldn’t Be Started in Windows 10 [2026] 8 Ways to Fix The Hosted Network Couldn't Be Started in Windows 10](https://technowizah.com/wp-content/uploads/2021/07/8-Ways-to-Fix-The-Hosted-Network-Couldnt-Be-Started-in-Windows-10.jpg)


As for Hibernate, the computer is temporarily turned off, and still leaves the activities on the previous computer when it is turned on. So, we can say that the Hibernate feature is more battery-friendly than Sleep.