How to Create a Blog – 5 Easy Steps To Starting A Blog – All the cool kids you know are blogging or blogging and making a lot of money out of it. Why don’t you get started & get paid from blogs too?

How to Create a Blog – 5 Easy Steps To Starting a Blog 2024
The thing is, if you’re on this page and reading this section, you probably don’t know how to blog.
Read more:
- Beginner’s Guide: What is a Domain Name? Explained
- Definition of Shared Hosting Cloud Hosting and VPS Hosting
- What is a Content Management System? Quick Learn
- What is Digital Marketing: Complete Guide for Beginners
Lucky for you, friends, because we are willing to take the time out of your busy schedule to write this guide, so you can have the blog that will be yours up and running as soon as possible!
Believe it or not, creating a blog isn’t difficult and doesn’t require a lot of technical knowledge. For those parts that require technical means, we will help to make you feel safer and more comfortable.
What is a blog?
Blogs are websites that focus on written content, usually a less formal way of writing.
When blogging first took off, most people used it as an online journal, writing their thoughts for the world to read.
Recently the world of blogs has grown, giving rise to many subcategories like fitness bloggers, photo bloggers, and mummy bloggers… if you can imagine it, it looks like there are bloggers on that topic.
Why do people start blogs?
Most people have a lot of motivation to start their own blog.
Some people want to practice their writing skills. Some people find it cathartic when they express themselves online. Some people are really passionate about the topic of their choice.
I can’t talk about all of them, but one motivation that draws most people to the wonderful world of blogging is the ability to make money from their blogs.
Since bloggers write about their personal experiences, they have a very personal relationship with their readers, a connection that high-profile brands are interested in so that bloggers endorse their product (if the blogger has a large following, of course).
Whatever motivation you may have for starting a blog, blogging is one of the greatest hobbies, and if done right you can make a living from blogging.
Note:
It seems a lot of people have the misconception that you have to be a good writer to start a blog. Although having good writing skills can help present your blog in a more professional manner, it’s actually your blog content that sells. You can always improve your blog post next time. If you want to improve your writing read a content writing guide.
Step 1: Define A Specific Topic
This exciting first step to starting a blog will shape the way you will blog throughout your blogging career, it’s a simple, very important step: you have to define your specific topic.
Do you want to become a photo blogger? Do you want to blog about your trip? Maybe you are more tech-inclined. Maybe culinary is your favorite.
Whatever your hobbies & interests, you choose a specific topic that will help forge a path for the blogging topic going forward. It’s not a hard and fast rule (few bloggers out there cover a wide variety of topics consistently and have great success) but it’s a guide that helps keep your blog focused and relevant.
So, choose your specific topic. Choose a name. Keep it simple and brief.
Step 2: Choose A Blogging Platform
There are many free blogging platforms for you. Some of them are Wix, Blogger, Tumblr, and WordPress.
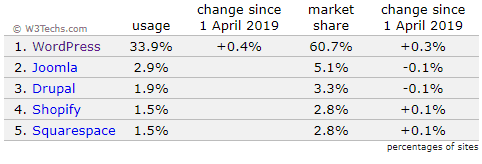
Our platform of choice is WordPress, as it is one of the most powerful blogging platforms used by 33.9% of websites on the internet recently.
WordPress is also SEO-friendly, very easy to use, and has lots of plugins, which have additional functionality that can be used without any technical knowledge.
You can also get web hosting and your domain name directly from WordPress.com for free, but as my grandmother said, ” anything good doesn’t come cheap, anything cheap isn’t good “.
Step 3: Obtain A Domain Name And Web Hosting
To clarify what I said in the previous point, WordPress.com is phenomenal, but free web hosting and domain names have a lot of limitations.
- You don’t have “yourname.com”
While this may not seem like a big deal, it is what separates an amateur from a pro. If you are serious about your blog and want to see it grow, you need to get your own domain name. - Limitations of free WordPress.com web hosting
have very little web hosting space (no more than 3GB). Once this capacity runs out, you will have to pay to increase the capacity to continue using your blog. - No plugins allowed
The free version does not allow plugins, and it saddens and breaks my fragile little heart. - Ads everywhere
You can’t make money from the wordpress.com website. Your free wordpress.com alone is not good news, but they put ads everywhere! Remember, ” everything that is good is not cheap, everything that is cheap is not good .” Ad placement is WordPress’s way of generating revenue. - Your blog can be deleted
What would it feel like if you had been working hard to blog and find followers for a year, and one day you were surprised that your blog was deleted because you accidentally violated one of the WordPress terms of use? This has happened before, and it will happen again. That’s a risk I won’t take.
These are just a few of the problems that come to mind. You can always buy the domain name and web hosting separately, so you don’t run into these problems. Here’s a step-by-step guide for doing it.
Domain name
There are lots of domain registrars out there like GoDaddy and Namecheap, but we love Namecheap because they have their perfect registration system and they provide a free WhoisGuard service. This helps keep your identity secret, for example, if you want to blog anonymously.
The process is very simple, just go in here, register, choose your domain name, and you’re done!
Remember, it’s best to use a domain name that’s simple and easy to remember, but attractive. No need for unique extensions like “.io” or “.biz” either. Stick to “.com” as a lot of people are used to it.
Web hosting
You might think web hosting is just space for you to store your website files and random web hosting will be fine, but make no mistake. In fact, if you want your blog to be successful, you better make sure that you get a web hosting service that is reliable and fast.
Have you ever come across a blog that is so slow that you become lazy waiting for content to appear? If you measure the time, you see that 3 seconds makes people feel that the blog is sluggish, and 5 seconds is the average time it takes people to leave the blog.
Your web hosting is crucial for ensuring that your blog is running fast and snappy, so you don’t lose readers to annoying slow loading times.
There are cheaper options available but SiteGround uptime, reliable customer service, a number of advantages, and extremely fast server response times, SiteGround is absolutely brilliant. In fact, we trust them so much that we host this website with them!
Opening an account and starting your blog with SiteGround is actually quite simple. Here’s what you have to do:
-
- Visit www.siteground.com to choose your hosting package.
-
- Click ” Get Started ” to see what’s available.

-
- We recommend choosing the GrowBig plan (Rp.139,340 / mo) because it is a balance between the price and the benefits. But depending on your needs, you can also choose the StartUp package (Rp. 97,497 / mo) or GoGeek (Rp. 209,080 / mo). Don’t hesitate, decide on a package and run. You’re free to upgrade or downgrade your account later if needed.
-
- You should now see a page where you are given the option to register the domain or use your own. You should now have your own domain name if you follow the instructions in this guide, so click ” I already have a Domain ” and fill in the boxes provided. Click ” Proceed “.

-
- Here, you need to fill in your personal data, such as your email address (make sure it’s valid! They will send you a receipt via email), create a password, first name, last name, country, and no. telephone, zip code, etc. If you need to, you can fill in your business name, but this is optional.

-
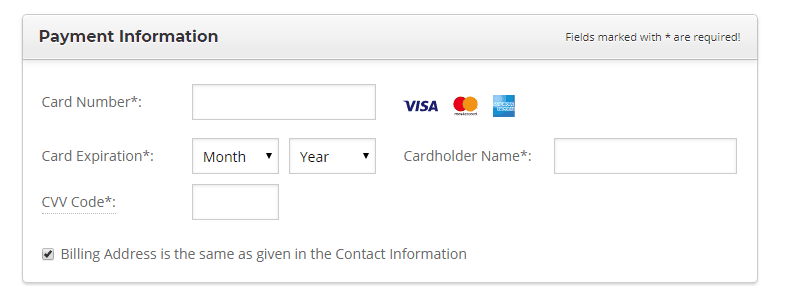
- Go down a bit to see space to fill in your payment details. Enter your Credit Card details, card expiration date, cardholder name, and CVV code (If you don’t know, this is 3 digits on the back of your card).
-
- Next, you see the purchase information section. You have a choice of 12 and 36 months. Select the desired plan and payment period. If you don’t need the SG Site Scanner, then just skip it. However, if you feel you need additional security, go ahead and check the box. Check the box to confirm that you read the T&C and Privacy Policy. If you want to be informed about your news and updates, check that box too. It doesn’t have to be because it’s optional. Click ” Pay Now “.

-
- Done! You now have a new account with SiteGround! They should send a receipt to the email address you originally listed. Click ” Proceed to Customer Area ” (Continue to Customer Area)

Installing WordPress
This section is a continuation of the previous section, we break it down into sections to make it easier to understand.
Note
If you have trouble completing ANY of these steps, feel free to contact us via email or contact SiteGround live chat support. They are very helpful and will guide you if needed.
-
- You should now see a section entitled ” set up your new hosting account “. Select ” Start a new website ” and click ” WordPress ” under ” choose which software to install ” (select the software to be installed). Now you need to fill in the WordPress login details. Your WordPress login will be separate from your SiteGround account, so make sure you remember your details. Log in and include your email, username, password, and repeat password to make sure it’s correct. Click ” Confirm “.

-
- SiteGround will direct you to complete your account with SG Site Scanner. But as previously mentioned, this is optional. After you make your selection, click “Confirm” and ” Complete Setup “

-
- After a short loading time, you see a screen saying your Hosting account is ready to use. Go ahead and click “Proceed to customer area ” (continue to customer area).

- Believe it or not, you just created your own blog! Say congratulations to yourself!
Now that your WordPress blog is published and active, you should be proud of yourself. Nice and clean. Extraordinary. However, it is also very common. According to my younger friends, your website is still “Vanilla”, so let’s fix it!
Step 4: Designing Your Blog
In this section, we will discuss what to do to make your blog look more character.
We can design & customize the blog manually to appeal to your target audience, but that takes a lot of time, and, come on, today who has the time …
Luckily, WordPress has thousands of free themes that are completely customized and that look very professional too!
Here’s how to access your WordPress theme
-
- Log in to your WordPress account, which looks something like “www.yoursite.com/wp-admin”. You want to change “your site” to the actual URL of your blog. Enter your WordPress username and password, then log in.

-
- After logging in, you will see your WordPress dashboard, like this one. Click “change your theme completely”.

-
- Next, click on WordPress.org themes and you’ll find thousands of themes to choose from! If these themes aren’t good enough for you, head over to ElegantTheme to purchase some good-looking themes.

Urgent
The themes are great, but they have drawbacks. Website loading speed is very important for your blog to rank well on Google.
Using a theme that is not optimal or unresponsive will have an impact on loading speed.
Make sure to check the comments for any negative reviews and try the responsiveness of the theme in the preview section. If the theme is no longer responsive in the preview, it will slow down on your blog.
-
- Once you’ve chosen a theme, click on “ Live Preview ”, then click “ Activate & Publish to install your theme.


Your theme is now installed, but you still need to customize and add a little content. Otherwise, your new blog will look a little empty.
Adding pages to your blog
Your small blog will be blank if you don’t enter at least an ” About Us ” page to inform readers about you.
-
- Under your WordPress dashboard, go to ” Pages ” and click ” Add New “

-
- You will be directed to a page where you can fill in the Header and Paragraph. Go and write ” About Us ” in the header. Then write something about your blog in ” Paragraph “. When you are finished, click ” Publish “.

Link your page to the menu
The ” About Us ” page will not appear unless you create a link for it in the menu.
All you have to do is go to the WordPress dashboard, under Appearance, and click on “ Menu ”. Your page list is automatically added to the menu structure. If not, check the box under ” Add Menu Items ” and click ” Add to Menu “.
When you are finished, click on ” Create Menu ” and your blog will be updated with the linked page on the menu.

Adding blog articles
This is the reason why you invest in your blog. Your blog articles will help keep you relevant, keep your website ranking in Google searches, and position yourself as an authority on your specific topic. If you do it right, you can make a decent living!
However, before you add random blog articles to your website, let’s organize them to make sorting easier in the future.
-
- On your WordPress dashboard, click on ” Posts ” and select ” Categories “. Check it out below. Fill in your category name. For example, you can name it ” Blog “. Click ” Add New Category ” below.

-
- Then, under ” Posts “, click ” Add New “. You will see a page where you can fill in the title and content of your post. Do it if you want to. When you are done, look for the ” Categories ” box on the right side of the screen and check the ” Blog ” box.

Click ” Publish ” and your new blog article is published! All you need to do now is add a category to your menu, and you’re done.
Create custom titles & taglines
If you want people to be able to find your blog and read your content, you’ll want to pay more attention to this section.
Your website title tells the public what your blog is about, and your tagline helps explain what the title says. They also help search engines organize and submit your blog to relevant searchers.
To customize your title and tagline, do it on your WordPress dashboard, go to ” Settings “, then ” General “.

Here, you can change the title and tagline to your liking. Do so, then click ” Save Changes “.
Disabling comments
Sometimes, when you share personal thoughts on your blog, you don’t want to have the comments section open to annoying people who leave nasty comments.
You can actually turn off comments so you don’t give these annoying people a chance to bully you.
On the WordPress dashboard, go to the “ Settings ” and “ Discussions ” sections. Here, uncheck ” Allow people to post comments on new articles “.

Create a static homepage
Yes, you want to run a blog, but in fact, you do not want the homepage ( homepage ) You look like that!
What you need is a static homepage, like a “home” page for visitors to enter and observe everything they see. Like many professional blogs, the static homepage doesn’t change and shows your readers the same thing every time they visit your website, making it look great.
If this is not done, WordPress will use the latest blog articles as your homepage, which will make it look amateurish.
You can make your homepage static by:
-
- Log in to your WordPress dashboard, click on “ Settings ” and “ Reading ”.
-
- Click ” A Static Page “, then select the page you want as your homepage, then ” Save Changes “.

Add or remove the content in the sidebar
Some people want content on their sidebar. Some people choose to switch to a cleaner appearance. It’s all up to you.
Adding or removing content from the sidebar is quite easy.
-
- Log in to your WordPress dashboard, select ” Appearances ” and click on ” Widgets “.
-
- Here you see a list of available widgets and the sidebar of your blog. All you need to do is drag and drop the widgets you want on the sidebar, or delete the widgets you don’t want.

Step 5: Using A Plugin
In the past, when we wanted to optimize a blog, add features, or create new functions, everything had to be done manually (and each one was time-consuming and tiring).
Now, you can do all that and more with just a few clicks, with the help of plugins!
In fact, you can add whatever you want to your website. Either turn it into an online shop or gallery portfolio. If you can imagine it, there might be a plugin for that!
All you need to do to install a plugin is under your WordPress dashboard, click on “ Plugins ” and “ Add New ”. From there, check out the popular tab or suggestions for a plugin that fits your needs, and you’re done!

There is a long list of plugins you can choose from, but remember that some plugins can slow down your blog. Do a little research on plugins and your blog will run very smoothly.
Here are some of our favorite plugins:
- Yoast SEO
To make your blog more SEO-friendly. - Swift Performance Lite
Helps reduce WordPress cache time, thus speeding up your blog load times! - Google Analytics by ExactMetrics
Helps you track the number of visitors who come to your blog. Very useful in helping to set your target benchmark!
You Are A Blogger Now!
Congratulations, newcomers to the world of blogging, you have successfully created your own blog! We do help you, but you do all the hard work alone, so you have to applaud yourself!
Before you go, here’s a summary of the things you will need to do to create your blog.
- Register a domain and choose a web hosting service
- Deciding on the right web hosting company
- Choose your domain name
- Create your blog
- Installing WordPress as your platform
- Design your blog
- Choose the right theme
- Install your theme
- Adding Content
- Add articles, and menus, and edit your pages
- Adjustments and settings
- Install plugins
Keep making adjustments!
Read more:
- How to Add Google Analytics to WordPress Blog
- Complete Guide What is SEO? And How It Works
- How to Create a Website in WordPress Complete Guide
Conclusion:
Always remember that WordPress is very customizable. You can create any type of blog you want with WordPress. Keep experimenting and customizing until you are 100% satisfied with what you have! As always, send us a message if you have any questions.
Don’t forget to bookmark and always visit Technowizah.com every day because you can find here the latest Tech Computer Android games How-to Guide Tips&Tricks Software Review etc, Which we update every day.


 2024")


")


