How to Create Restore Point in Windows 10 PC – In Windows 10, System Recovery is a feature designed to create a summary of your computer and save its work as a “restore point” when system changes are detected.

How to Create Restore Point in Windows 10 PC 2024
Benefits of restoring points
A restore point is very useful in the event of a critical problem, namely after installing an update, driver, or application or after improperly modifying a system setting using the Registry or other tools. You can use a restore point to restore your device settings to an earlier point to fix the problem without losing your files.
Read more:
- How to Install and Activate SPSS 24 on Windows
- How To Ping Google To Check Internet Connectivity
- Fix Wireless Capability Is Turned Off In Windows
- How to Fix Windows License Will Expire Soon
Although System Recovery is a useful tool, it is disabled by default. For some strange reason, this means that you have to enable it before you or Windows 10 can create a restore point.
In this Windows 10 guide, we will guide you through the steps needed to set up a System Recovery as well as the steps to recover your device from any problems that may have affected the normal operation
How to activate System Recovery in Windows 10
As I mentioned earlier System Recovery is not enabled by default, but you can activate this feature with the following steps:
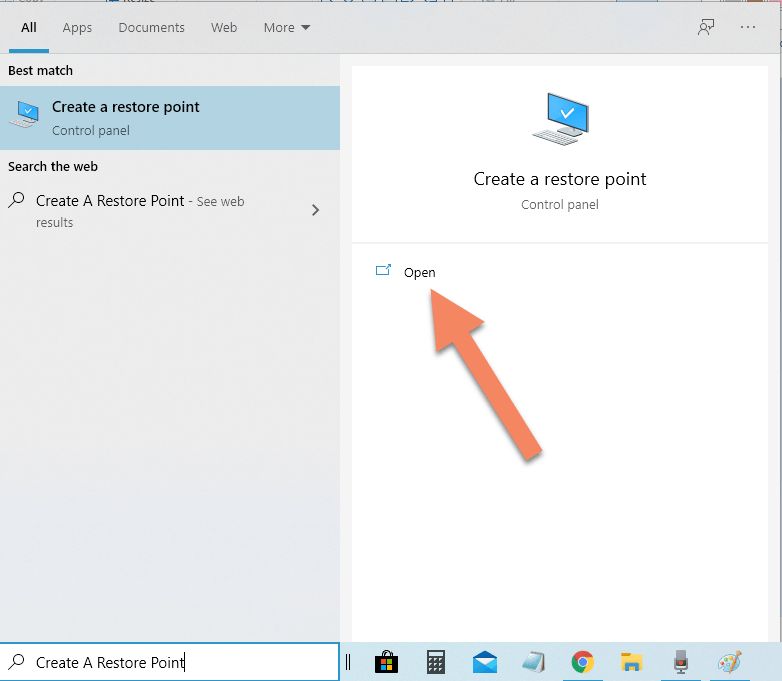
- In the Search section, type Create A Restore Point and click Open from the top result to open the System Properties window.
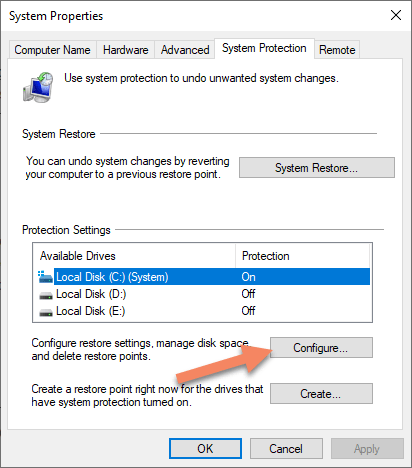
- Under the “System Protection“ section, select the main “System” drive, and click the Configuration button.
A quick tip: Windows 10 can manage space automatically, but under the “Disk Space Usage” section, you can also use the slider to specify the maximum amount of storage you want for System Recovery.
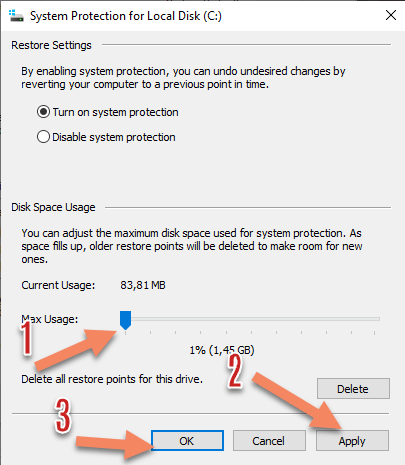
Manage Storage In Windows System Protection
- Click the Apply button.
- Click the OK button.
After you complete these steps, Windows 10 will create restore points automatically when new updates are applied or when certain system changes are made.
System Restore is not a feature you can enable globally. This is only available for system drives (which have an OS installed on them).
How to create a System Restore Point in Windows 10
System Recovery will automatically create checkpoints when it detects a system change.
But if you are going to make significant modifications to your installation, then it is advisable to make a system recovery manually first.
To create a restore point manually, use these steps:
- Search for Create A Restore Point (See steps above), and click on the top result to open the System Properties window.
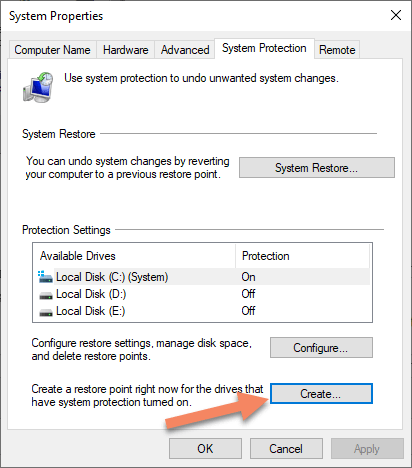
- Under the “System Protection” section, click the Create button.
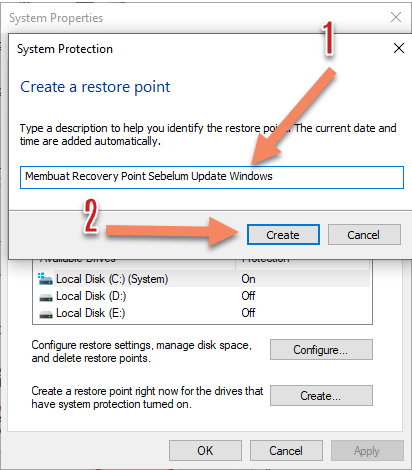
- Type a descriptive name for the restore point – for example, Creating a Recovery Point Before Windows Update.
- Click the Create button.
- Click the Close button.
- Click the OK button.
After completing these steps you will have a way to restore your original state if something went wrong while installing a new driver or application, or after editing the Registry.
How to recover using System Restore on Windows 10
If you experience problems after making a system change, before spending time troubleshooting the problem, you should be able to undo the changes using this restore point that you created.
You can perform this task while you still have access to the desktop, or even if your computer does not boot properly.
Undo system changes using a restore point
If you still have access to the desktop, you can revert system changes using a restore point with these steps:
- Search for Create restore point (see step above), and click on the top result to open the System Properties window.
- Click the System Restore button.
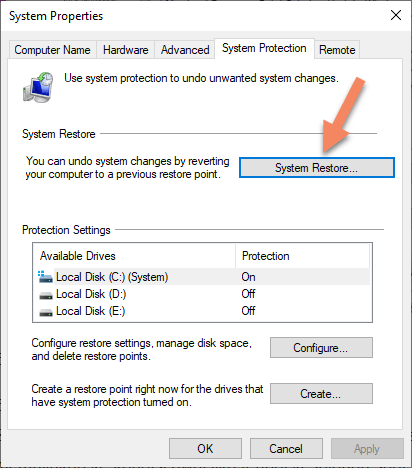
3. Click the Next button.
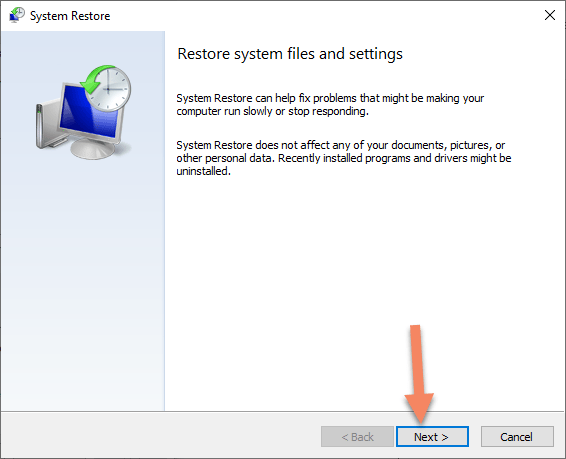
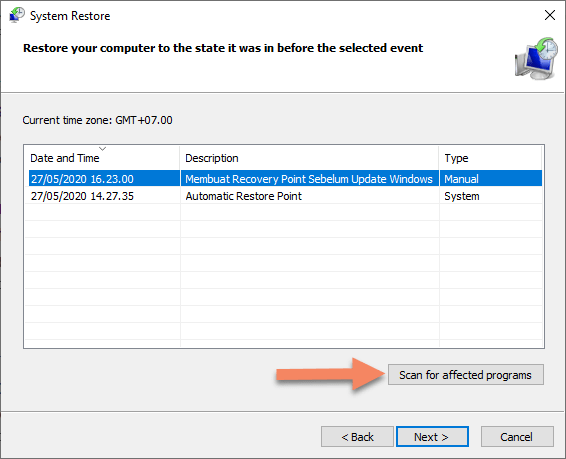
4. Select the restore point you want to use on your computer.
5. Click the Scan for affected programs button to understand applications that are no longer available because they were added after the creation of a restore point.
6. Click the Close button.
7. Click the Next button.
8. Click the Finish button.

Read more:
- How to Remove Old Windows on Windows
- 5 Ways to Turn off Windows 10 Update
- How to Activate Windows Defender
Conclusion:
Once you have completed these steps, the Restore Point will return your computer to its previous state.
![8 Ways to Fix The Hosted Network Couldn’t Be Started in Windows 10 [2026] 8 Ways to Fix The Hosted Network Couldn't Be Started in Windows 10](https://technowizah.com/wp-content/uploads/2021/07/8-Ways-to-Fix-The-Hosted-Network-Couldnt-Be-Started-in-Windows-10.jpg)


