7 Ways To Fix Sound Problems in Windows 10 PC – Sound problems or sounds that don’t work properly may upset us all. For that, the admin has 7 Steps to Fix Sound Problems in Windows 10 quickly and easily.

How To Fix Sound Problems In Windows 10 PC Laptop [2024]
#1. Check Sound Settings

Maybe this is a step that needs to be taken before you go any further. But this will also be the most obvious thing we overlook. Make sure when you check it out. At the same time, check:
- Cable
- plug
- Speaker connection
- Headphone connection
- More audio connection
#2. Restore Or Reinstall Audio Driver
When Windows 10 takes control of driver updates, sometimes your system ends up with the wrong driver configuration. In the early days of Windows 10 (especially after the upgrade cycle of Windows 7, 8, and 8.1) driver updates left many users unhappy. Microsoft has improved the driver update process a lot since then and manufacturers are now deep into the Windows 10 ecosystem.
Read more:
- 6 Ways to Fix Faulty Hardware-Corrupted Pages
- 5 Ways to Optimize Slow SSD in Windows 10 PC
- 16 Best Free Antivirus for Windows 10 Laptop PC
- 8 Ways to Fix Stop Code Memory Management
As such, the new driver is configured for Windows 10, rather than trying to make the old Windows 7, 8, or 8.1 drivers conform.
Windows 10 gives us several options to fight annoying drivers. First, we can try to restore it to its initial configuration.
Right-click the Start button, select Device Manager, and right-click your sound driver, select Properties, and browse to the Driver tab.
Hit the Roll Back Driver option if available, and Windows 10 will start the process.

If like the picture above you don’t have the option to Roll Back the Driver, you have to Update or Reinstall the driver. When we are dealing with audio driver issues, do a re-installation.
This will remove the offending driver during the process, and give your system a nice clean instead. Before proceeding with the removal, make sure you have the new manufacturer version of the driver.
You can download directly from the hardware publisher’s website, or use the app as a third party.
On the same Properties tab, you should note the last option: Uninstall. Click this, and you will see the Confirm Device Uninstall window. Depending on the driver publisher, this window may also contain an option to Delete the driver software for this device.
If so, check the box and hit OK. After you remove the driver, restart your system, and install the new driver.
#3. Update High Definition Audio IDT CODEC
Some systems may experience problems with their IDT High Definition Audio CODEC. This can be fixed with a manual driver update which allows us to choose the sound driver we want to use. Right-click the Start menu and select Device Manager. Go to the Sound, video games, and Controllers section.
If you find the IDT High Definition Audio CODEC, right-click it and select Update Driver Software. In the next pane, select Browse my computer for software driver, followed by Let me pick from a list of device drivers on my computer. This allows you to choose from which drivers are already installed on your system.
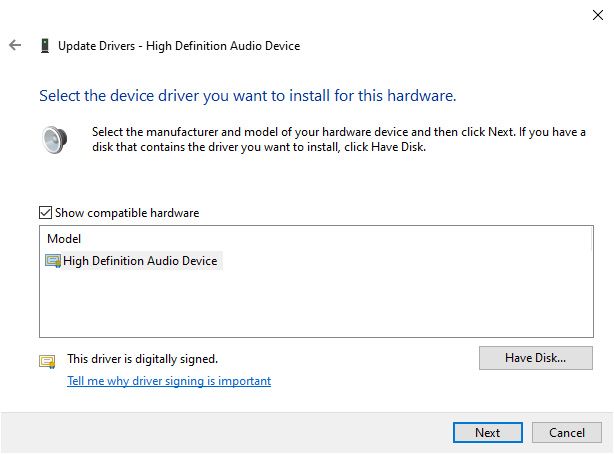
Under Model, select High Definition Audio Device, followed by Next, followed by Yes. You may need to reboot the system for the changes to take effect.
#4. Fix Realtek Audio
Maybe you guys haven’t experienced any problems with Realtek drivers personally, but it looks like this is a common Windows 10 audio issue. There are some fixes for Realtek audio issues below.
Wi-Fi Driver Refresh
One fix is focused on disabling the Realtek WLAN driver, uninstalling, and reinstalling the latest version, even if you already have the latest version installed.
First, go to the Realtek website and download the latest version applicable to your system. Right-click the Start menu and select Device Manage and browse to your Realtek Wireless LAN drivers.
Right-click and Uninstall. Now you extract the file you downloaded earlier, browse to setup.exe, and follow the instructions. You have to reboot your system after installation.
Disable Front Panel Jack
These fixes can be very system-specific, but they certainly fix one system, and that can fix your audio issues too. Some people tried to fix persistent Realtek audio issues by disabling front jack detection from within Realtek HD Audio Manager itself.
#5. Disable Audio Enhancements
Next up is Windows 10 Audio Enhancements. Audio Enhancements is a Microsoft built-in and third-party package designed to make sure your system-specific audio hardware is working properly. Unless it’s not. But this can also cause audio problems in your Windows 10. Fortunately, they are easy to turn off.
In the Start menu search box type Sound, and click on the Sound Control Panel option. In the new box that opens, right-click the default device, and select Properties. Click the Enhancements tab, and make sure to check the box labeled Disable all enhancements, and Apply.
#6. Restart Audio Service
Audio services can sometimes magically mute themselves, but you can use them to start your audio back up. In the Start menu search box, type Services, and press Enter. Scroll down to Windows Audio.
If the service is stopped for any reason, your system audio will not work properly. Restart by double-clicking and selecting Start.
While you are here, double-check the type of starting service. The audio service should be set to Automatic by default. If something is different, Automatic (start delayed), Manual or Disabled, change it back.
#7. Try Audio Troubleshooter
You can also use the built-in audio troubleshooter, allowing Windows 10 to identify and fix problems on its own.
If you’ve used Microsoft’s built-in troubleshooters before, you know they don’t always catch everything, but they can be for you to try. Go to Control Panel > Troubleshooting > Troubleshoot audio playback, and follow the instructions.
Read more:
- 9 Ways to Fix Avast Error Can’t Open on Windows
- 8 Ways to Fix Unreadable External Hard Drive
- 5 Ways to Fix The Disk Structure Is Corrupted And Unreadable
Conclusion:
So that’s 7 Steps to Fix Sound Problems In Windows 10. We have covered some of the most common Windows 10 audio problems, and hopefully, the audio on your Windows 10 is back to normal again.
While not a definitive fix for every problem, Windows 10 seems to really like you guys using the built-in High Definition Audio Drivers.


